-
BUError 0X00000709 is a variation of the common can’t connect to a printer error, it occurs when users try to connect to printers over their local network from their Windows machines or when setting up the default printer on their Windows.

Printer Error 0X00000709 This is a very old error message and occurs with numerous variations in all versions of the Windows operating systems (Windows 7 and Windows 10). These are the most common error messages:
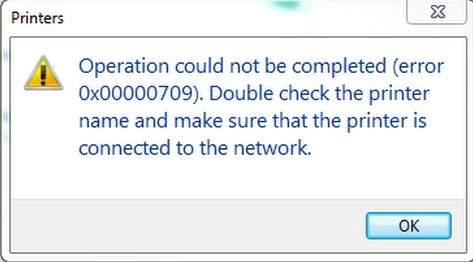
Operation could not be completed (Error 0X00000709). Double check the printer name and make sure the printer is connected to the network.
Operation could not be completed (error 0x00000005). Access is denied.
What causes Error Code 0X00000709 in Printers
This 0X00000709 error message is mostly connected to the permissions of your printer. If the printer isn’t getting enough permissions to connect to your system, then Windows revokes the attempt to connect and displays this error message instead.
There are also other causes such as corrupt Network clients and bad services hindering the connection procedure. There might also be conflicting applications that don’t let the printer operation run successfully.
How to Fix Printer Error 0X00000709
Before you attempt the solid workarounds listed below, it is recommended to try and validate the following tips. These are common issues that are often overlooked and are directly related to the printer not getting connected or getting set as Default.
- Try Disabling your Antivirus Software
- Make sure the Host PC Name is less than 15 characters. If using the hostname is proving troublesome, then attempt to connect through the IP address. If possible, rename the Host computer. This worked for numerous people.
- If you are using a shared printer, try reconnecting to the printer after removing it from your list of shared printers.
- Make sure you are logged in as an Administrator.
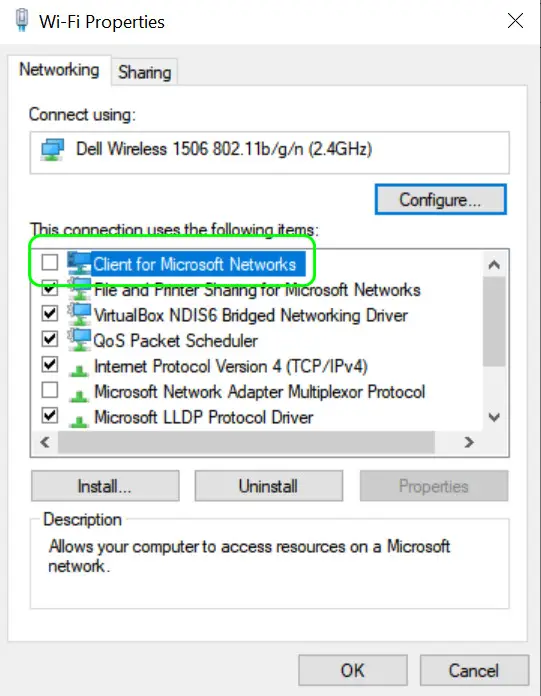
Reinstall the Client for Microsoft Networks
The network printer may show Error 709 if the installation of the Client for Microsoft Networks in the network adapter properties is corrupt. In this context, reinstalling the Client for Microsoft Networks may solve the problem. Before proceeding, make sure Network Discovery is enabled and Password Protected sharing is disabled.
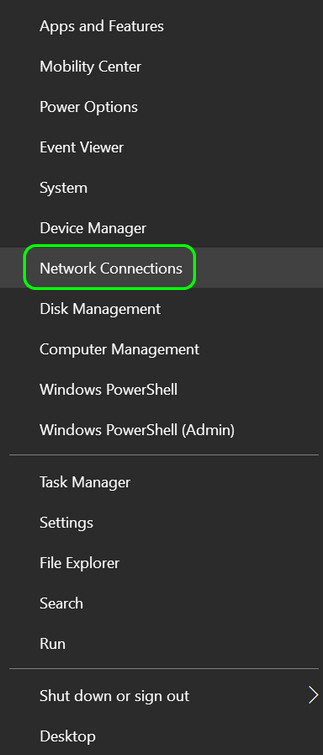
- Right-click Windows and open Network Connections.

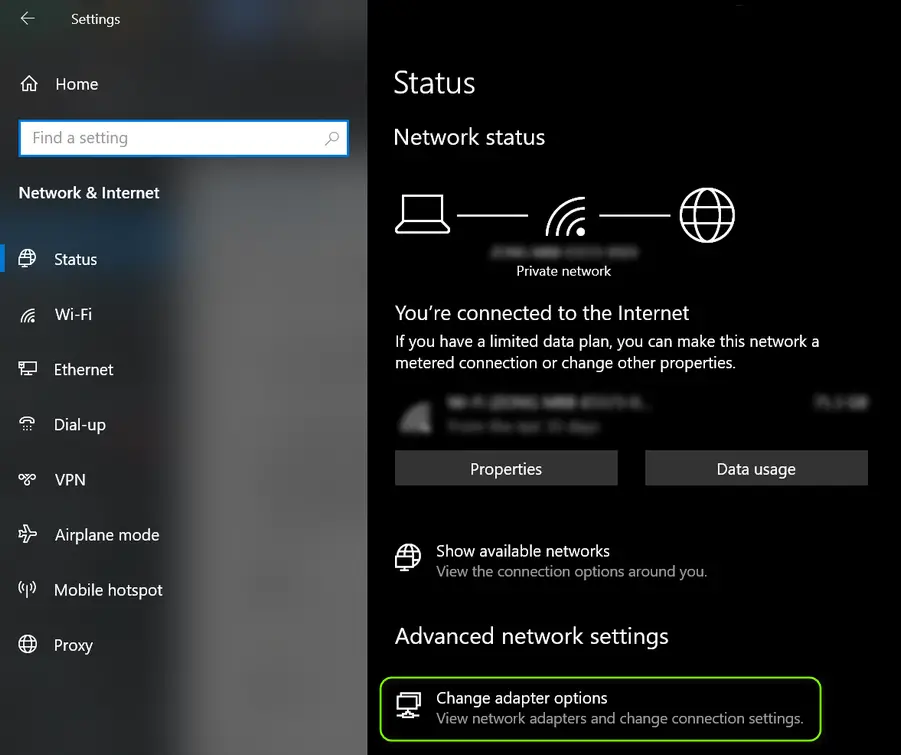
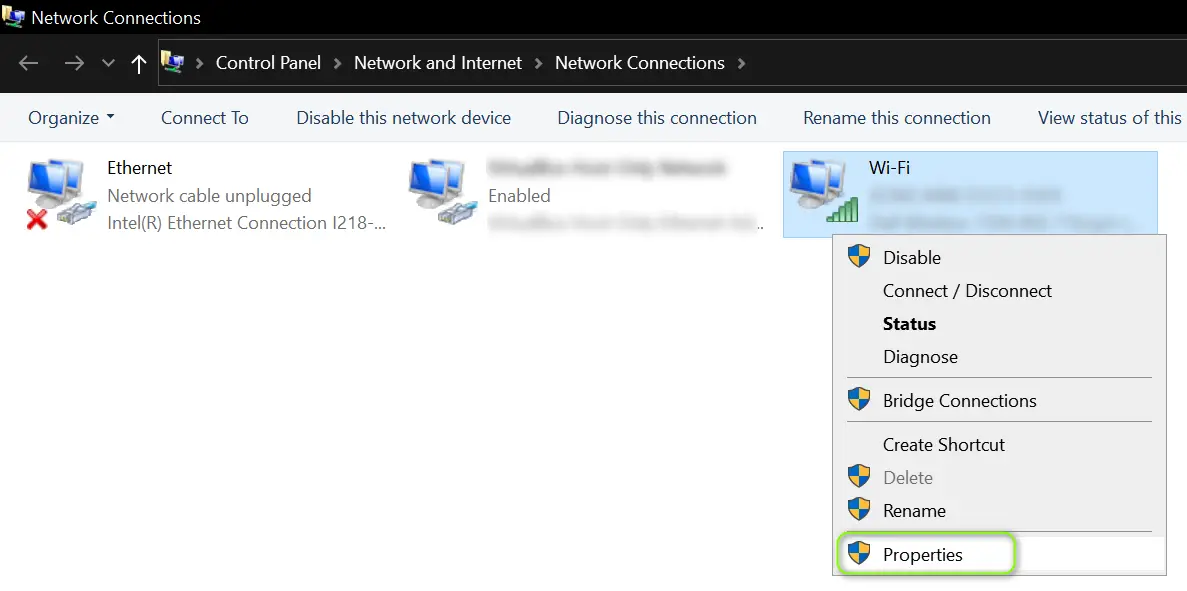
Network Connections – Windows - Now select Change Adapter Options, right-click on your network adapter, and select Properties.

Change adapter settings – Network Connections 
Properties of Connected Network - Then uncheck the checkbox of Client for Microsoft Networks and press Apply to save changes.

Disabling Client for Microsoft Networks - Reboot your PC completely.
- Upon reboot, navigate back to this setting and enable the option of ‘Client for Microsoft Networks‘. This will reinstall this client from scratch into your system. Now check if the issue is resolved.
Edit the Spooler Service Properties and Start its Dependencies
Error 0x00000709 may emerge if the Print Spooler Service is in an error state or one of the dependencies of the spooler service is not running. In this scenario, editing the spooler services properties or starting its dependencies may solve the problem.
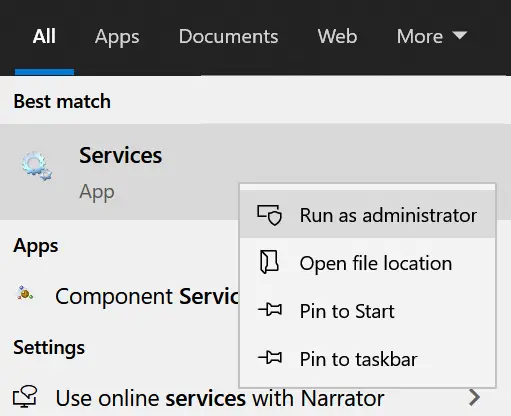
- Click Windows, type Services, and right-click on it. Then select Run as Administrator.

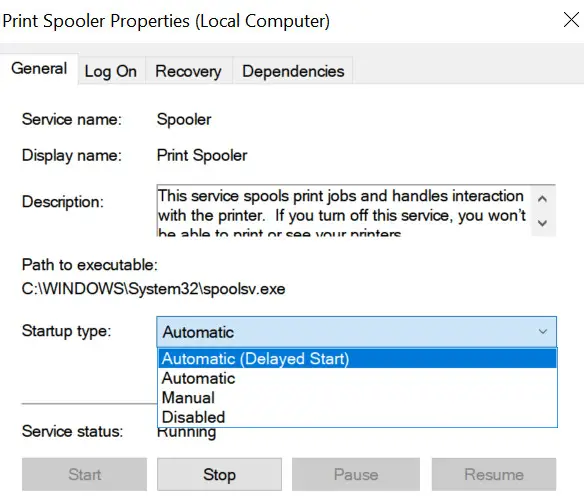
Opening Services as an Administrator - Now double-click on the Print Spooler service and head to the Dependencies tab.
- Then make sure the services present there are running e.g., Remote Procedure Call (RPC).
- Once services present in Dependencies are started, restart the Print Spooler service and check if the printer is clear of the error 0x00000709.
- If that did not do the trick, check if setting the startup type of Print Spooler service to Delayed Start or Manual resolves the printer issue.

Changing startup type of Spooler Service
Remove Conflicting Applications
You may encounter the network printer Error 709 if there are applications on your system that are conflicting with the printer operation and removing such applications (like CutePDF Writer) may solve the problem. Before proceeding, make sure the 32-bit host machine has additional drivers for the 64-bit client.
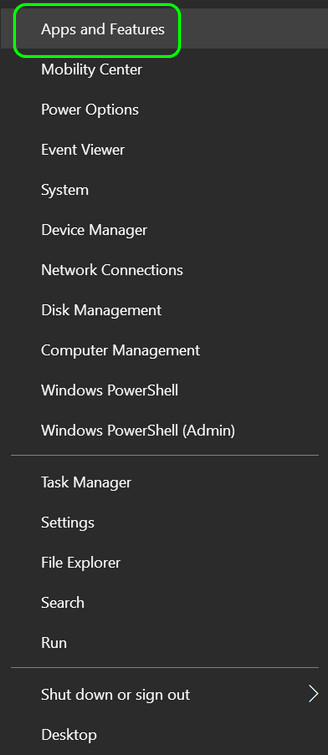
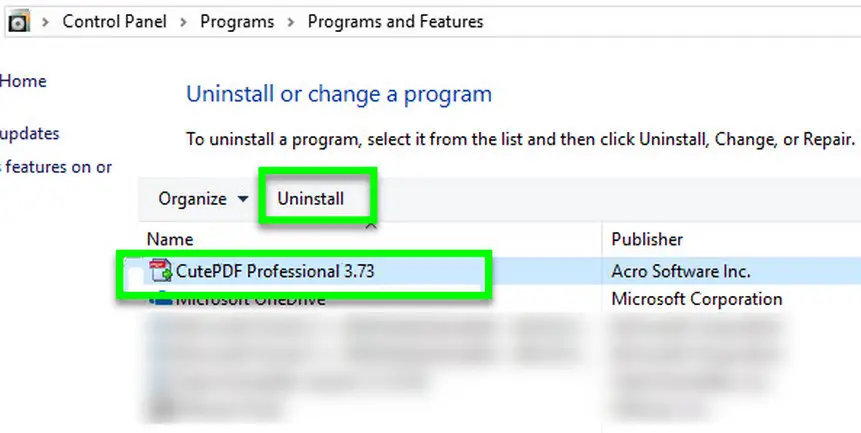
- Right-click Windows and select Apps & Features.

Apps and Features – Windows - Now expand the problematic application (like CutePDF) and click Uninstall.

Uninstalling CutePDF - Then confirm to uninstall the application and once the application is uninstalled, reboot your PC.
- Upon reboot, check if the network printer is operating fine.
The following applications are reported by the users to create the issue:
- CutePDF
- Equitrac
- Thermal Printer (like a Star Micronics) driver
You may also check if you have installed the 32-bit application (like Equitrac) on the 64-bit machine, if so, then check if installing the 64-bit application resolves the issue.
Edit the Printer Properties
Your network printer may fail with the security checks of Windows when connecting if the user or the printer does not have the required security permissions. In this case, giving the required permissions to the user or printer may solve the problem.
Give the User Full Control of the Printer
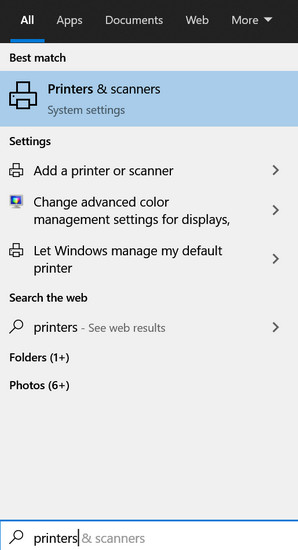
- Click Windows, type Printers, and open Printers and Scanners.

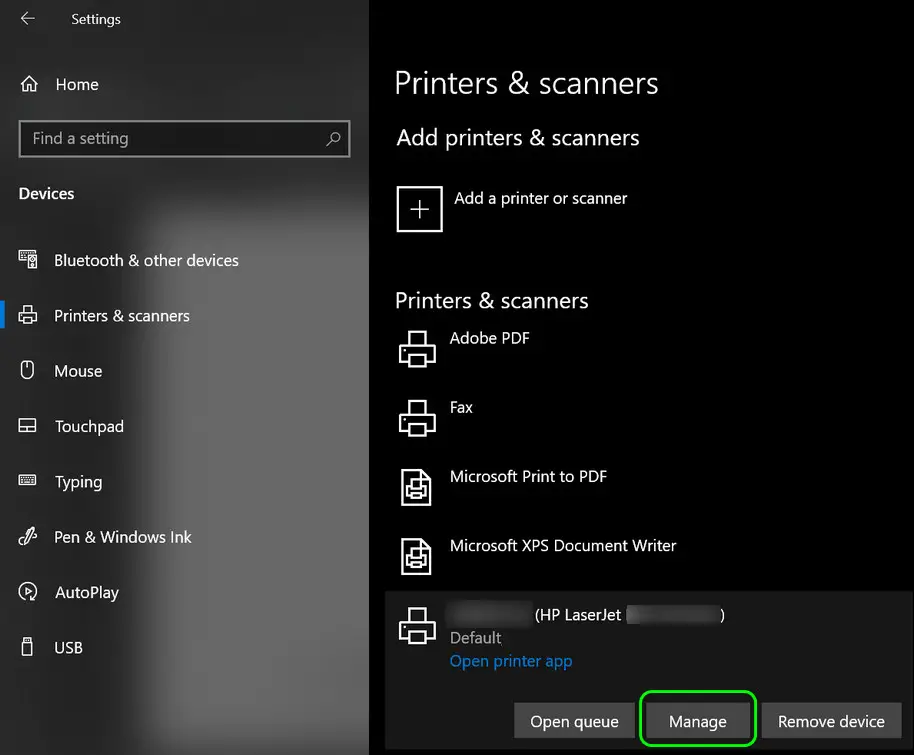
Printer and Scanners – Windows - Now expand the problematic printer and click Manage.

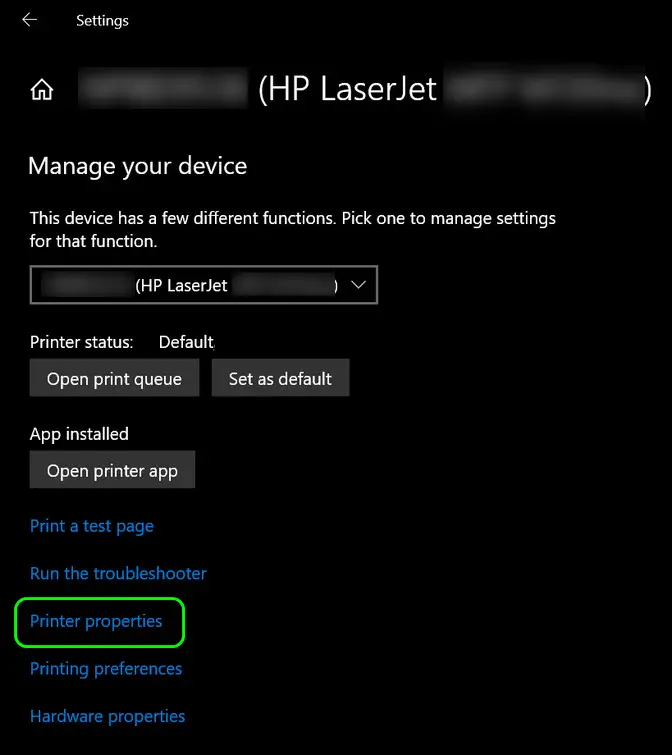
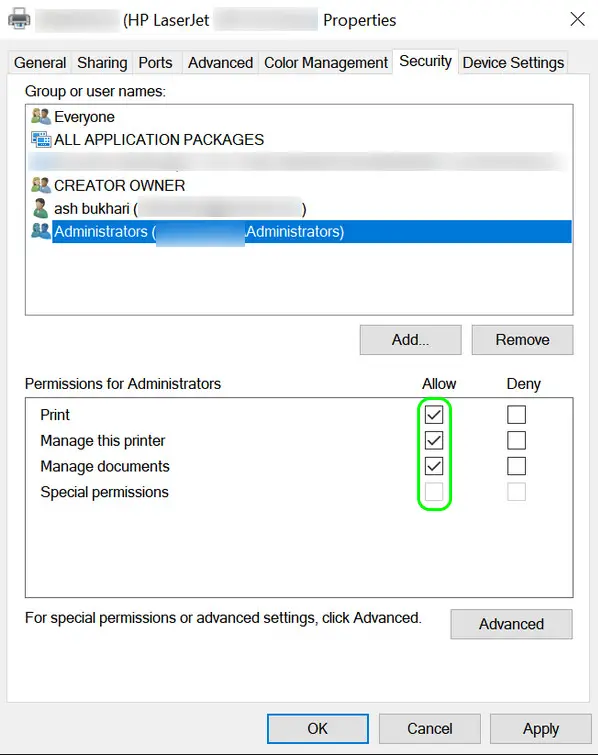
Managing problematic printer - Then open Print Properties and head to the Security tab.

Printer properties - Now give all the permissions to every user (one by one) by selecting the relevant box in the Allow column.

Granting all Permissions to Printer – Windows 10 - Then reboot your system and check if printer error 709 is cleared.
Open the Printer Que as Administrator
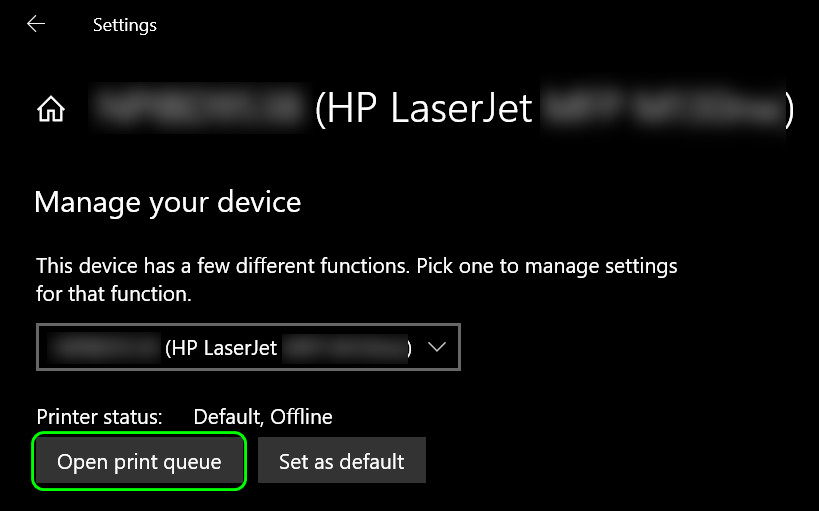
- Open Printers and Scanners from the start menu as we did earlier.
- Now, expand your printer and select Manage again.
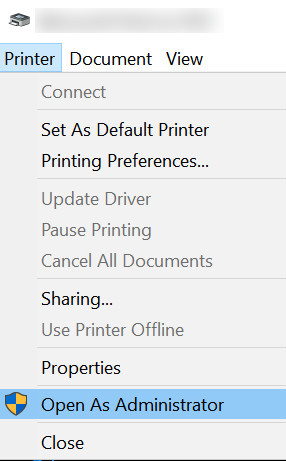
- Then click on the Open Print Queue button and expand the Printers menu.

Opening Print Queue - Now select Run as Administrator and click Yes (if the UAC prompt is received).

Opening as Administrator - Then check if the printer is clear of the Error 0x00000709.
Completely Reinstall the Printer
A corrupt installation of the network printer or its driver might cause it to show error 709. Here, reinstalling the printer will install fresh files from scratch. This will rule out a corrupt installation instantly.
- Firstly, clean boot your PC and make sure no process/service related to the printer is operating in the Task Manager of your system.
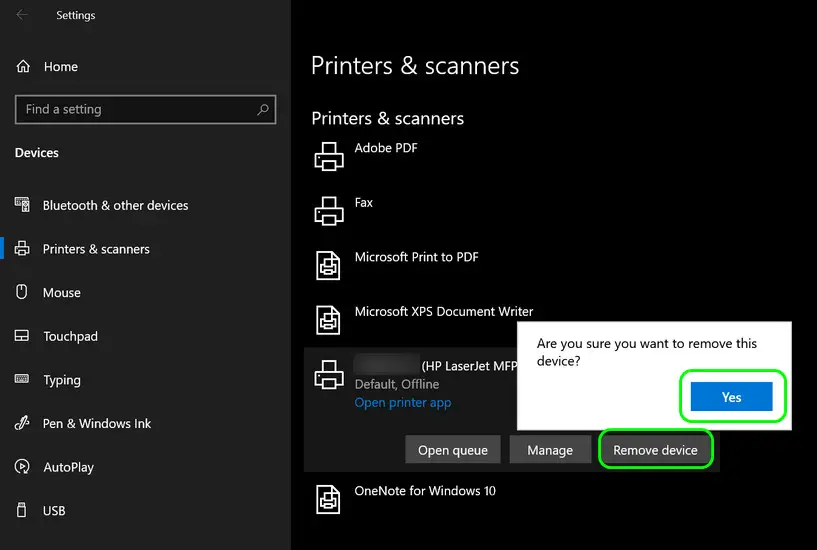
- Then click Windows, type Printers, and select Printers and Scanners.
- Now expand the problematic printer and click on Remove Device.

Removing Bad Printer - Then confirm to remove the device and let the device uninstall.
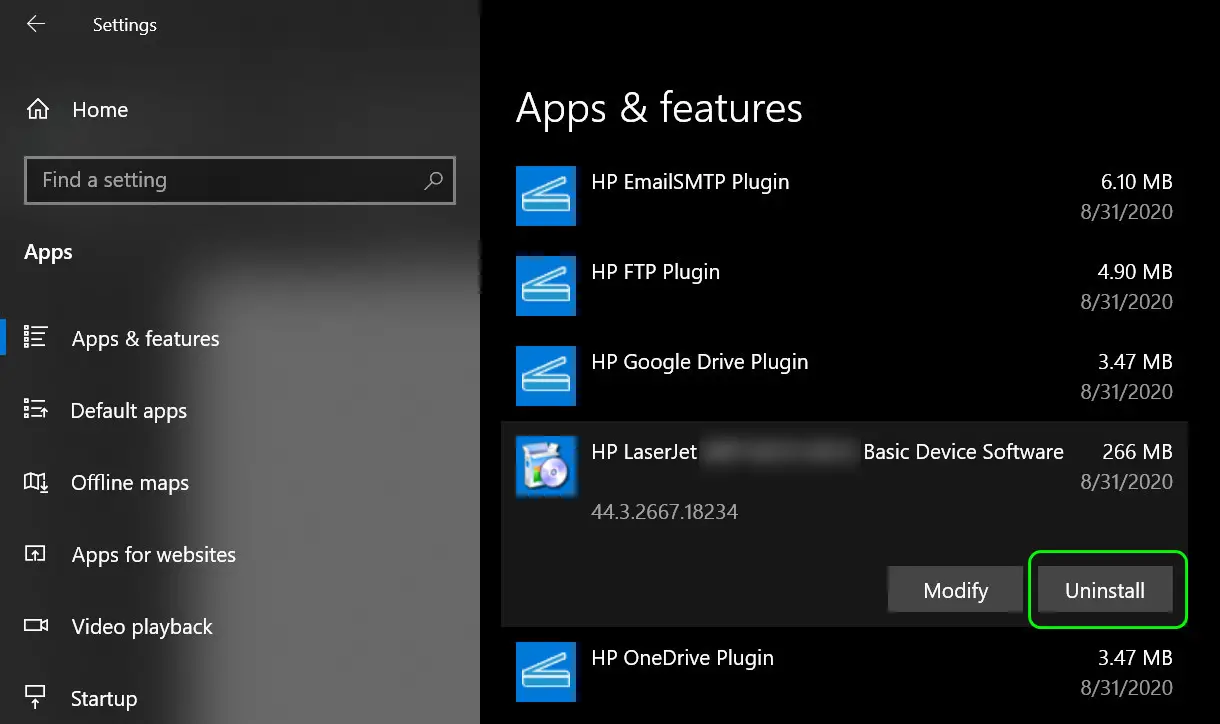
- Once uninstalled, right-click on Windows and select Apps & Features.
- Now expand the printer software (e.g., HP Basic Device Software) and click on Uninstall.

Uninstalling Printer Software - Then confirm to Uninstall the application and follow the prompts on the screen to uninstall the printer software.
- Now reboot your PC and right-click Windows.
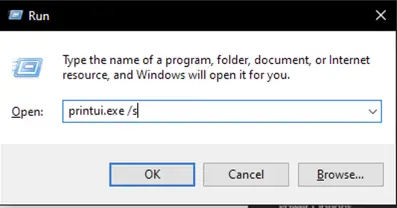
- Then select Run and execute the following:
printui.exe /s

Running printui.exe /s - Then head to the Drivers tab and select the problematic printer driver.
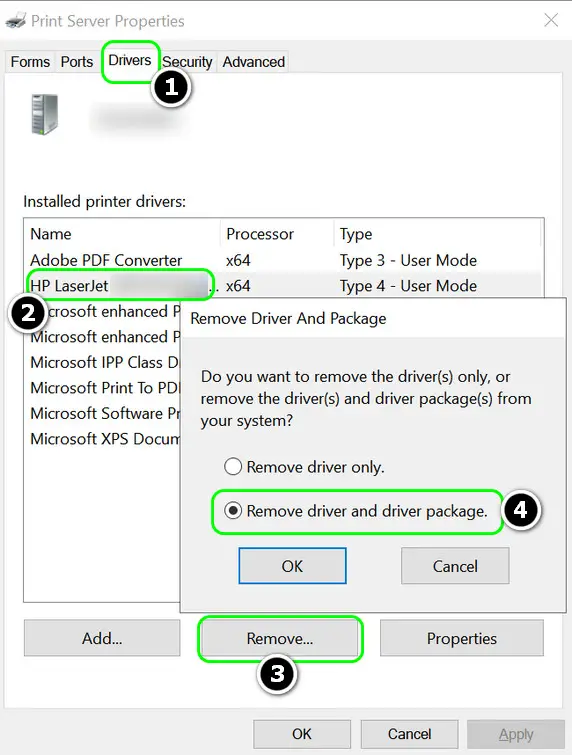
- Now click on Remove and select ‘Remove Driver and Driver Package’.

Remove Driver and Driver Package in the Print Server Properties - Then remove all the drivers related to the problematic printer in the Print Server.
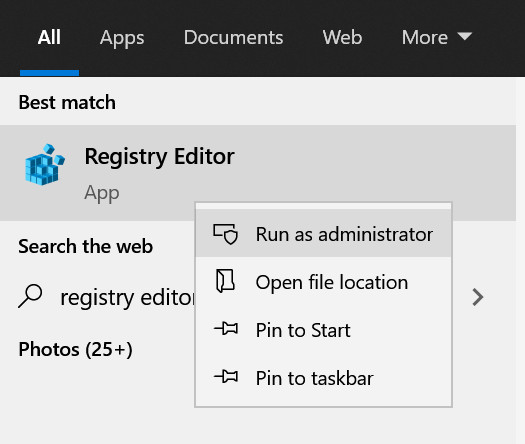
- Now click Windows, type Registry Editor, right-click on it, and select Run as Administrator.

Registry Editor as Admin - Then, on the menu bar, expand Edit and select Find.

Find – Registry Editor - Now search for the printer and delete all the entries referring to the printer (make sure you have backed up the registry before deleting the entries).
- Then reboot your PC and upon reboot, reinstall the printer application and check if it is clear of the error 709.
Edit the System’s Registry
You may encounter the error 0x00000709 with the network printer if the relevant registry keys in your computer are misconfigured. In this context, properly configuring the registry keys related to the printer may solve the problem. Before proceeding, make sure to create a backup of your system’s registry.
Warning: Advance with utmost caution and at your own risk as editing the system’s registry is a skillful task and if not done correctly, you may cause unintended and everlasting damage to your system/data.
Here are different registry values that seem to fix the issue. Try them one at a time and see if they do the trick before moving on to the other ones.
Give the User Full Permissions to the Windows Registry Key
- Click Windows, type Registry Editor, and right-click on its result. Then select Run as Administrator.
- Now navigate to the following path (copy-paste the address in the address bar of the editor):
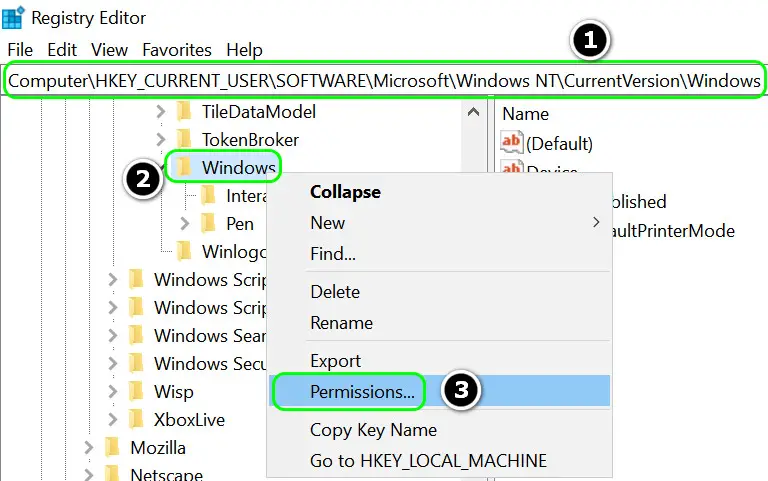
Computer\HKEY_CURRENT_USER\SOFTWARE\Microsoft\Windows NT\CurrentVersion\Windows

Open Permissions of the Windows Key - Then, in the left pane, click on the Windows key and select Permissions.
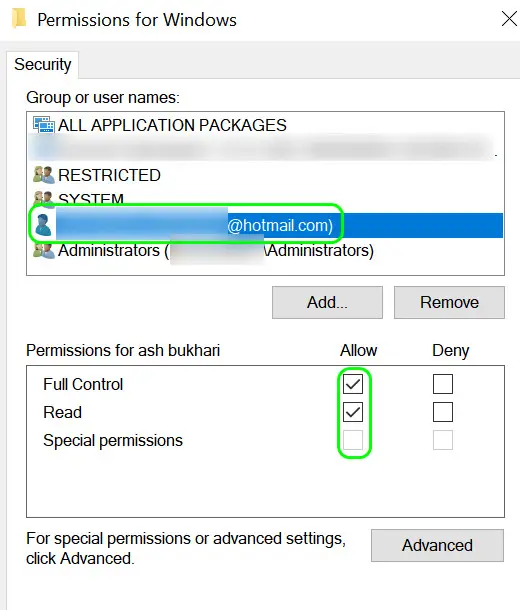
- Now select the problematic user account and checkmark the checkbox of Allow in front of Full Control.

Allow User the Full Control of the Windows Key - Then repeat the same for the Administrators and System account.
- Now apply your changes and reboot your PC to check if the printer issue is resolved.
- If the problematic user, administrator, and system accounts do not exist in the permissions window, then you may add the same by clicking the Add button.
Set the Default Printer Value to 2
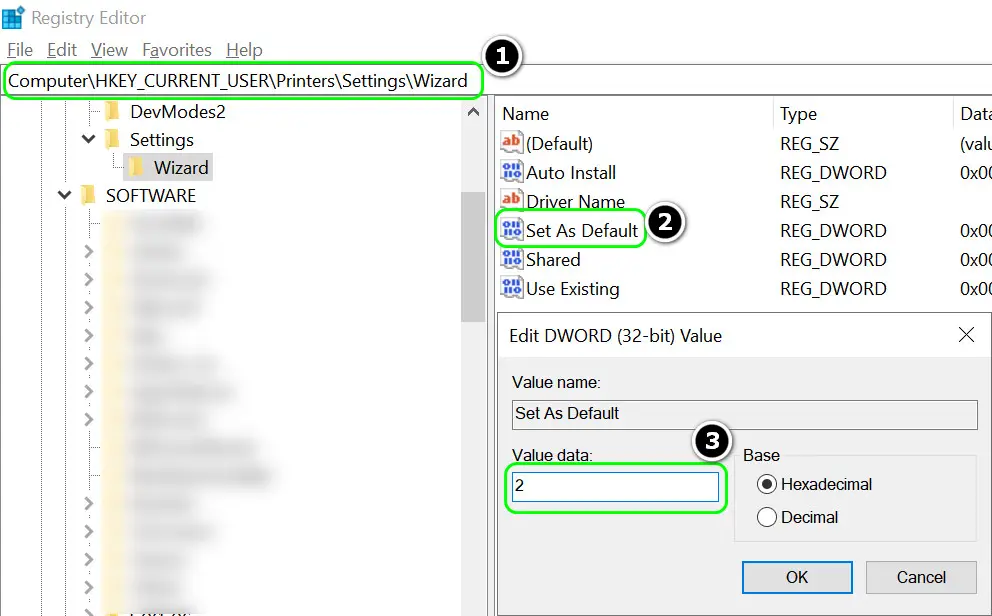
- In the Registry Editor, navigate to the following path:
Computer\HKEY_CURRENT_USER\Printers\Settings\Wizard
- Now, in the left pane, double-click on Set as Default and change its value to 2.

Change the Set as Default Value to 2 - Then exit the editor and restart your machine. Upon restart, check if the Printer Error 709 is cleared.
- If not, navigate to the following key in the following registry again:
Computer\HKEY_CURRENT_USER\Printers\Settings\Wizard
- Then create a new Dword (32-bit) Value and enter its name as Locate Type.
- Now set its value to 2 and exit the editor.
- Reboot your PC and check if the network printer is working fine.
Delete the Sub-Keys of the Windows Key
- In the Registry Editor, navigate to the following path:
Computer\HKEY_CURRENT_USER\SOFTWARE\Microsoft\Windows NT\CurrentVersion\Windows
- Now, in the left pane, delete the following keys (if present):
Device

LegacyDefaultPrinterMode

UserSelectedDefault
- Then Restart your PC after closing the Registry Editor and check if the Network printer is working fine.
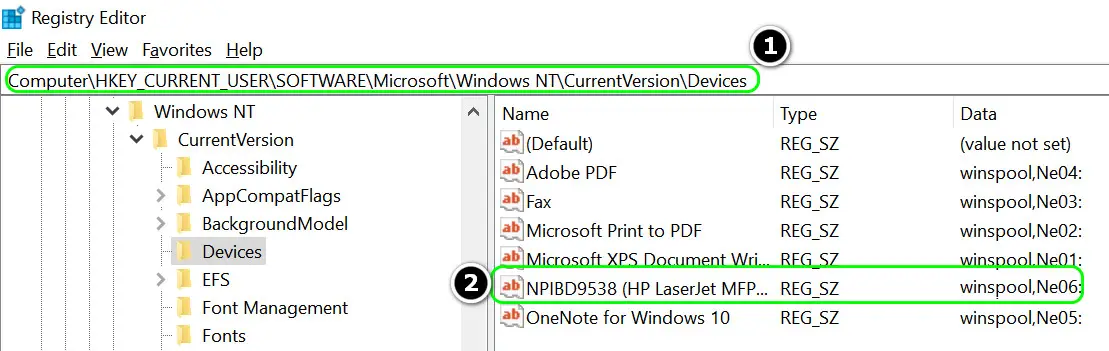
Create the Printer Sub-key Under the Devices Key
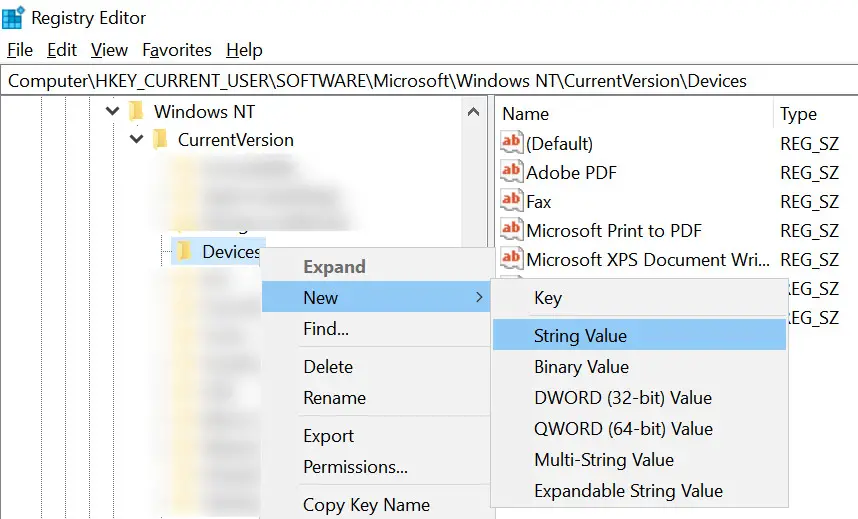
- In the Registry Editor, navigate to the following path:
Computer\HKEY_CURRENT_USER\SOFTWARE\Microsoft\Windows NT\CurrentVersion\Devices
- Now, in the right pane, check if the key related to the printer you want to add is present. If not, then right-click on the Devices key (in the left pane) and select New > String Value.

Create a New String Value Under Devices - Then, in the left pane, enter the name of the new sub-key as per the printer e.g., NPIBD9538 (HP LaserJet MFP M130nw).
- Now check the Data column and check the maximum value e.g. winspool, Ne05
- Then set the value of the key created in Step 3 by adding 1 to the value found in Step 4.

Create the New Printer String Value and Set its Value - Now close the editor and reboot your machine.
- Upon reboot, check if the network printer issue is resolved.
- If not, then check if creating another printer key with its port in the following registry path and restarting the system resolves the printer issue:
Computer\HKEY_CURRENT_USER\SOFTWARE\Microsoft\Windows NT\CurrentVersion\PrinterPorts
Set the Printer Value in the Device Key
- Navigate to the following registry path:
Computer\HKEY_CURRENT_USER\SOFTWARE\Microsoft\Windows NT\CurrentVersion\Windows
- Now, in the right pane, double-click on the Device key and set its value to your printer (but only amend the part before) as per the printer name. For example NPIBD9538 (HP LaserJet MFP M130nw).
- Close the editor and reboot your machine to check if the printer is working again.
- If not, then rename the Device key in the registry path (mentioned in step 1) as per your printer, close the editor, and restart your machine. Check if the issue is resolved.
If you cannot find your printer’s name in Step 2, then you may create a local administrator account on the machine and copy the name from the same path in its registry as mentioned in Step 1.
But, if that did not do the trick, then you may add the printer with the hostname in the Hosts file to solve the issue. If the issue still persists, then consider creating a new Windows user account to solve the issue.
Repair Corrupt System Files
A clean and fresh way to resolve the Printer Error 0X00000709 is to repair the system files that are causing the error. These files sometimes get corrupted due to viruses or malware that the user is unaware of. Some of these corrupted and missing files lead to the error therefore it is mandatory to fix these with the help of the Command Prompt.
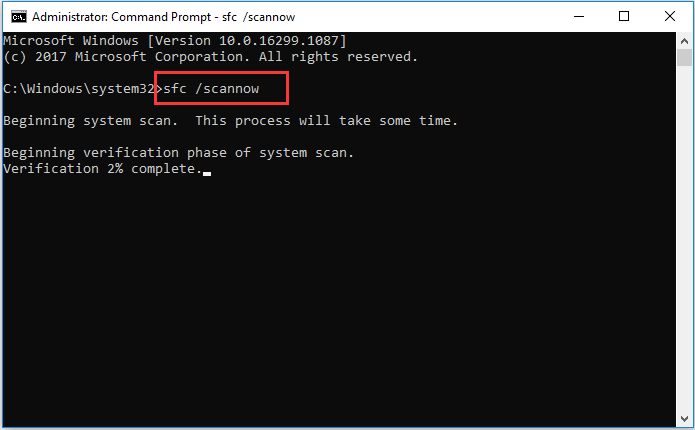
- Open the Windows Command Prompt from the Windows taskbar.
- After the Command Prompt window pops up, type sfc /scannow and then press Enter.

sfc scannow Command Prompt - The repairing process will begin after the command is entered properly. Wait for the verification to be completed at 100%.
- After the verification process is done, restart your PC and check if the files are repaired and the error 0X00000709 is fixed.
Uninstall The Problematic Update
There is a possibility that the latest Windows update that the user has installed can be a cause of the error 0X00000709. Sometimes initially when an update is rolled out, users can face bugs and errors therefore it is recommended to uninstall the latest update if it becomes problematic. Follow the steps below to uninstall the update.
- Firstly, press Win + I to access the Windows Settings app.
- Locate the Windows Update option and click on it.
- Then, in the right pane of the menu, click on Update history.
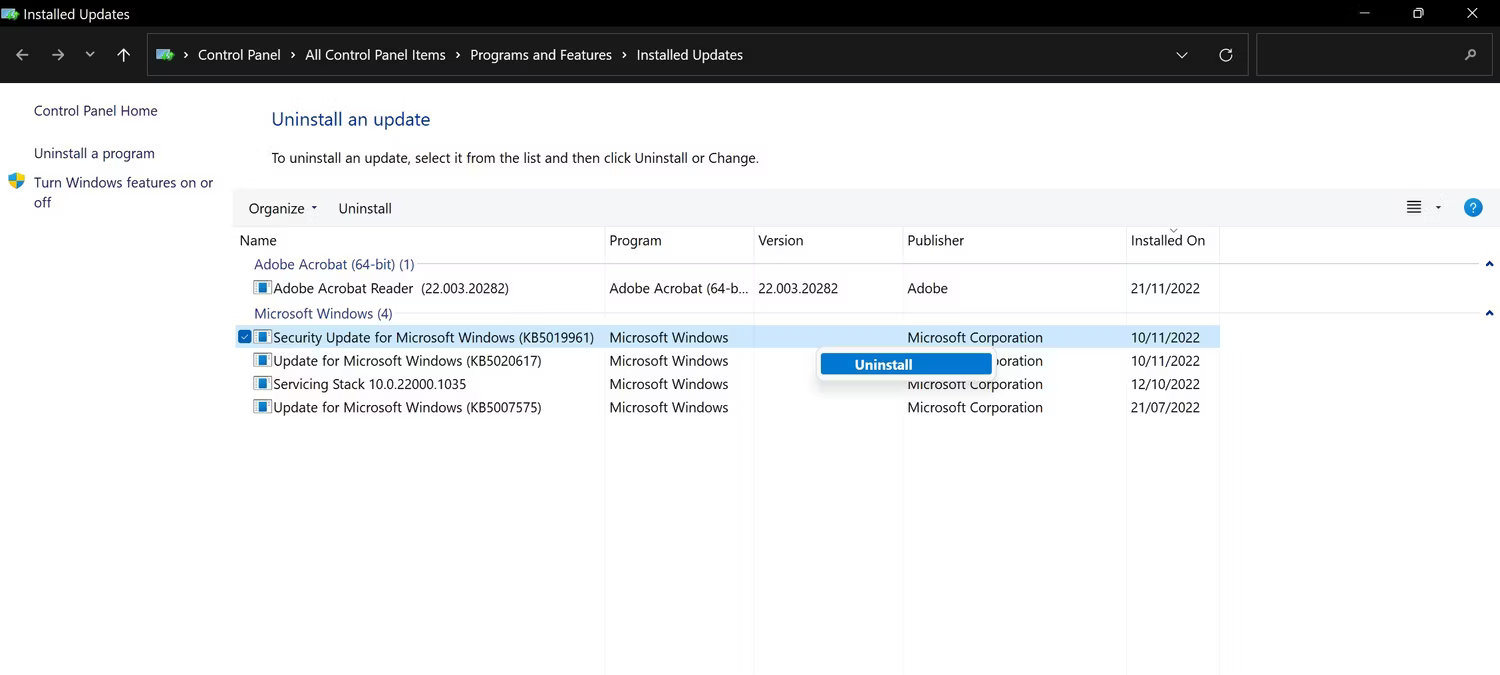
- Now, find the Uninstall Updates button and head over towards it.
- Since the system has been updated to the latest version, find that recent update by checking its installation date in the Control Panel.
- Once located, right-click on it and click Uninstall.

Uninstalling The Latest Windows Update
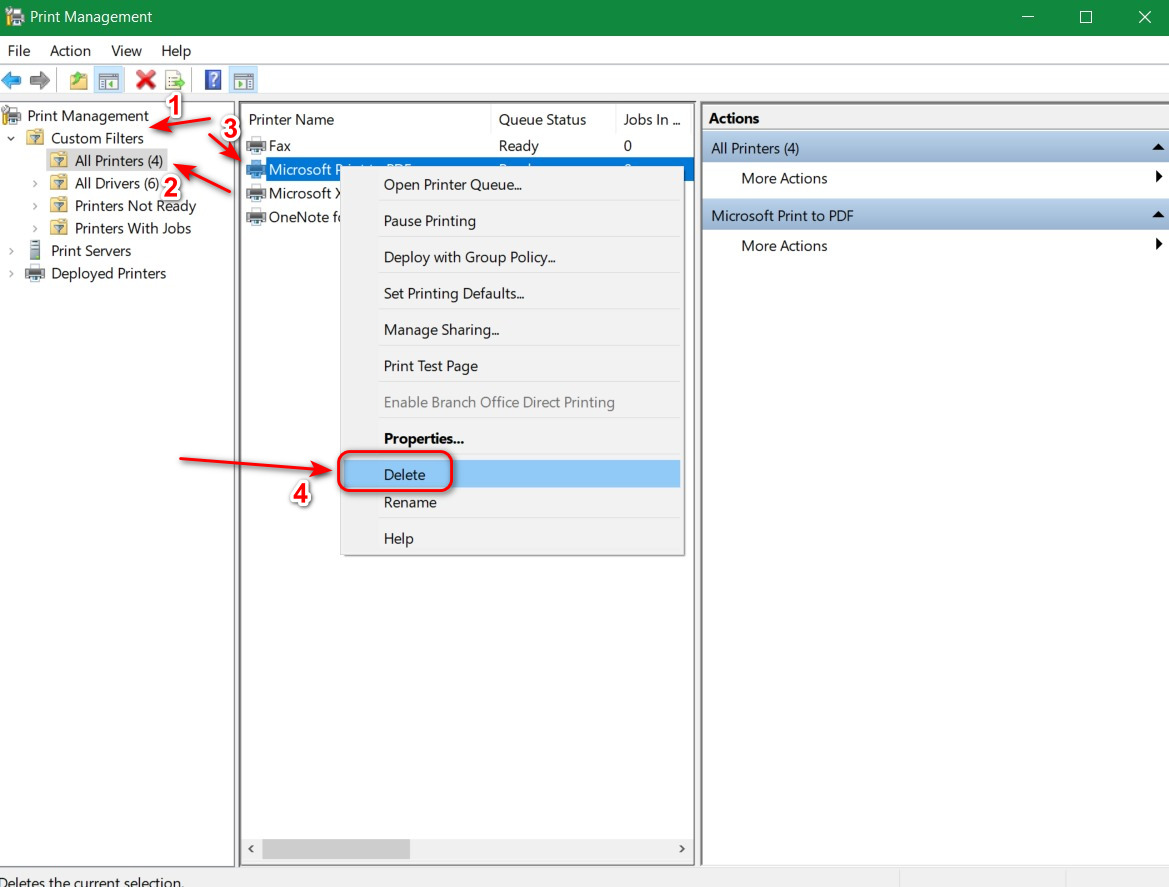
Access The Print Management
Eventually, ghost printers can also be the reason for printer error 0X00000709 which leads to further issues. Print Management can clear out the ghost printer and provide easy access to printing without any errors.
Print Management allows users to manage and handle all printers connected to the computer. Follow the ways mentioned below to open Print Management and fix the error.
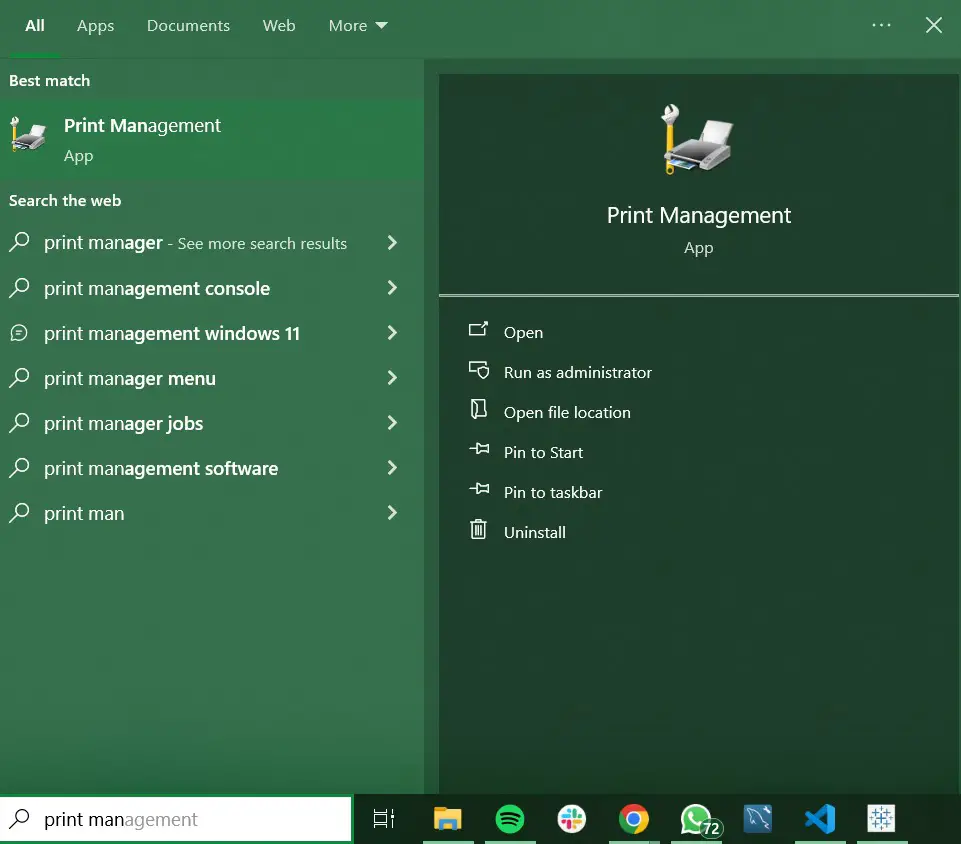
- From the Windows Start bar, type and open Print Management.

Print Management - On the left panel, click on Custom Filters and expand the list then click on All Printers.
- After that is done, locate the ghost printer on the right-hand side of the list.
- Then, right-click on the ghost printer and hit Delete.

- Now, the ghost printer will be gone and any other errors being faced will vanish too.
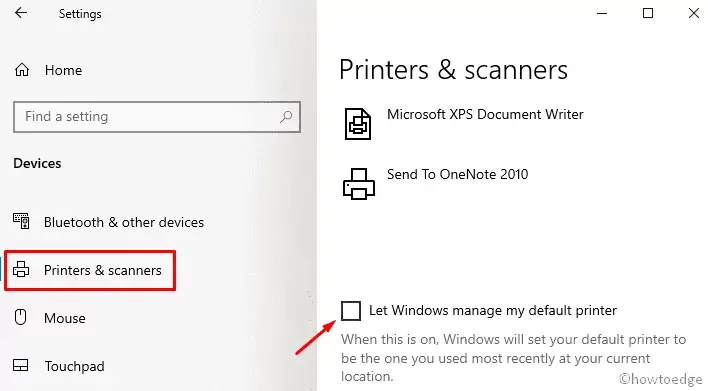
Disable the Windows 10 managing Printers automatically
Windows 10 has a feature that works on the user’s behalf and auto-manages the available printers of the PC. If this feature is turned on, users might face the printer error 0X00000709 alongside some other errors. A better way to get rid of this issue is to disable this optional feature from the Windows settings.
Windows 10 works on users’ behalf and auto-manages the available printers. If you are facing the 0x00000709 error, you should disable this optional feature by opening the local settings on your PC. Here’s how to perform this task –
- Open the Windows settings by pressing Win + I.
- Now, select Devices and then Printers & Scanners.
- On the right side of the panel, make sure that the “Let Windows manage my default printer“ checkbox is unmarked.

Let Windows Manage My Printer - Lastly, close all running windows and then Restart your PC to reveal the changes you made so far and if the error has been resolved.
Conclusion
In conclusion, printer error 0X00000709 is a problematic issue that can be resolved with our easy-to-follow guide. With multiple solutions like reinstalling the client for Microsoft Networks, editing spooler service properties, removing conflicting apps, or tuning your printer properties, you can easily solve this error. Just remember to follow each step and read the instructions carefully. Hopefully, your printer will regain its functionality after implementing our guide.
Further Read:
10 minutes read