SFC and DISM tools are extensively used to cater to issues in the system such as missing system files and corrupt modules. These tools scan specific files through a manifest and compare the local files on the system with the ones available online at Microsoft’s servers.
Why Use The SFC Scan And DISM Tool?
As far as the SFC scan is concerned, it is essential for every Windows user, whether you are a coder, a gamer, or even just a regular user. Whenever you feel like the operating system is acting up, the first course of action will always be the SFC scan.
Coming to the DISM tool, it is basically a beefed-up version of the SFC scan. When an SFC scan cannot get the job done, the DISM tool comes in handy.
But the main question right now is, why? The SFC scan and the DISM tool are made by Windows, so you can be sure that they will not give you any virus or malware. Instead of looking for complex solutions, these tools will help you save a lot of time.
SFC Scan
SFC stands for System File Checker and, as the name depicts, it scans and repairs the systems files of a Windows system. This scan instantly takes action upon detecting a corrupted or modified file and replaces that file with its original version.
When Should We Use the SFC Scan?
We recommend using an SFC scan in the following scenarios:
- To solve the Blue Screen of Death (BSOD) error.
- If you are getting messages about the missing DLL files.
- When your Windows programs are crashing.
How to Use the SFC Scan?
You can use the SFC scan on your Windows system in the following way:
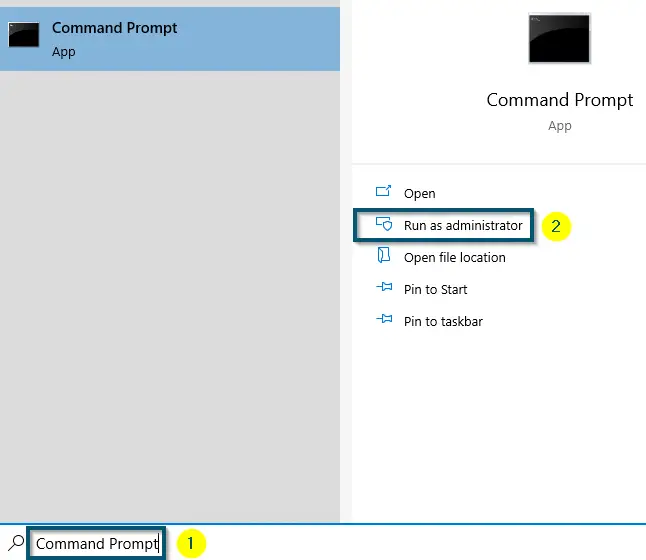
- First of all, open ‘Command Prompt’ or ‘Windows PowerShell’ as ‘Administrator.’

Opening ‘Command Prompt’ as ‘Administrator’ - Now, if you want to repair or replace the damaged files with their original version, then run the following SFC command:
sfc /scannow
- However, if you just want to scan your system without repairing it, you can use the following SFC command:
sfc /verifyonly command
- Once the system has successfully executed the command, you will see the following window:

Command Prompt (CMD) indicating the success of SFC scan - After running the SFC commands, we recommend rebooting your system. This way, the commands will be completely effective.
DISM Tool
DISM stands for Deployment Image Servicing and Management. This tool is more powerful than an SFC scan because when the SFC scan fails, this one gets the job done. Like the SFC scan, this tool also works in the elevated version of ‘Windows PowerShell’ or ‘Command Prompt.’
When Should We Use the DISM Tool?
We recommend using the DISM tool in the following scenarios:
- When you are experiencing frequent errors, system freezing, and crashing.
- If the SFC scan doesn’t run.
- As mentioned earlier, this tool works when the SFC scan fails. So, use it only after the failure of the SFC scan.
How to Use the DISM Tool?
You can use the DISM tool on your Windows system in the following way:
- Open ‘Command Prompt’ or ‘Windows PowerShell’ as ‘Administrator.’
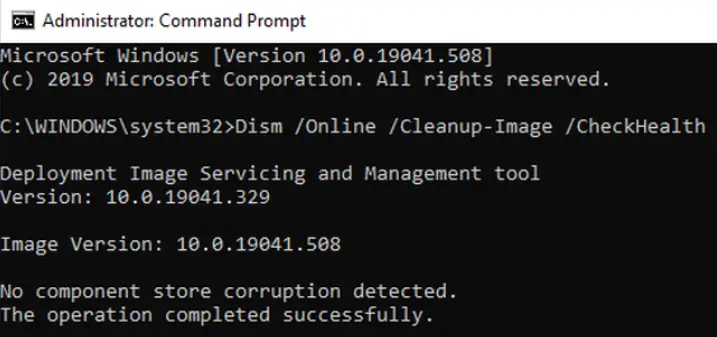
- First, run the following command because it will check whether the system image is corrupted or not without making any changes:
Dism /Online /Cleanup-Image /CheckHealth
- Now, if the system doesn’t detect any corruption, you can run a more advanced-level DISM scan to identify whether the component store is restorative or not. This command will not make any changes to the system as well.
Dism /Online /Cleanup-Image /ScanHealth
- But if the DISM tool reports some issues in the image of the Windows system, we recommend running another advanced DISM command. This command will connect the DISM to Windows for downloading and repairing the damaged files as necessary.
Dism /Online /Cleanup-Image /RestoreHealth
Note: The above command might hang at 20 seconds, which is normal. Plus, it will take 10 minutes to complete its working
- After running the DISM tool, we recommend rebooting your system and running the SFC commands again. This way, the DISM tool will be completely effective.
Conclusion
We hope this article helped you troubleshoot whatever problem you were having. If you are interested in other important troubleshooting methods, do not look any further than our how-to category.
Other Window’s related troubleshooting methods:
- How to Factory Reset a Windows System?
- How to Perform an In-place Upgrade Using Media Creation Tool?
- 4 Different Ways of Booting a Computer into Safe Mode
- How to Update the BIOS of a System?