OPatch Failed with Error Code 73 indicates a critical issue in Oracle’s patching system. OPatch, an essential tool employed by Oracle, is designed to safeguard its products from potential security vulnerabilities and enhance their functionality.
When an attempt to update an Oracle product fails with code 73, the system generates the OPatch Failed with Error Code 73 message. This error is not specific to a particular Oracle product or operating system; it can occur across various Oracle products and different operating systems.

Variations Of ‘OPatch Failed With Error Code 73’ Error Message:
This error message has several variations; therefore, it occurs in various other scenarios with different forms. So, let’s see those variations first before getting to the fix of this error message. Because, this way, you can easily relate to your use case and solve the issue at hand.
- Sometimes, this error code occurs while running the command OPatch lsinventory. In this case, the users have reported the error message in the following way:
OPatch failed with error code 73 Isinventory
- In some cases, this error code occurs while upgrading the OJVM from version 19.3 to 19.7 and applying the patch ‘30805684: OJVM RELEASE UPDATE 19.7.0.0.0.’ In that case, the users have reported the following issue with this error message:
Prerequisite check ‘CheckActiveFilesAndExecutables’ failed

OPatch failed with error code 73 utilsession failed
- Sometimes, this error message occurs while installing the SBP of 11024. In this case, the error code shows the following message:
LsInventorySession failed: OPatch failed to locate Central Inventory.
- In some cases, this error message occurs while applying the patch number 29859180 on a system running Windows operating system. In that case, users have reported the following error message:
OPatch failed with error code = 73 Windows 2012 r2

OPatch failed with error code = 73 windows 2016

OPatch failed with error code 73 windows
- Users faced this error message while trying to fix the security vulnerabilities for Oracle WebLogic on the Windows system. In that case, the users have reported the following error message:
OPatch failed with error code 73 WebLogic 12.2.1.4
- In some cases, users have faced this error message while trying to apply WLS patches on a Windows server. In this case, the system gives the following error message:
OPatch failed to locate Central Inventory
- Sometimes, users have faced this error message while upgrading Oracle from version 10 to 11.2.0.3.1.
What Causes This Error Message?
- If this error message occurs in Oracle Home, then one of the following can be the probable cause of this issue.
- Oracle Home dir. path does not exist in the Central Inventory.
- Oracle Home is a symbolic link.
- Oracle Home inventory is corrupted.
- If this error message occurs while upgrading the patch of OJVM from version 19.3 to 19.7, then this error could be due to an already connected session to sqlplus binaries.
- If this error message occurs while installing the SBP of 11204, then one of the following can be the cause of this issue.
- Corruption of Central Inventory.
- The ‘oraInst.loc’ file specified is not valid.
How to Solve OPatch Failed with Error Code 73?
We compiled verified solutions from community forums such as Community Spiceworks, and Stackoverflow. Combined, we put out 7 detailed solutions, with sources.
Use The Correct Patch
If you’re using a patch that’s not intended for the version of the Oracle product you have, the patch installation will fail with error code 73. To resolve this issue, use the correct Opatch specifically designed for the product version.
- Launch the Terminal and execute the following:
SELECT BANNER_FULL

FROM V$VERSION;

Check the Version of the Oracle Product - Its output will be:
BANNER_FULL

Oracle Database 19c Enterprise Edition Release 19.0.0.0.0 - Production

Version 19.3.0.0.0
- Make sure the patch you are using is for the Oracle version and product i.e., a patch for FMW will not work for the Enterprise edition.
- If the version does not match, go to the Oracle website and download the compatible patch version as per the Oracle product.
- Install it and see if that clears the error code 73.

We found this solution on StackOverflow. The solution was posted under user RoBar, and it worked for him.
Change The Location Of The Home Directory
If the Home directory of the Oracle database is not located where required by the Opatch, this will result in the error code 73. To fix this, change the Home directory of the database.
- Check the current location of the Home directly. You can look in the Registry Editor in the following key:
Computer\HKEY_LOCAL_MACHINE\SOFTWARE\ORACLE

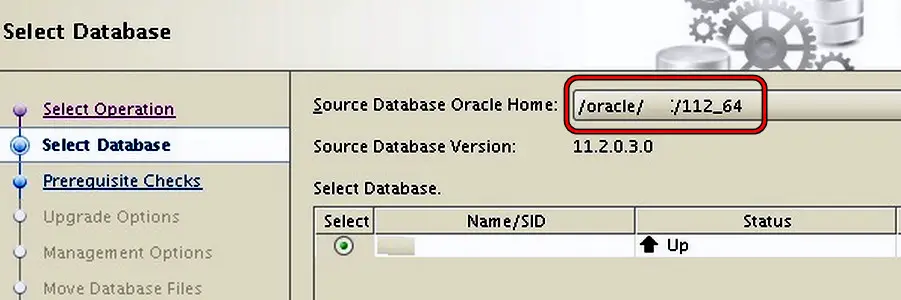
Check the Home Directory of Oracle - If it shows as:
/oracle/DRD/11203
- Make sure to change it to:
/oracle/DRD/112_64
- Restart the system and check if the patch works correctly.
We found this solution on Community Spiceworks. The question was asked by ashokpanhalkar-fqmzakcq and answered by Ashok.
Stop The Relevant Services
If the relevant services haven’t been stopped and the database is still in use, this will result in the Opatch error code 73. Remember that the patch can’t update an Oracle installation while the database is still being queried. To resolve this issue, stop the relevant database services and then retry the patch update.
To do so on Windows:
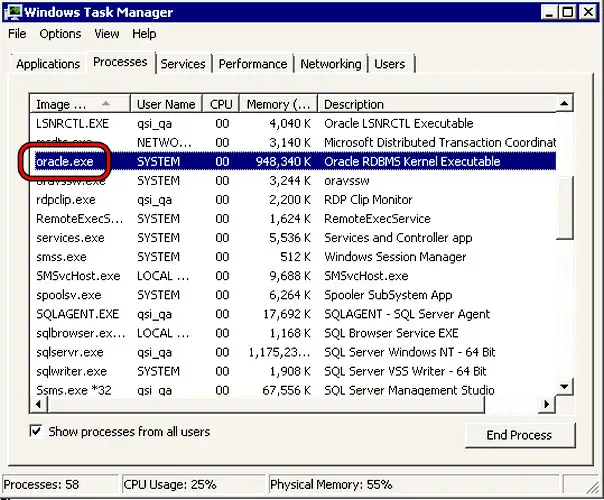
- Right-click Windows and open Task Manager.
- End all Oracle-related tasks and anything related to SQL (such as SQLPlus).

End Oracle-Related Tasks in the Task Manager - Rerun the patch and see if it executes without causing error 73.
- If not, make sure none of the users are accessing the database and retry the update.
- If this does not work, check if you have a code to create a user on the database.
- If so, either remove the code or place it at the end of the database. See if that solves the problem.
- If the issue persists, check if the Oracle Support Identifier is running. If so, stop it and see if this resolves the issue.
This fix was posted on DBA Stackexhange. User dezso recommended this solution, and it seemed to solve the problem for them.
Set Environmental Variable For Oracle
If the Environmental Variable for Oracle is not set as per the requirements of the patch, this can lead to the OPatch error code 73. To fix this, set the environmental variable for Oracle.
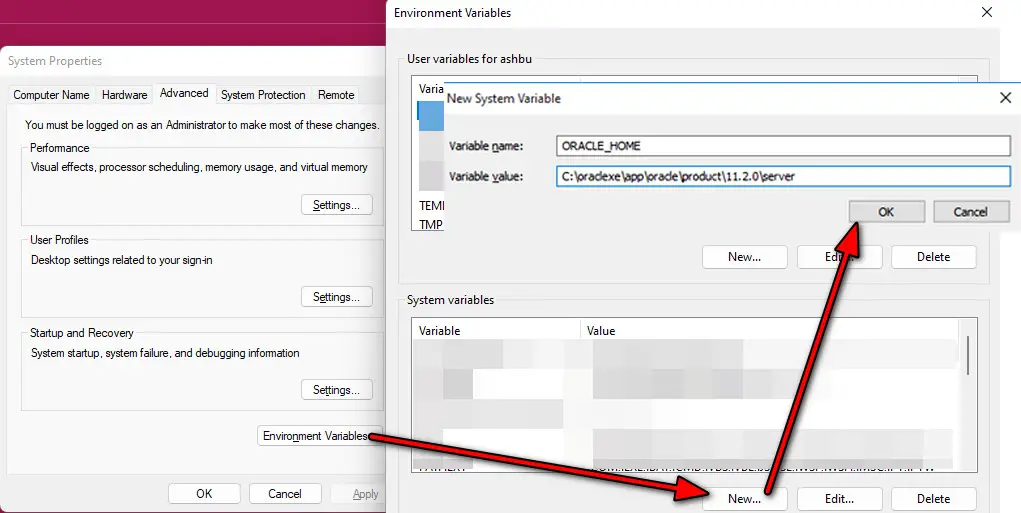
- Press the Windows key and type Environmental Variable.
- Open it and click on Environment Variables.

Add the ORACLE_HOME as an Environmental Variable in Windows - In the System Variables section, click on New and enter the name ORACLE_HOME.
- Set its directory to the Oracle’s Home directory and click OK.
- Retry the patch and see if it is working correctly.
We hand-picked this solution from experts-exchange. It seemed to work for most users.
Use The OPatch Utility
As the OPatch fails, we can use the OPatch Utility to update the Oracle database manually. To do so:
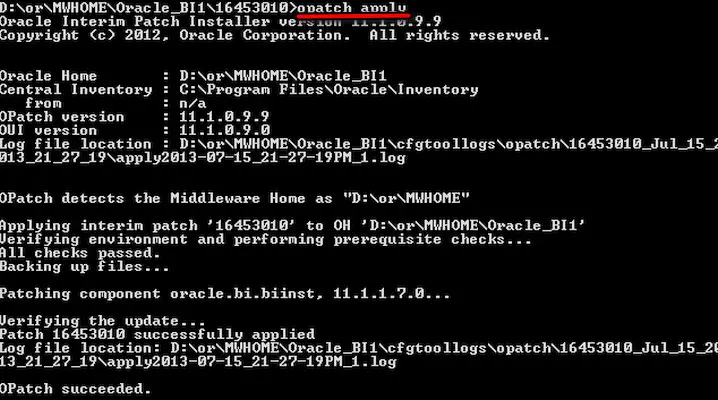
- Launch the Terminal and change the directory to the Home directory:
$ cd $ORACLE_HOME/OPatch

Run the Opatch Apply Command - Execute the following and check if that solves the problem:
opatch apply
This fix was also picked out from experts-exchange. The question was asked by user Netsol, and the thread helped him solve the error.
Delete The Unapplied Patches From The Patch Storage
If the Patch Storage holds older unapplied patches, this can conflict with the application of the current patch, and deleting the Patch Storage (without deleting the applied patches) will solve the problem.
- Launch the Terminal and execute the following:
$ORACLE_HOME/OPatch/opatch lsinventory | grep -E "(^Patch.*applied)|(^Sub-patch)"
- This will output as:
Patch 33561310     : applied on Fri Jan 28 05:21:35 GMT 2022

Patch  33515361     : applied on Fri Jan 28 05:15:00 GMT 2022

Patch  29585399     : applied on Thu Apr 18 08:21:33 BST 2019
- This confirms three patches are applied. Execute the following to open the Patch Storage directory:
cd $ORACLE_HOME/.patch_storage
- Execute the following to list down the contents of the directory:
$ ls -al
- This will output such as:
total 212

drwxr-xr-x. 17 oracle oinstall 4096 Mar  2 07:20 .

drwxr-xr-x. 72 oracle oinstall  4096 Mar  1 16:00 ..

drwxr-xr-x.  3 oracle oinstall  4096 Apr 18  2019 29517242_Apr_17_2019_23_27_10

drwxr-xr-x.  3 oracle oinstall  4096 Apr 18  2019 29585399_Apr_9_2019_19_12_47

drwxr-xr-x.  4 oracle oinstall  4096 Dec 11  2020 31668882_Sep_14_2020_06_32_18

drwxr-xr-x.  4 oracle oinstall  4096 Dec 11  2020 31771877_Oct_7_2020_21_34_19

drwxr-xr-x.  4 oracle oinstall  4096 Jan 25  2021 32067171_Dec_2_2020_09_24_57

drwxr-xr-x.  4 oracle oinstall  4096 Jan 25  2021 32218454_Jan_14_2021_16_24_38

drwxr-xr-x.  4 oracle oinstall  4096 Apr 27  2021 32399816_Mar_9_2021_06_16_02

drwxr-xr-x.  4 oracle oinstall  4096 Apr 27  2021 32545013_Apr_16_2021_07_40_05

drwxr-xr-x.  4 oracle oinstall  4096 Aug  2  2021 32876380_Jul_5_2021_04_53_50

drwxr-xr-x.  4 oracle oinstall  4096 Aug  2  2021 32904851_Jul_20_2021_09_21_24

drwxr-xr-x.  4 oracle oinstall  4096 Oct 26 12:50 33192694_Sep_14_2021_16_48_27

drwxr-xr-x.  4 oracle oinstall  4096 Oct 26 12:45 33192793_Oct_15_2021_07_09_52

drwxr-xr-x.  4 oracle oinstall  4096 Jan 28 05:16 33515361_Jan_13_2022_06_14_07

drwxr-xr-x.  4 oracle oinstall  4096 Jan 28 05:22 33561310_Jan_5_2022_08_13_10

-rw-r--r--.  1 oracle oinstall 65515 Jan 28 05:21 interim_inventory.txt

-rw-r--r--.  1 oracle oinstall    92 Jan 28 05:21 LatestOPatchSession.properties

drwxr-xr-x. 18 oracle oinstall  4096 Jan 28 05:21 NApply

-rw-r--r--.  1 oracle oinstall  9666 Jan 28 05:16 newdirs.txt

-rw-r--r--.  1 oracle oinstall 65103 Jan 28 05:21 record_inventory.txt
- Remove the patches that are not used by executing the following:
rm -Rf 29517242_Apr_17_2019_23_27_10

rm -Rf 31668882_Sep_14_2020_06_32_18

rm -Rf 31771877_Oct_7_2020_21_34_19

rm -Rf 32067171_Dec_2_2020_09_24_57

rm -Rf 32218454_Jan_14_2021_16_24_38

rm -Rf 32399816_Mar_9_2021_06_16_02

rm -Rf 32545013_Apr_16_2021_07_40_05

rm -Rf 32876380_Jul_5_2021_04_53_50

rm -Rf 32904851_Jul_20_2021_09_21_24

rm -Rf 33192694_Sep_14_2021_16_48_27

rm -Rf 33192793_Oct_15_2021_07_09_52
- Once done, retry the patch and see if the problem is solved.
We got this particular fix from the DBA StackExchange. User Balazs guarantees this solution works, so it is definitely worth a try.
Reinstall The Oracle Database
This is a huge step but if none of the above works and no other solution can be found, the last method to clear the Opatch error 73 will be to reinstall the Oracle database.
Warning: Proceed at your own risk as you may lose data if you do not correctly apply the required steps or if the latest version fails to import your data. Also, make sure to back up the database in a safe location so that it can be used later.
- Log into the system with an administrator account that can uninstall the Oracle database software.
- Open the Terminal and execute the following to go to the Oracle Home directory. By default, the installation directory of the software is the home directory, unless specified otherwise during installation:
$ export ORACLE_HOME=/scratch/u01/app/oracle/product/19.0.0/dbhome_1

$ cd $ORACLE_HOME
- Its output will be:
Checking for required files and bootstrapping ...

Please wait ...

Location of logs /tmp/deinstall2019-05-05_09-32-20AM/logs/

############ ORACLE DECONFIG TOOL START ############

######################### DECONFIG CHECK OPERATION START #########################

## [START] Install check configuration ##

Checking for existence of the Oracle home location /scratch/u01/app/oracle/product/19.0.0/dbhome_1

Oracle Home type selected for deinstall is: Oracle Single Instance Database

Oracle Base selected for deinstall is: /scratch/u01/app/oracle

Checking for existence of central inventory location /scratch/u01/app/oraInventory

## [END] Install check configuration ##

Network Configuration check config START

Network de-configuration trace file location: /tmp/deinstall2016-05-05_09-32-20AM/logs/netdc_check2016-05-05_09-33-05-AM.log

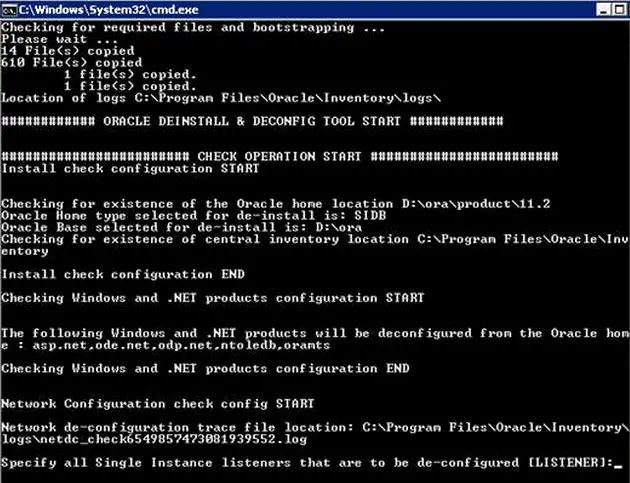
Deinstall the Oracle Database Application on Windows - Start the de-installation tool:
$ $ORACLE_HOME/deinstall/deinstall
- When asked to de-configure the instance listeners, accept the default value by pressing Enter.
Specify all Single Instance listeners that are to be de-configured. Enter .(dot) to deselect all. [LISTENER]: Enter
- Its output will be:
Network Configuration check config END

Database Check Configuration START

Database de-configuration trace file location: /tmp/deinstall2019-05-05_09-32-20AM/logs/databasedc_check2019-05-05_09-35-32-AM.log
- Accept the default value by hitting the Enter key when asked to select the database names.
Use comma as separator when specifying list of values as input

Specify the list of database names that are configured in this Oracle home [orcl]: Enter
- Its output will be:
###### For Database 'orcl' ######

Single Instance Database

The diagnostic destination location of the database: /scratch/u01/app/oracle/diag/rdbms/orcl

Storage type used by the Database: FS

Database file location: /scratch/u01/app/oracle/oradata/orcl,/scratch/u01/app/oracle/recovery_area/orcl

Fast recovery area location: /scratch/u01/app/oracle/recovery_area/ORCL

database spfile location: /scratch/u01/app/oracle/product/19.0.0/dbhome_1/dbs/spfileorcl.ora
- When prompted to, accept the default for the discovered database by hitting the Enter key:
The details of database(s) orcl have been discovered automatically.

Do you still want to modify the details of orcl database(s)? [n]: Enter
- Its output will be:
Database Check Configuration END

Oracle Configuration Manager check START

OCM check log file location : /tmp/deinstall2019-05-05_09-32-20AM/logs//ocm_check8037.log

Oracle Configuration Manager check END

######################### DECONFIG CHECK OPERATION END #########################

####################### DECONFIG CHECK OPERATION SUMMARY #######################

Oracle Home selected for deinstall is: /scratch/u01/app/oracle/product/19.0.0/dbhome_1

Inventory Location where the Oracle home registered is: /scratch/u01/app/oraInventory

Following Single Instance listener(s) will be de-configured: LISTENER

The following databases were selected for de-configuration : orcl

Database unique name : orcl

Storage used : FS

Checking the config status for CCR

Oracle Home exists with CCR directory, but CCR is not configured

CCR check is finished
- When asked to continue, press Y, and once uninstalled, open the output.txt to make sure everything went smoothly.
- Restart the system and reinstall the Oracle database. Hopefully, this will clear the OPatch error 73.
If the issue persists, go to the installDBBinaries.sh file and comment out the Oracle Database Upgrade Assistant (DBUA). Retry the patch and see if that clears the error. If this does not work, you may contact Oracle Support for further troubleshooting.
Thiago Cavalheiro posted this fix on answers.sap.com. He exclaims that this is the easiest way possible to solve the error.
Final Words
We hope we helped you solve your error. We provided you with every solution possible with their sources. We stand behind our guide and guarantee implementing all these solutions will fix your error.
Other programming articles: