Safe Mode boots a system in a basic mode. The basic mode starts a computer with a limited set of drivers and files. Users use this mode to identify the source of a problem and, if the system doesn’t cause any issues in the ‘Safe Mode,’ this indicates that the basic files and drivers of the system are working fine.
This is a very common troubleshooting tool that is used in diagnosing whether third-party applications are causing problems.

Different Ways of Booting a Computer into Safe Mode
There are essentially four ways of booting a system in the ‘Safe Mode.’ You can follow the one that is suitable according to your situation.
1. Enabling Safe boot via ‘System Configuration’
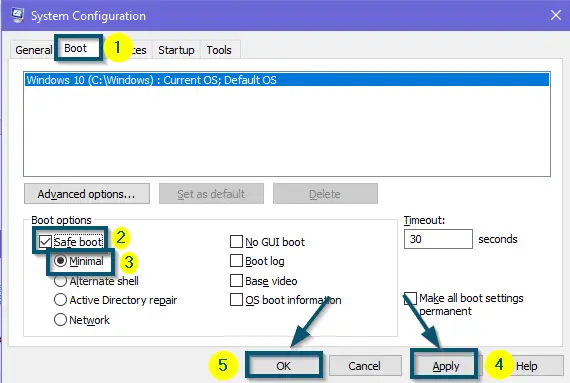
When you enable the Safe boot through ‘System Configuration,’ every time you boot up your system, it will keep booting in the Safe Mode. This technique is useful if you want to diagnose something that requires your computer to restart several times without leaving the ‘Safe Mode.’ However, for leaving the ‘Safe Mode,’ you will have to disable the ‘Safe boot’ option again.
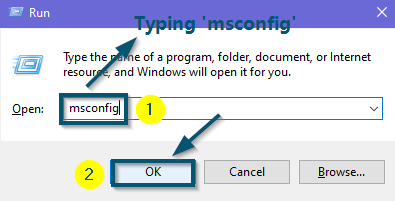
- First, press the ‘Windows + R’ keys to open the ‘Run’ dialog box.
- Now, type ‘msconfig’ and press the ‘Enter’ key (or click on the ‘OK’ button).

Typing ‘msconfig’ in the search box of ‘Run’ dialog box and clicking on the ‘OK’ button - After that, switch to the ‘Boot’ tab and check the ‘Safe boot’ and ‘Minimal’ options.
- Now, apply the new settings by clicking on the ‘Apply’ and ‘OK’ buttons.

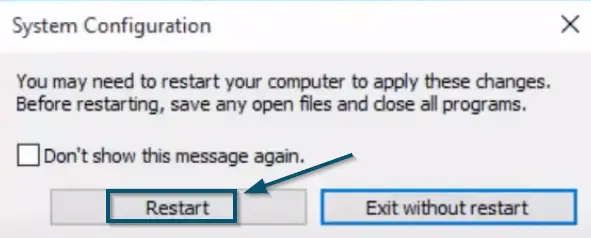
Checking the ‘Safe boot’ and ‘Minimal’ options in the ‘Boot’ Tab and applying the settings - After that, Windows will show a confirmation message. So, click on the ‘Restart’ option to restart the system in ‘Safe Mode.’

Clicking on the ‘Restart’ button to restart the system in the ‘Safe Mode’
Note: If you want to boot your computer normally, follow the next steps. Otherwise, skip them
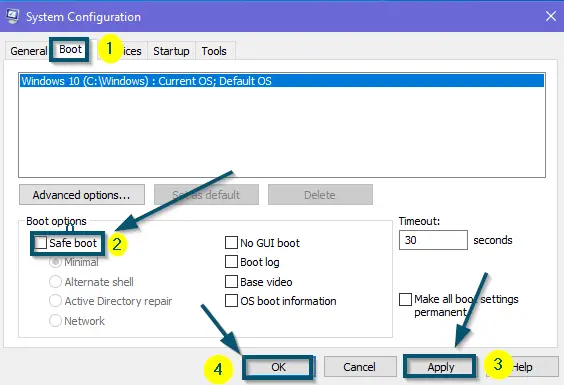
- Now, again go to the ‘System Configuration’ by ‘following steps 1 and 2 of this solution.’
- After that, switch to the ‘Boot’ tab and uncheck the ‘Safe boot’ option.
- Then, apply the new settings by clicking on the ‘Apply’ and ‘OK’ buttons.

Unchecking the ‘Safe boot’ option and applying the settings - Now, windows will show a confirmation message. So, click on the ‘Restart’ option to restart the system normally.
2. Booting into the Safe Mode via ‘Advanced startup’ Settings
The second method is the most common method of booting a system in Safe Mode.
- First, go to the ‘Settings’ and click on the ‘Update & Security’ option.

Going to the ‘Settings’ from the ‘Start menu’ 
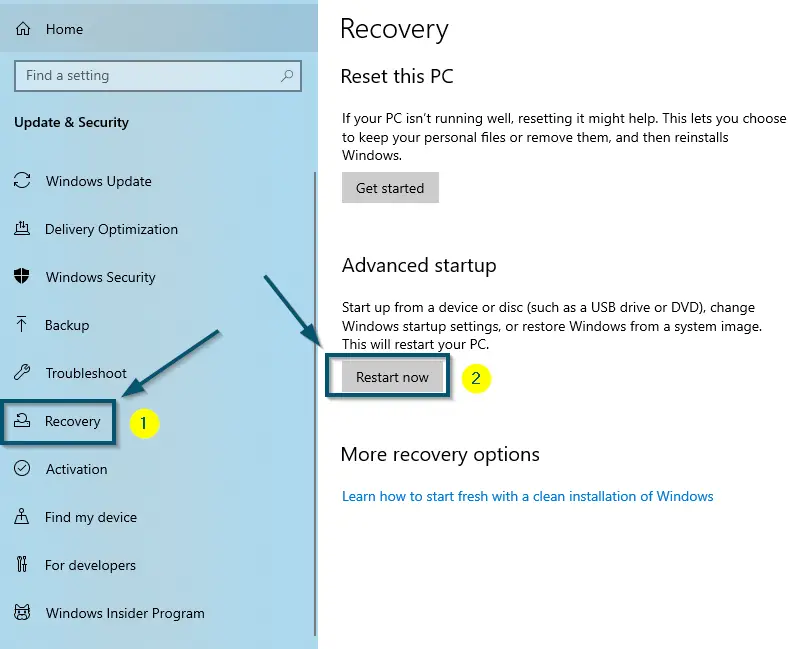
Clicking on the ‘Update & Security’ option - Now, choose the ‘Recovery’ option from the side options.
- Then, click on the ‘Restart now’ button under the ‘Advanced startup’ section. Your system will restart in the ‘Windows Recovery Environment’ mode.

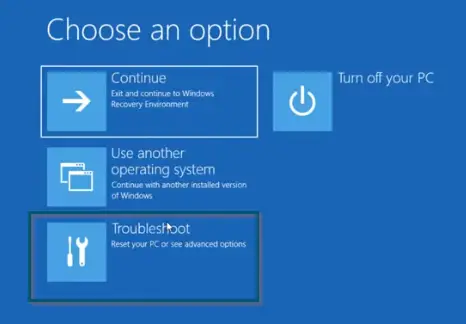
Going to the ‘Recovery’ tab and clicking on the ‘Restart now’ button - So, choose the ‘Troubleshoot’ option first.

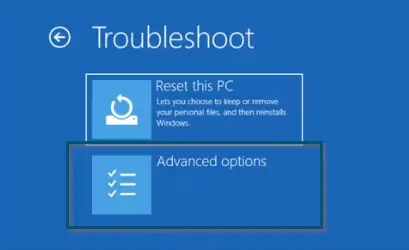
Choosing the ‘Troubleshoot option’ - Then, choose the ‘Advanced options’ in the ‘Troubleshoot’ window.

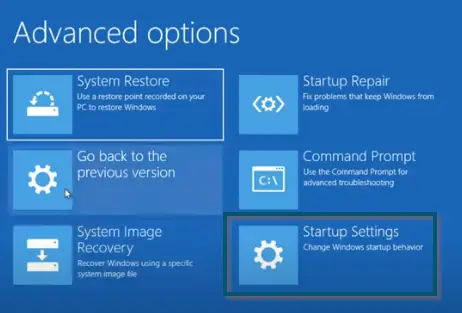
Choosing ‘Advanced options’ in the ‘Troubleshoot’ Window - Choose the ‘Startup Settings’ option in the ‘Advanced options’ window.

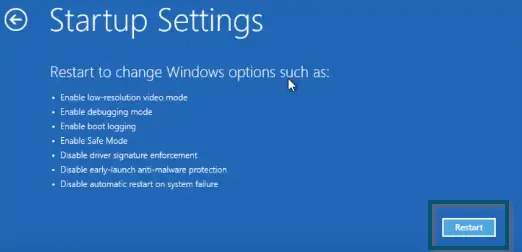
Choosing ‘Startup Settings’ in ‘Advanced options’ Window - Then, click on the ‘Restart’ button in the next window.

Clicking the ‘Restart’ for restarting in the Safe Mode - Upon restart, press ‘4’ (or ‘F4’) to enter the ‘Safe Mode.’

Pressing ‘4’ or ‘F4’ to Enter the ‘Safe Mode’


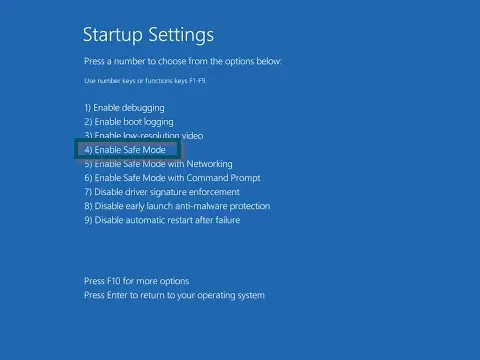
Note: You can also choose options 5 and 6 to boot into the ‘Safe Mode’
- Once you’ve entered the safe mode, you can diagnose the required problem.
3. Booting into the Safe Mode from the ‘Sign-in Page’
The third way of booting the computer into the ‘Safe Mode’ is through the ‘Sign-in page’ of Windows.
- First, press and hold the ‘Shift’ key on your keyboard.
- Then, click on the power icon and choose the ‘Restart’ option.

Choosing the ‘Restart’ option from the ‘Sign-in Page’

Note: Do not leave the ‘SHIFT’ key
- After restarting your system, you’ll again see the ‘Choose an option’ screen of ‘Windows Recovery Environment.’
- So, for the next steps, follow the procedure from step 4 of the previous method to boot the computer into ‘Safe Mode.’
4. Booting into the Safe Mode from the ‘Fresh Boot’
The last method is a bit tedious and, sometimes, it doesn’t work. But it won’t be fair to miss this out. This method follows the procedure of booting into the ‘Safe Mode’ when your computer is off.
- Power on your system and wait for the Manufacturer’s logo to disappear.
- Once the logo disappears and Windows-10 tries to boot, hold the power button for about 5-10 seconds. This technique will turn off your system.

Windows-10 logo on system boot-up
Note: Perform the Step-1 and 2 twice
- Now, Windows-10 should boot into the ‘Windows-10 Repair Environment’ (on the third attempt).
- So, for the next steps, follow the procedure from step 4 of ‘Method # 2’ to boot the computer into ‘Safe Mode.’
