Steam Deck Dock will not work due to configurational issues of the deck/TV or as a result of issues with the deck’s PD controller. Changing the different display configurations of the deck/TV or resetting the deck’s PD controller will solve the problem.
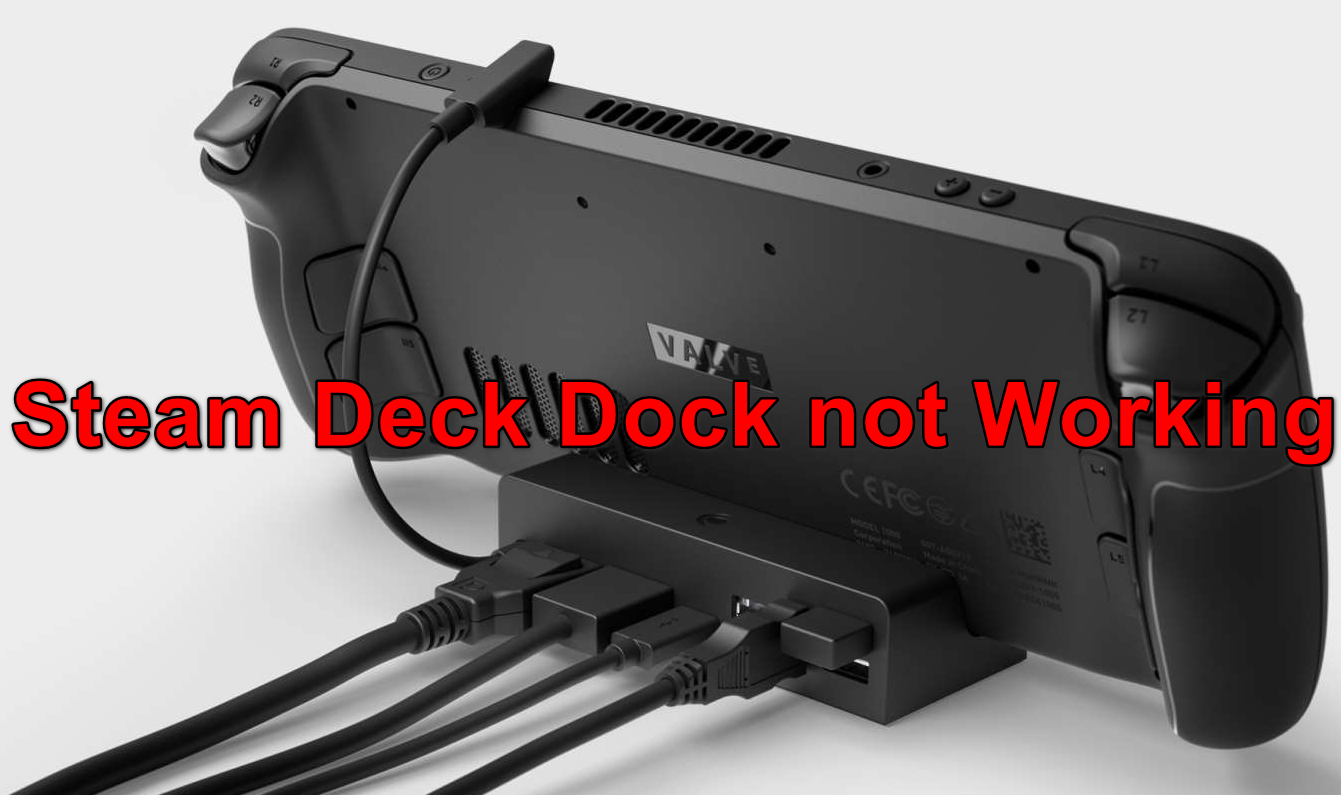
The issue occurs when the dock fails to show your deck’s screen to your display unit (TV, monitor, etc.). Sometimes the problem occurs even with an out-of-the-box deck or dock.
Before starting the troubleshooting process, make sure that the deck’s power supply is connected directly to the power source, not through an extension cable or a surge protector. Moreover, try connecting the HDMI cable to different ports of the display unit. It will be better to try another HDMI cable (such as HDMI 2.1) to connect the dock to the display unit.
If your display unit has a DP port, check if the dock works properly when connected to the DP port. If you have connected the deck through DP and HDMI to different devices, remove one and retry to display the deck screen on the display unit. Additionally, connect the deck directly to the display unit by using HDMI (USB-D to HDMI converter will be required) and check if it is working.
1. Switch the Deck to the Desktop Mode
If the underlying graphics modules of the deck are in an error state, the dock will fail to output the deck’s screen in game mode. To fix this, switch to the deck’s desktop mode.
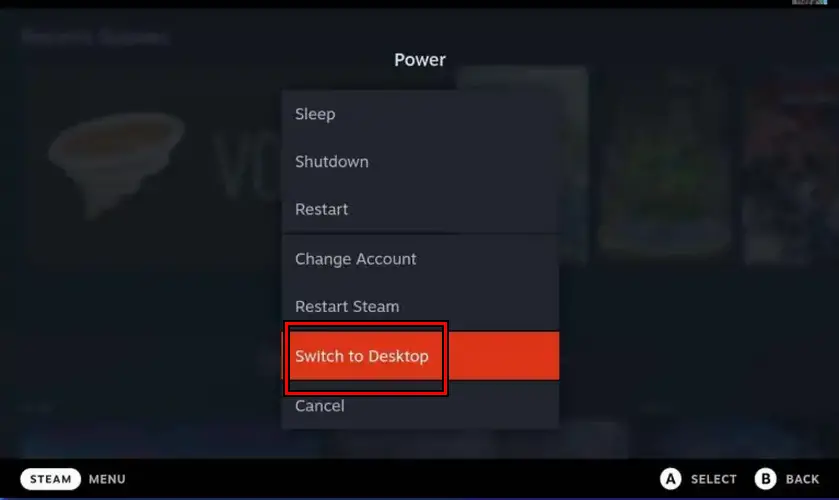
- Disconnect the deck from the dock and press the power button of the deck for 3 seconds.
- Select Switch to the Desktop Mode and connect the deck to the dock. Check if the issue is cleared.

Switch the Steam Deck to the Desktop Mode - If so, disconnect the deck from the dock and go to the deck’s game mode.
- Connect the deck to the dock and see if the problem is solved.
2. Restart the Steam Deck, Dock, and TV/Monitor
The dock will not work with the Steam Deck due to a malfunction in the display modules of the deck, dock, or TV/monitor. Restarting these devices will reinitialize the required modules in the required state and thus solve the problem.
Restart the Steam Deck
- Put the deck into sleep mode by pressing the Power button of the deck while connected to the deck.
- Press the power button again to wake up the deck and check if the issue is cleared.
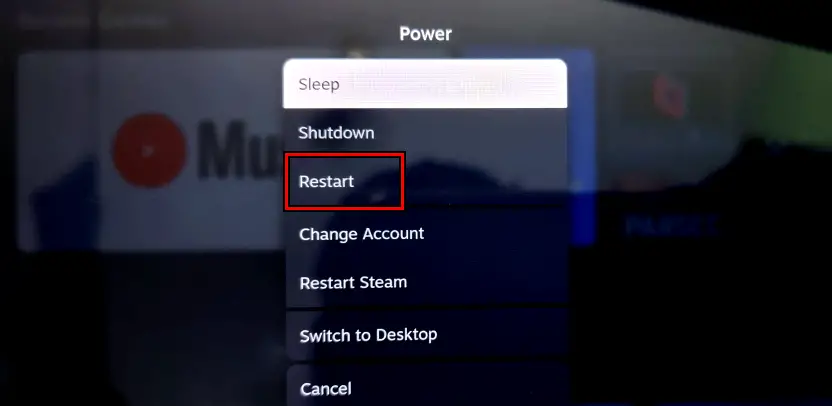
- If the issue persists, disconnect the Steam Deck from the dock and press the power button of the deck.
- Select Restart and once done, connect the deck to the dock. Check if it is working properly.

Restart the Steam Deck - If not, disconnect the deck and dock.
- Press the Power button and select ShutDown.
- Press the Power button to power on the deck and once the Home screen of the deck is shown, connect the deck to the dock. Confirm if the problem is solved.
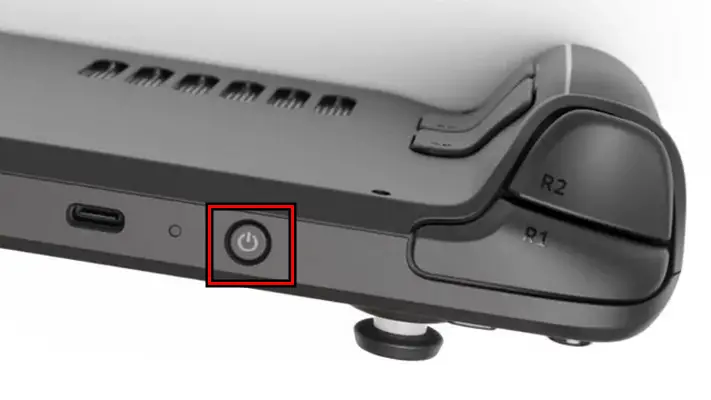
- If this does not work, disconnect the Deck from the dock and press/hold the power button till the deck is powered off.

Press the Power Button on the Steam Deck - Once done, power on the deck and connect it to the dock. Verify if the issue is cleared.
Restart the TV
- Disconnect the deck from the dock and restart the deck.
- Connect the deck to the dock and press/hold the power button of the TV’s remote till the manufacturer logo is shown on the TV.
- Reconnect the power cable of the deck and check if the problem is solved.
- If not, remove the deck from the dock and shut down the deck through its power menu.
- Shut down the TV and then connect everything (deck, TV, dock, etc.).
- Power on the TV and once properly powered on, power on the deck. Check if the screen is shown on the TV.
Restart the Deck
- Plug everything required with the dock and connect the deck to the dock.
- Remove the power cable of the dock (USB-C cable) from the dock and wait for a few seconds.

Unplug the Power Cable of the Steam Deck from the Dock - Plug back the power cable to the dock and check if the problem is solved.
- If not, disconnect the deck from the dock and remove the power cable from the dock.
- Disconnect all the cables from the dock and wait for 30 seconds.
- Plug back everything (except the power cable) and then connect the deck to the dock.
- Connect back the dock’s power cable and check if the dock is working.
- If the issue persists, disconnect the deck from the dock and shut down the deck from its power menu.
- Remove the power cable of the dock and connect the deck to the dock in the powered-off state.
- Power on the deck and once reached the Home screen, insert the power cable of the dock. Verify if the issue is cleared.
- If this does not work, disconnect everything from the dock and connect the power cable to the dock.
- Insert the HDMI cable into your dock and connect the deck to the dock. Check if the issue is cleared.
- If this does not work as well, plug everything in the dock except the deck.
- Plug another device (such as an Android phone) into the dock and wait till its screen is shown on the TV.
- Unplug the other device and plug the deck into the dock. Check if the issue is resolved.
- If the problem is still there, disconnect everything (including the power cable) from the dock and leave it overnight.
- Replug everything (except the power cable) to the dock and connect the deck.
- Insert the power cable and check if the problem is solved.
3. Update the Deck and Dock to their Latest Builds
A deck with an outdated OS will not be compatible with the dock and can cause issues. The dock issue might also be a result of a bug in the dock’s firmware. Updating the deck and dock to their latest OS/firmware builds will solve the problem.
Update the Deck
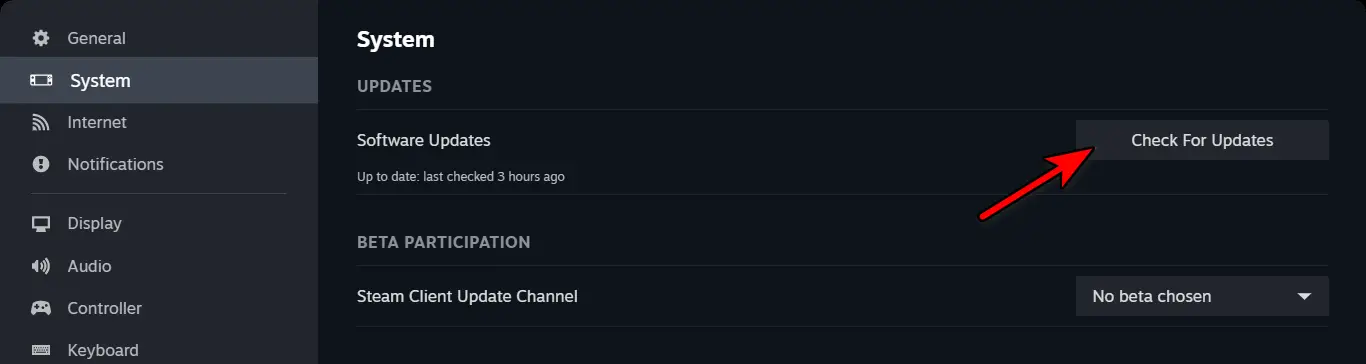
- On the deck, navigate to Settings > System.
- Tap on Check for Updates and install the OS updates (if available).

Check for Updates on Steam Deck - Restart your Steam Deck and check if it is working correctly with the dock.
If not, you may join the Beta update channel of SteamOS and check if that clears the issue.
Update the Dock
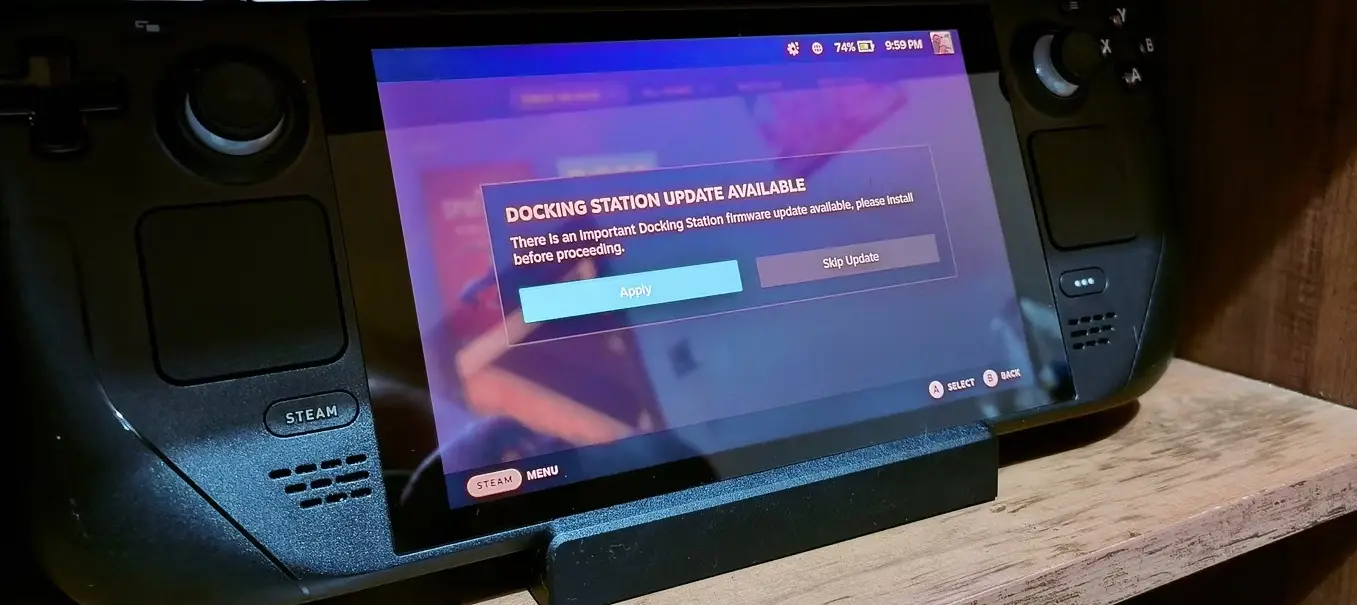
- Shut down the deck from its menu and unplug all cables/peripherals from the dock.
- Connect only the deck with the dock and power on the deck.
- If an update prompt for the dock’s firmware is shown, update the firmware, and once done, check if the problem is solved.

Update Firmware of the Steam Deck Dock - If no update prompt is shown, unplug everything from the dock and plug back the power cable only.
- Restart the deck and connect it to the dock.
- Update the dock’s firmware if a prompt is shown and then check if the issue is cleared.
4. Disable HDMI-CEC in the TV Settings
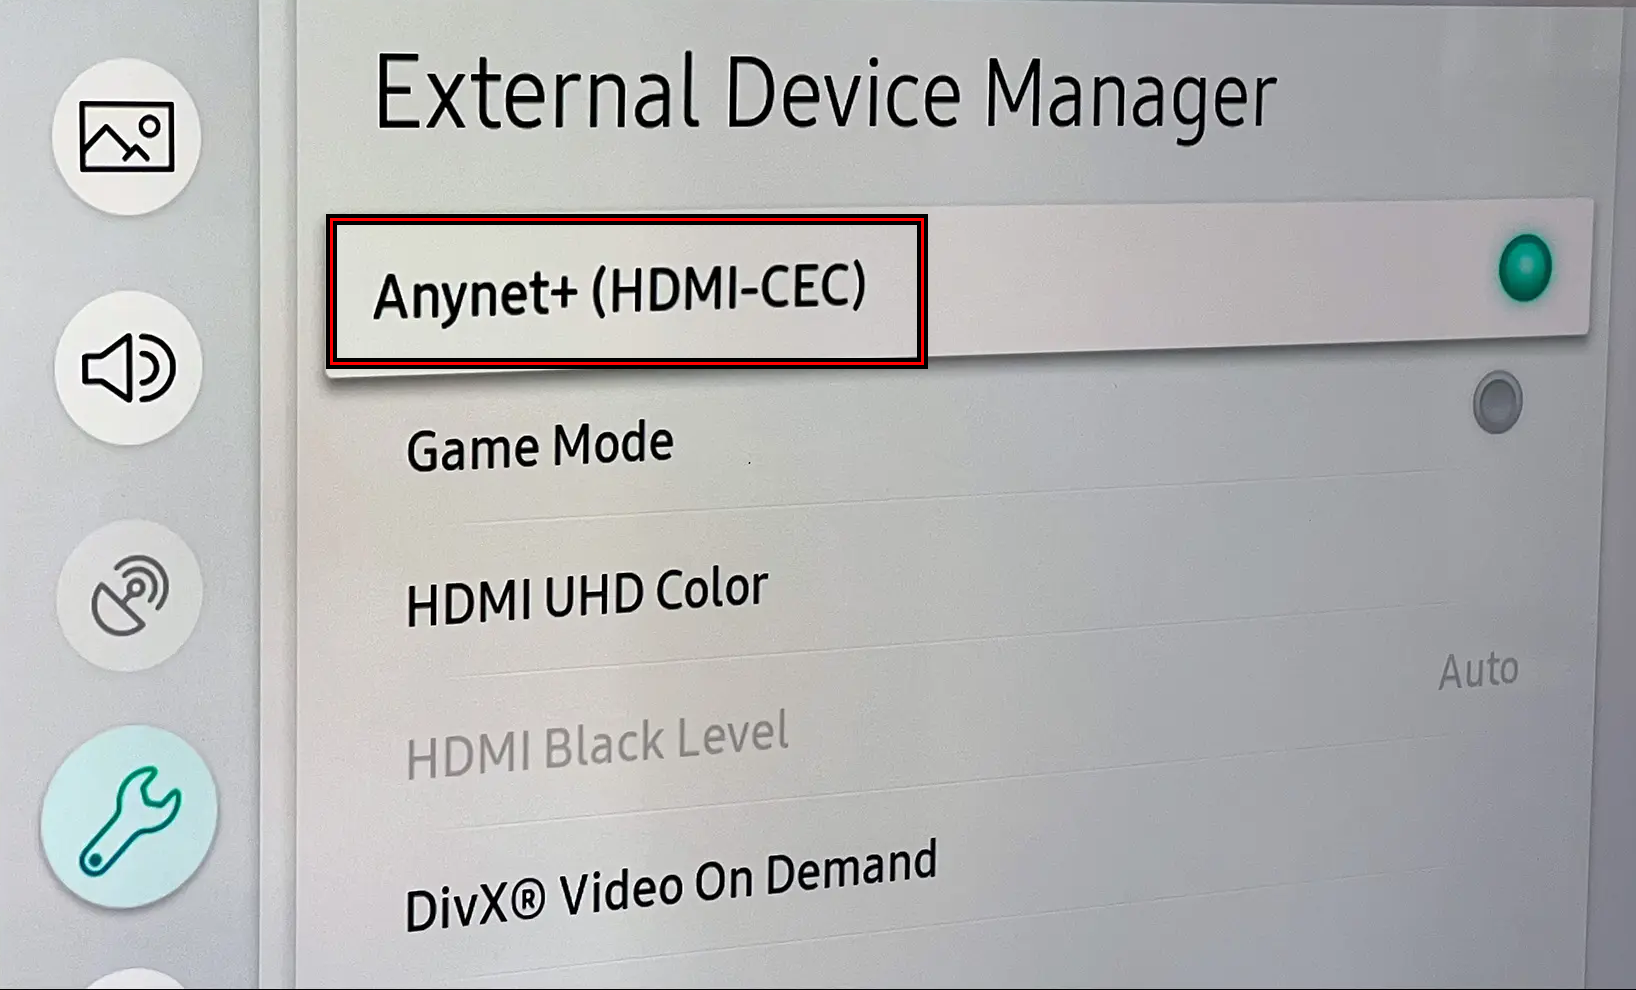
HDMI-CEC enables controlling the devices connected to your TV through a single remote. If this setting is enabled on your TV, it will interfere with the signals from the dock and thus cause the issue. Here, disabling the HDMI-CEC on the TV will resolve the issue. To disable Anynet+ (HDMI-CEC) on a Samsung TV:
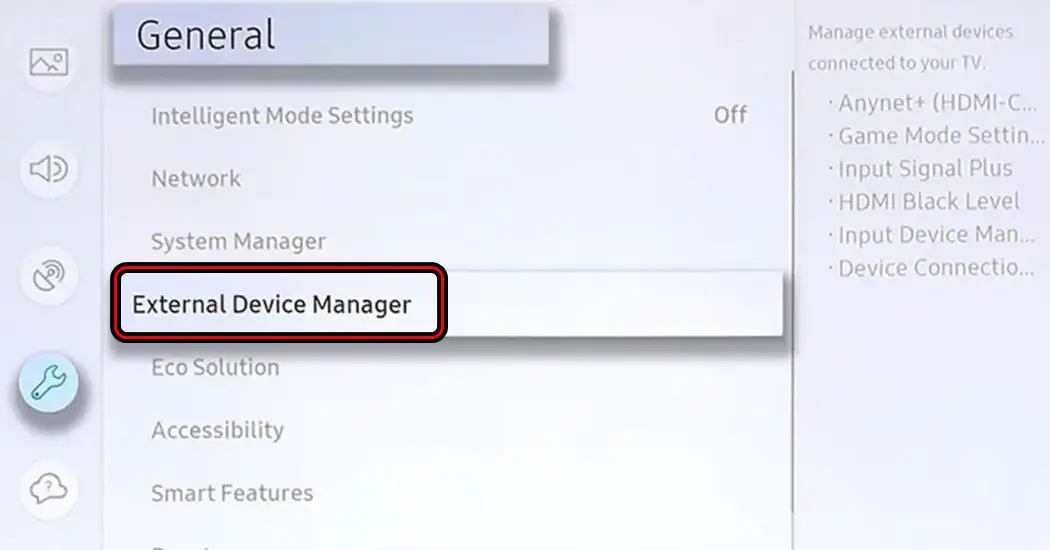
- On the TV, navigate to Settings > General > External Device Manager.
- Disable Anynet+ and check if the issue is cleared.

Disable Anynet+ in the Samsung TV Settings
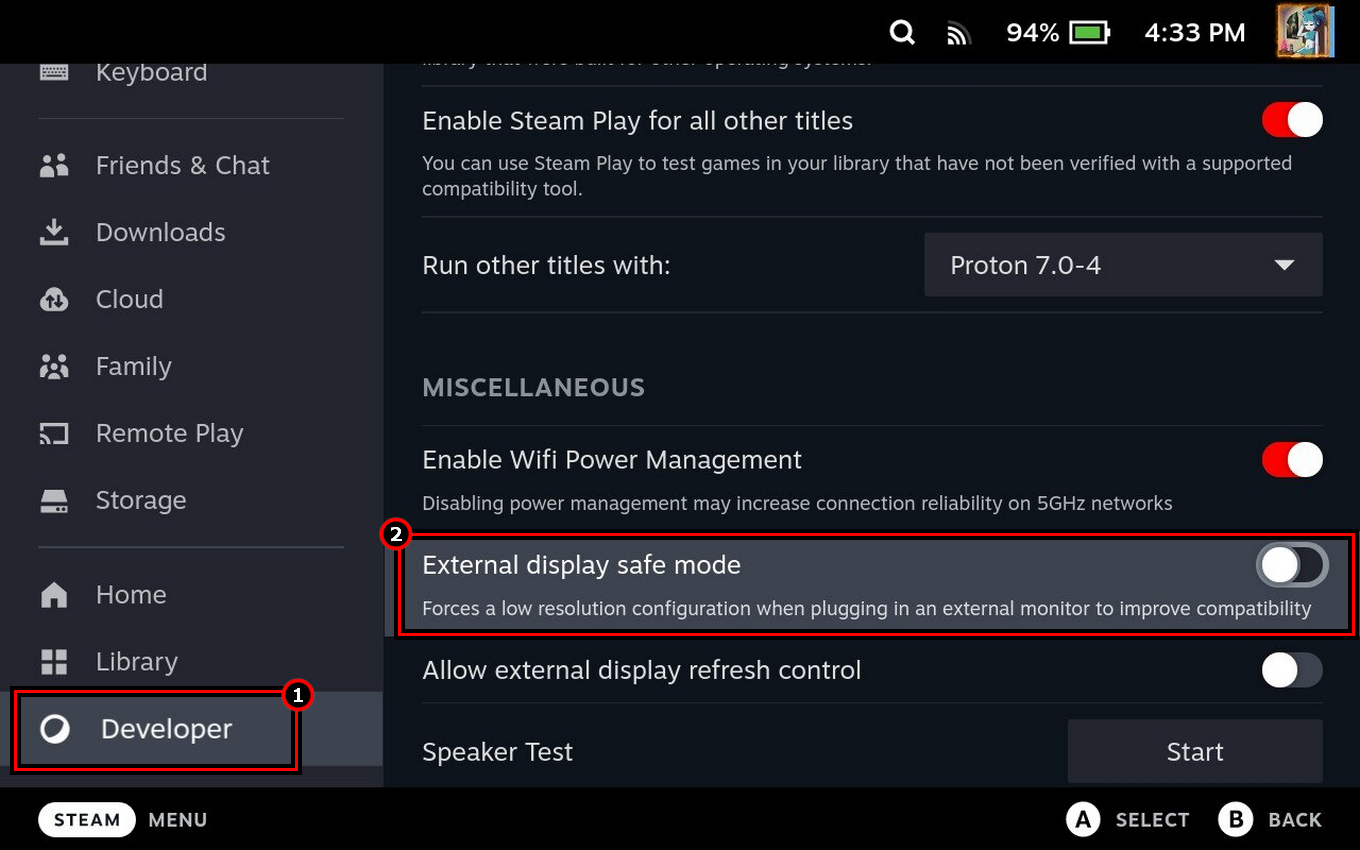
5. Enable External Display Safe Mode
If there is a resolution mismatch between the deck and your display unit, the display unit will not be able to show the deck’s screen and thus cause the issue. For example, if the deck is outputting at 4K but the display unit can only show 1080p, then the display unit will not show the output.
Enabling the External Display Safe Mode will solve the problem as it will try to use the lowest resolution to output the deck’s screen.
- Disconnect the deck from the dock and remove the dock’s power cable.
- Switch to the Desktop Mode of the deck and navigate to Steam > Settings > Display.
- Under Advanced, enable External Display Safe Mode and connect the deck to the dock. In some cases, you may need to enable the Developer Mode of the deck and enable safe mode there.

Enable the External Display Safe Mode of the Steam Deck - Plug the power cable into the dock and check if the issue is resolved.
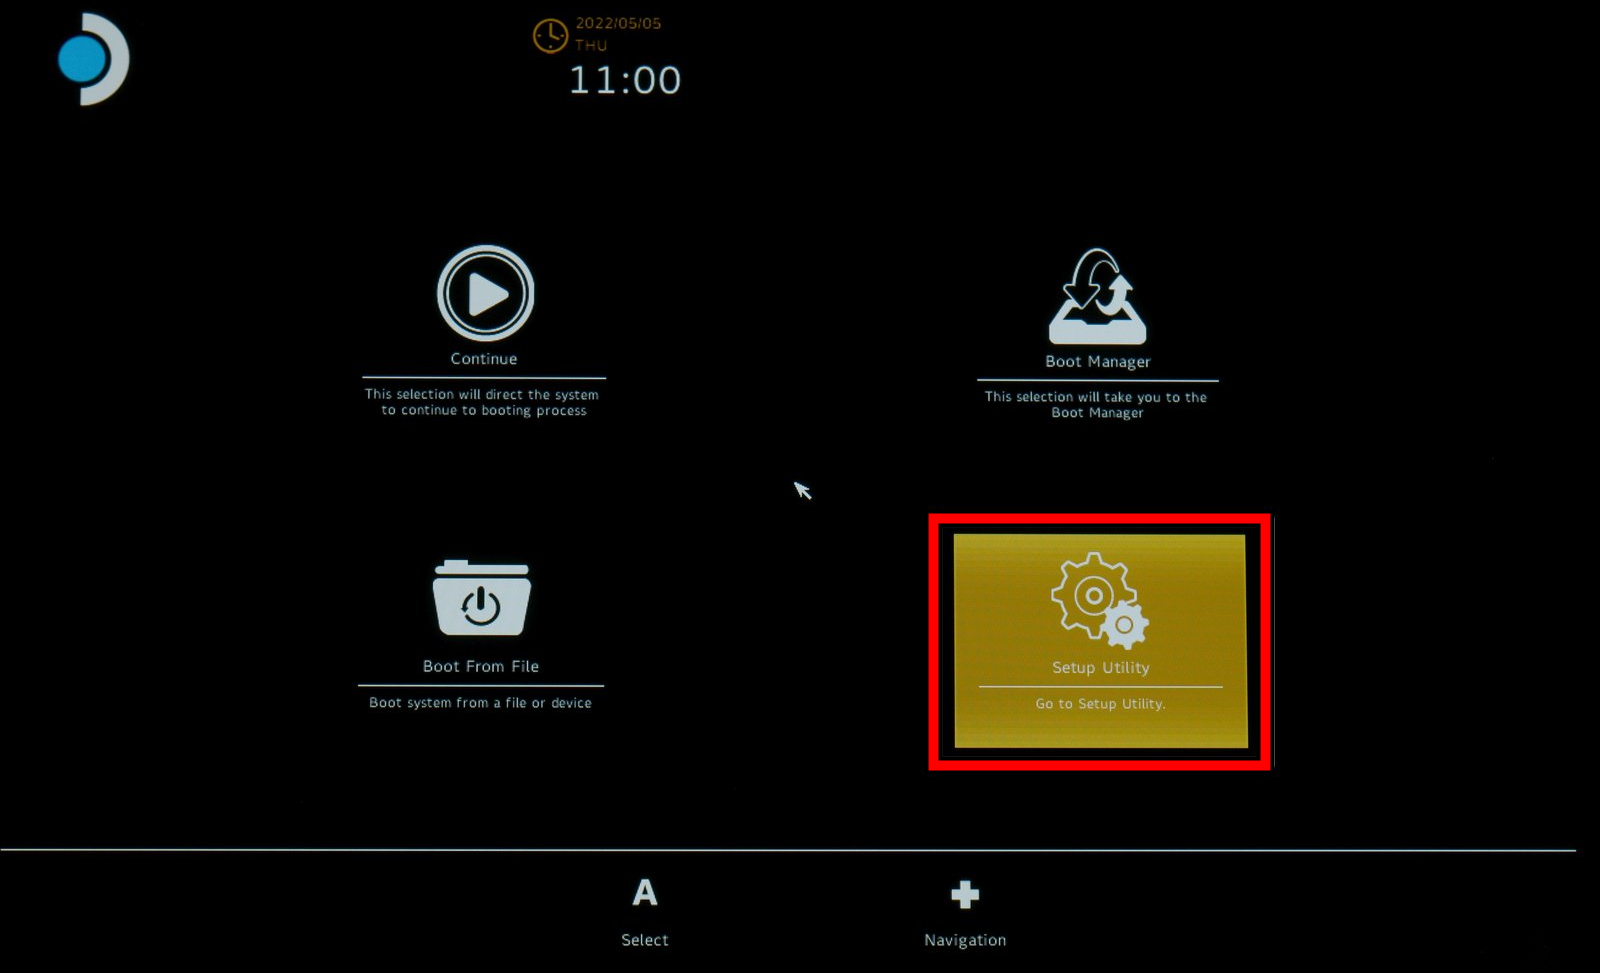
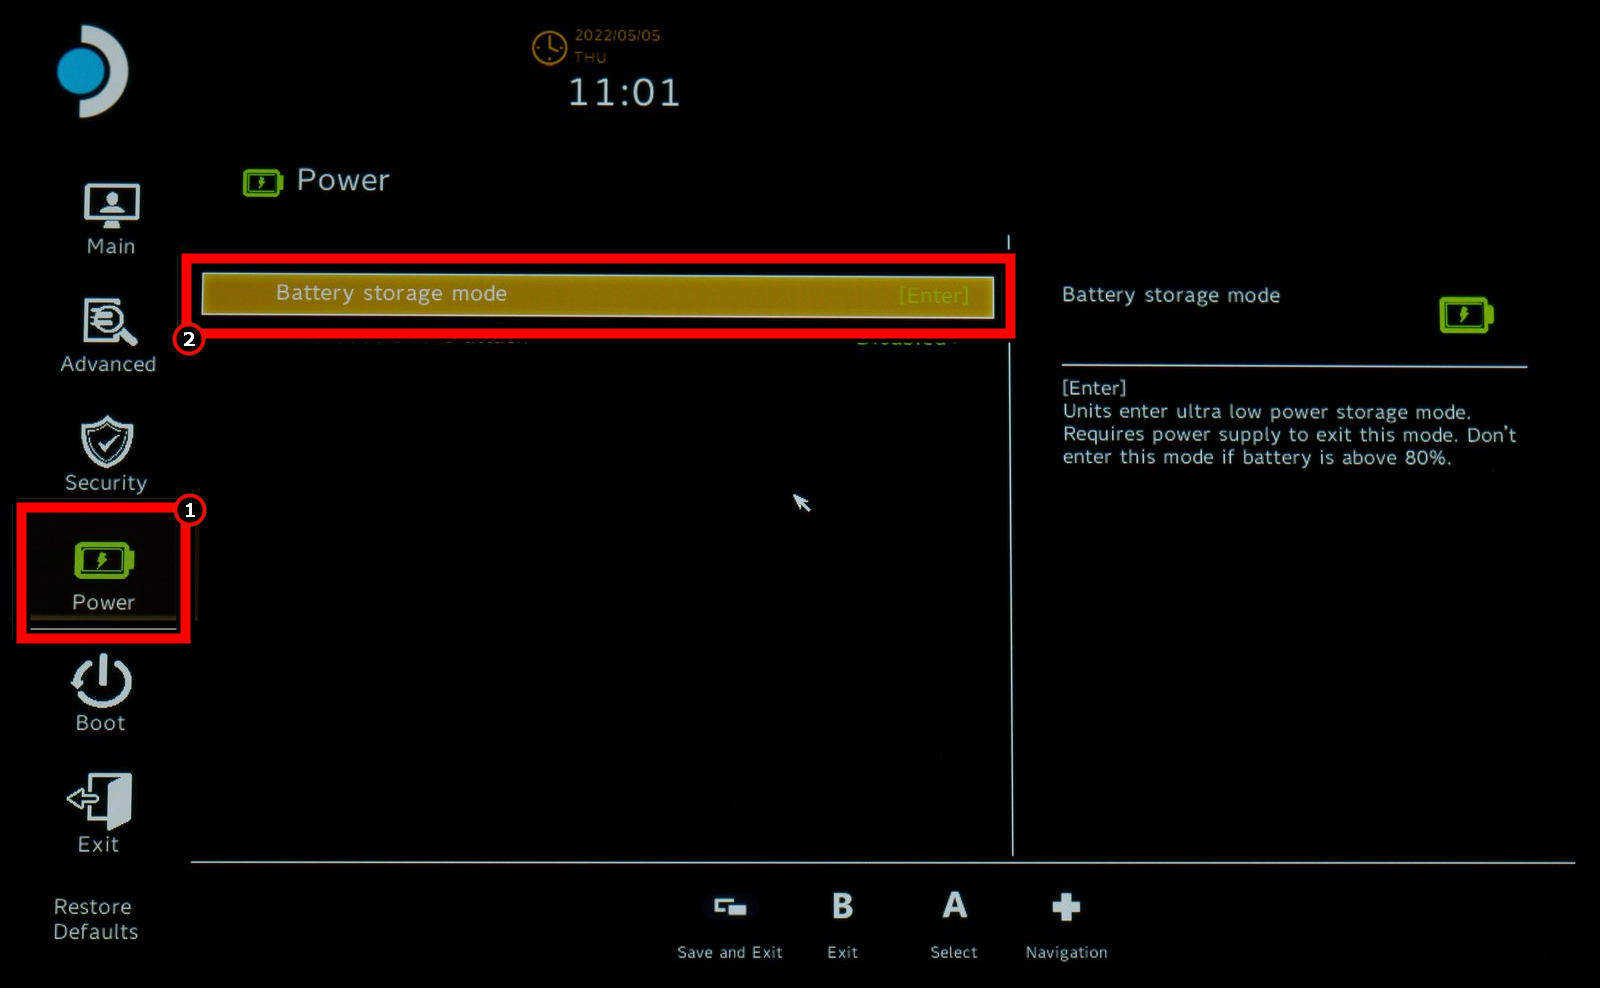
6. Put the Deck into the Battery Storage Mode
Battery Storage Mode of the Steam Deck is a hardware configuration reset of the deck. If an invalid hardware configuration is causing issues between the deck and dock, putting the deck into battery storage mode and then deactivating it will do the trick.
The original Deck charger and cable will be required to end the battery storage mode. If that is not available, you can use an equivalent 45W+ USB-C PD charger and cable.
- Disconnect the deck from the power source and Shut Down the deck through its Power menu.
- Press/hold the following buttons:
Volume+

Power
- Once in BIOS, release the buttons and navigate to Setup Utility. Use the D-pad to navigate in the BIOS and use the A button to select an item in the BIOS.

Open the Setup Utility in the BIOS of the Steam Deck - Navigate to the Power menu and select it.
- Navigate to the Battery Storage and enable it.

Enable Battery Storage Mode in the BIOS of the Steam Deck - The deck’s power LED will blink thrice to confirm the required mode is enabled and the deck will be switched off. Press the power button on the deck and the deck should not power on.
- Wait for 5 minutes and then to disable the battery storage mode, plug the Steam Deck into its charger.
- Power on the deck by pressing the Power button and once the deck’s Home screen is shown, plug everything into the dock (except the Power cable).
- Connect the deck to the dock and plug the dock’s power cable. Check if the dock is working correctly.
7. Reset the PD Controller of the Deck
The external Display controller (aka PD controller) is responsible for showing the deck’s screen through other connected devices (such as the dock). If the controller holds an invalid configuration of the dock, it will not pass the signal to the dock and thus cause the issue.
Here, resetting the PD controller of the deck will solve the problem.
- Disconnect everything from the deck and Shut Down it by holding its power button for 10 seconds.
- Press and hold the following buttons:
Volume Down

Quick Access (…)

Press the Quick Access and Volume Down Buttons on the Steam Deck - Press/hold the Power button and release the power button when a chirping sound is heard.
- Once the Steam logo is shown, release the Volume Down and Quick Access buttons.
- Wait till the deck boots. It may take time longer than usual.
- Once done, plug everything into the dock (except the power cable) and connect the deck to the dock.
- Plug back the dock’s power cable and check if the issue is

8. Edit the Graphics Settings of the TV and Deck
The dock will not be able to output the deck’s screen to the TV if the graphics settings of the TV and deck are not compatible with each other. Editing the graphics settings of the TV and deck to make them compatible will resolve the issue.
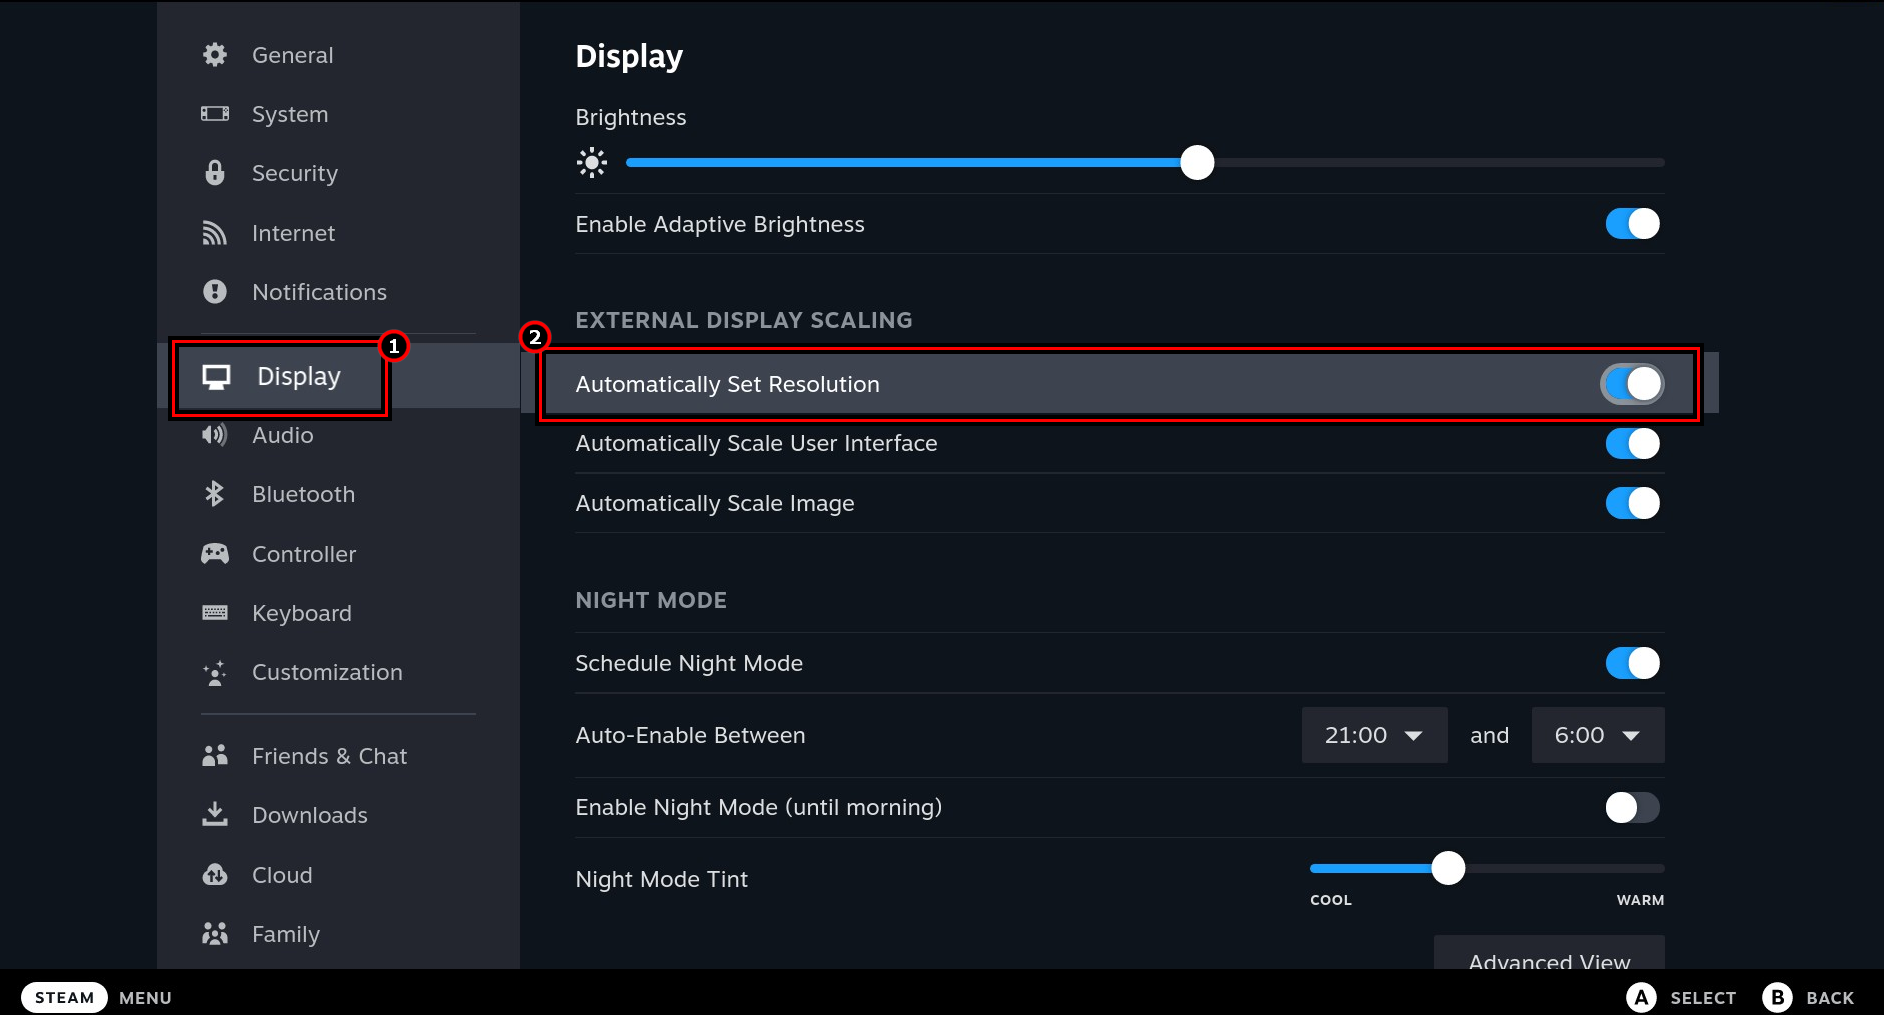
Change Output Resolution of the Deck
- Disconnect the deck from the dock and press the Steam button on the deck.
- Go to Settings > Display.
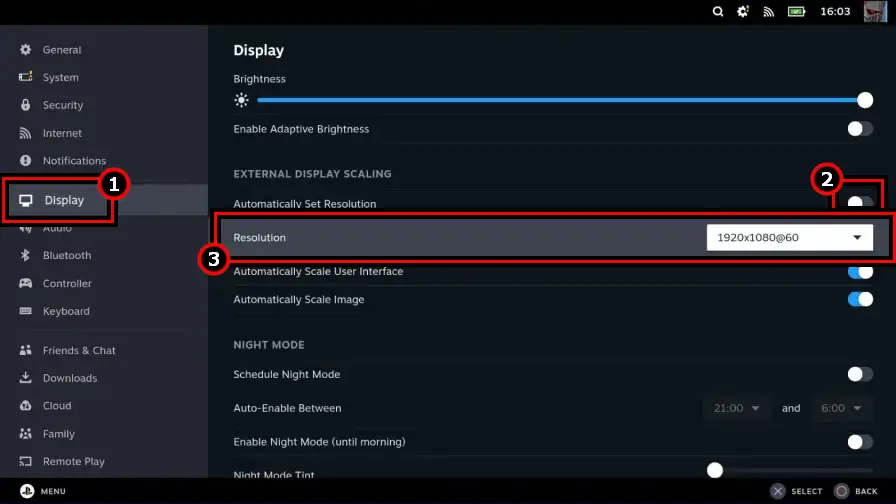
- Under Display Scaling, enable Automatically Set Resolution and connect the deck to the dock. Check if the dock is working correctly.

Enable Automatically Set Resolution in the Display Settings of the Steam Deck - If not, disconnect the deck from the dock and disable auto-set resolution.
- Set the resolution to 1440p 120Hz and connect the deck to the dock. See if the dock is working correctly.
- If this does not work, set the resolution to 1920×1080 @60 FPS and check if that clears the problem.

Change the Output Resolution of the Steam Deck - If the issue persists, check the screen resolution of your display unit and set the deck’s output resolution accordingly. Verify if the dock is operating properly.
- If the dock still does not work, set the deck’s FPS to 60 and check if the issue is cleared.
If you fail to change the screen resolution of the deck, use the mirror screen option in the desktop mode to mirror the screen to the TV. If it works, you can change the output resolution when the deck is docked.
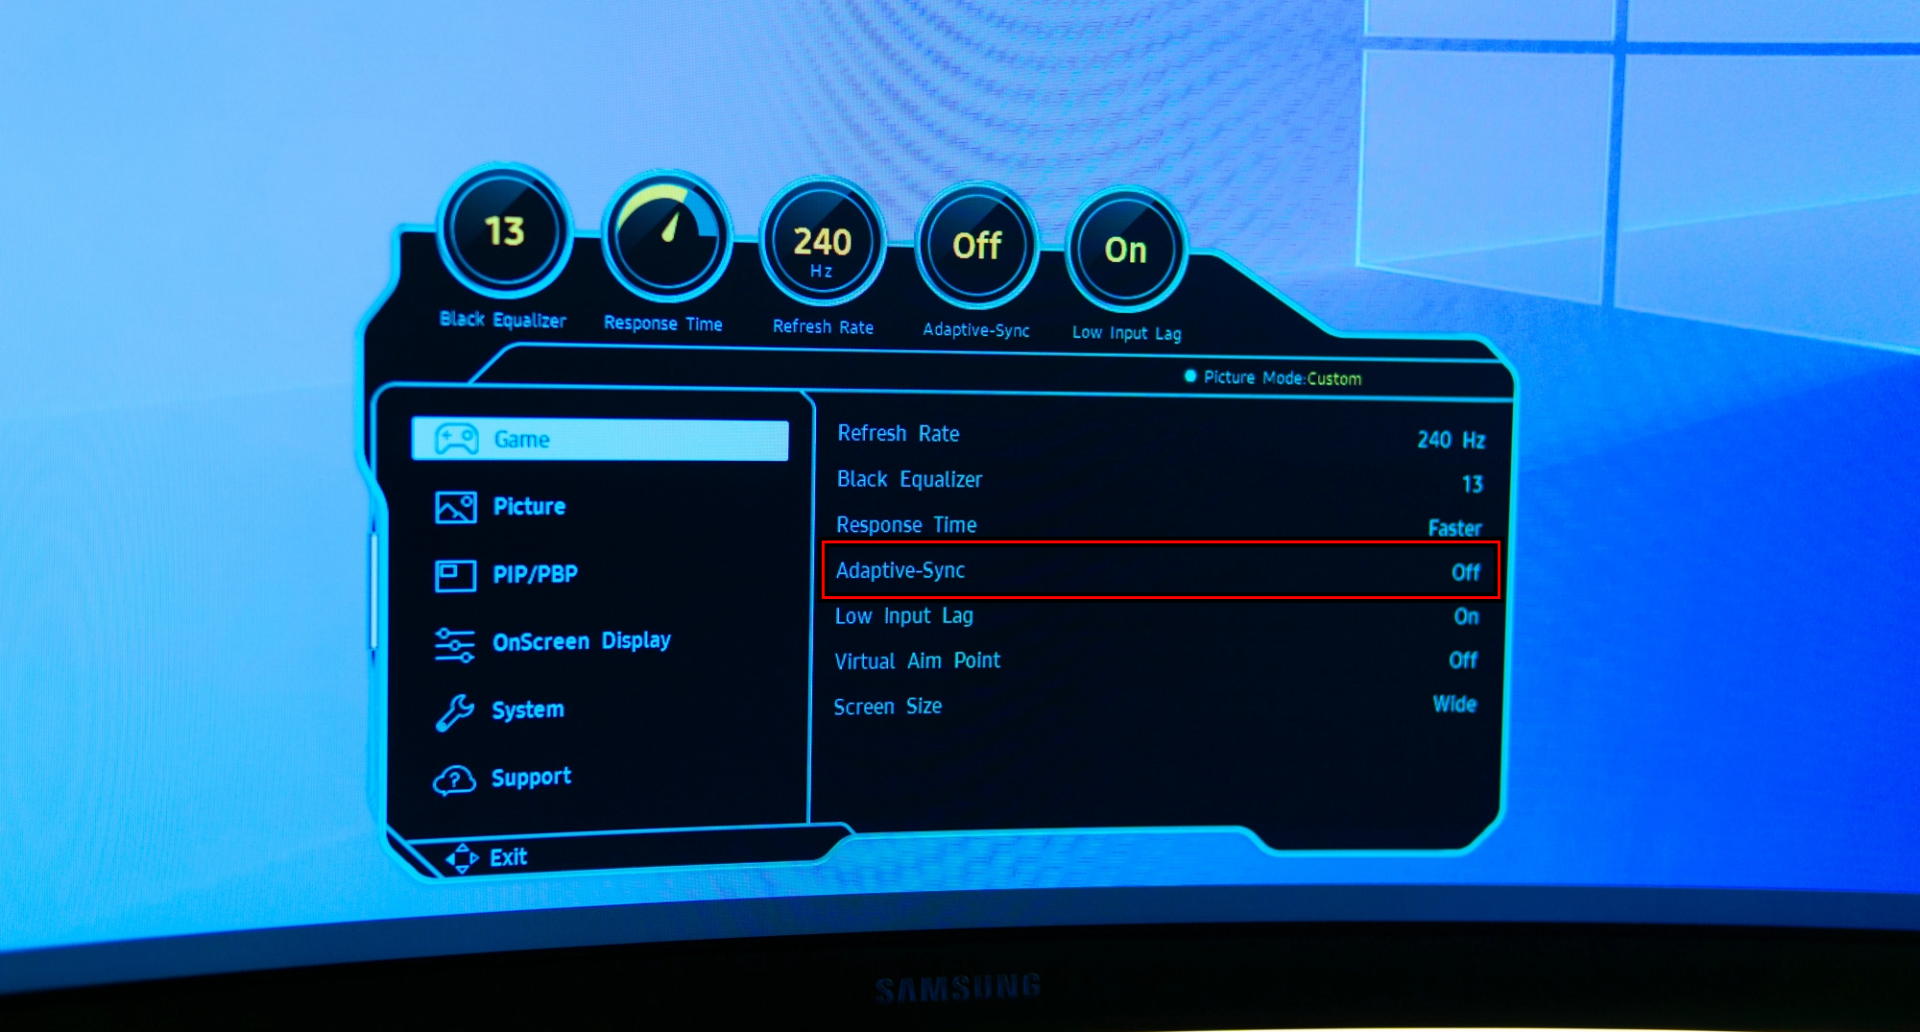
Disable Adaptive Sync on the Display Unit
To disable Adaptive Sync on a Samsung Odyssey G7 monitor:
- Open the Monitor Settings and go to the Game tab.
- Disable Adaptive Sync and check if the dock is functioning correctly.

Disable Adaptive Sync on a Samsung Odyssey G7 Monitor
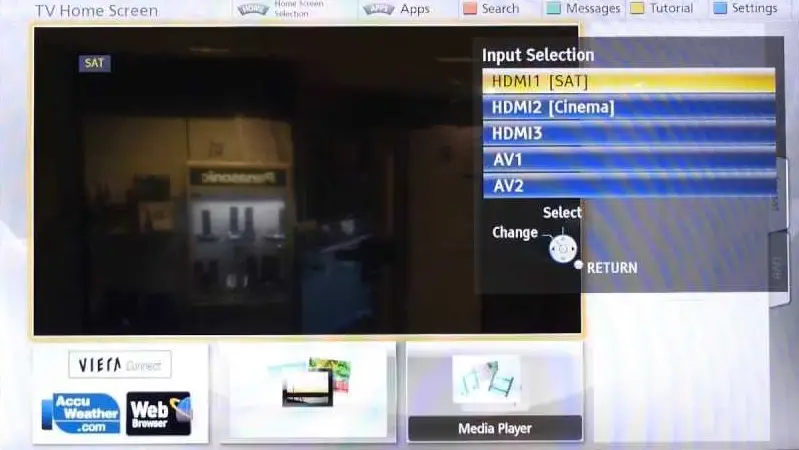
Change the Input to Extended on the Display Unit
To do so on a Panasonic TV:
- Press the Input button on the remote and select the HDMI port where the dock’s output cable is connected.

Change the HDMI Port Type in the Input Selection of the TV - Change it from Regular to Extended and check if the dock is functioning correctly.
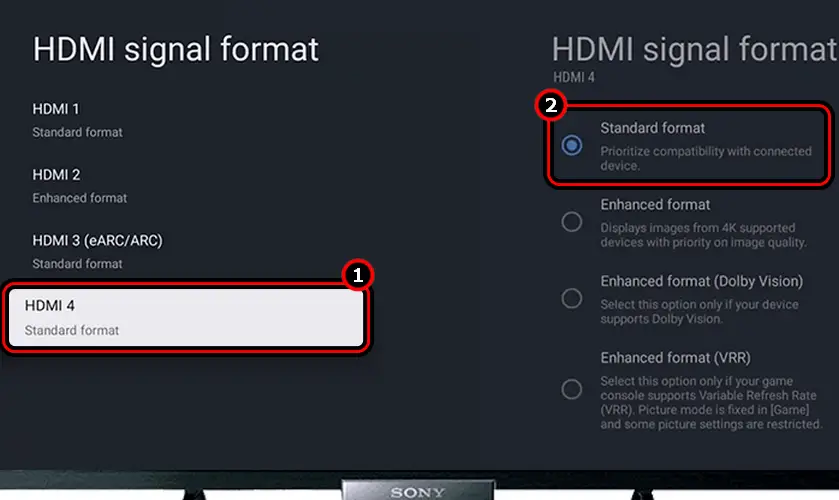
On a Bravia TV,
- Go to Settings > Options for External Inputs > Input for the Dock > HDMI Mode.
- Set it to Standard and check if that solves the problem.
Set the HDMI Signal Format of the Bravia TV to Standard
Enable and Disable Game Mode on the Display Unit
- Navigate to the TV Settings > General > External Device Manager.
- Enable Game Mode and then disable it. Check if the Steam Deck Dock is working correctly.

Open External Device Manager in the TV Settings
On a Sony TV you may enable or disable the Game Mode in Settings > Channels & Inputs > External Inputs > External Device Setup > Required Input > Game.
Change the Refresh Rate of the Deck and Display Unit
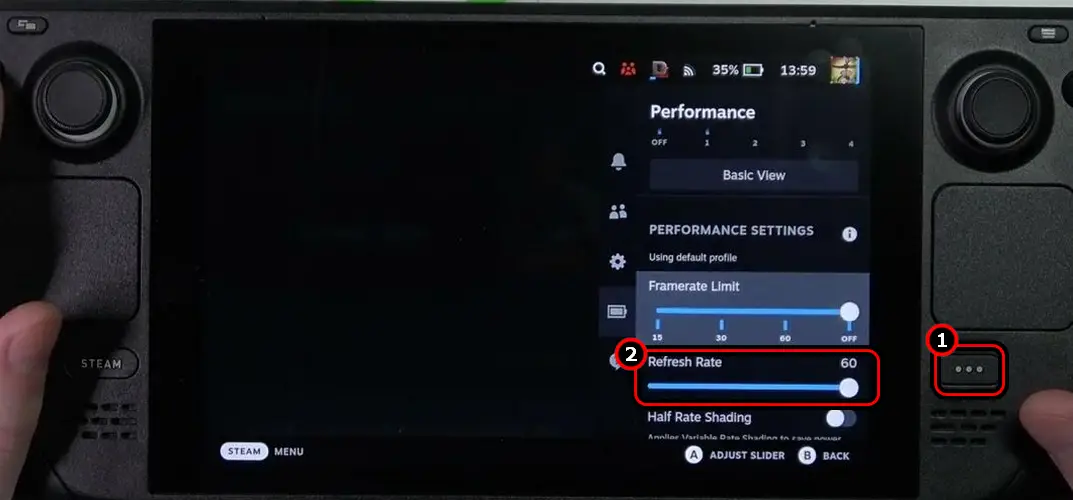
- Press the Quick Access button and navigate to Performance and Advanced View.
- Set the Refresh Rate to 60Hz and check if that makes the dock work. For some games, you may need to use 30FPS.

Change the Refresh Rate to 60 in the Steam Deck Performance Settings - If not, lower the refresh rate of the display unit to 120 and check if that solves the problem.
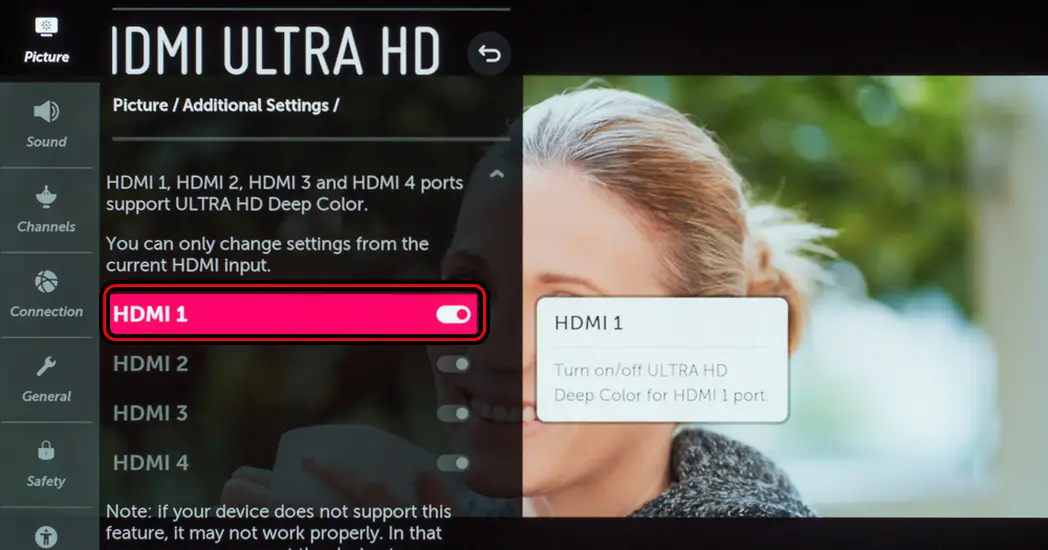
Enable HDMI Ultra HD Deep Color
To do so on an Onkyo TX-NR676:
- Navigate to All Settings > Picture > Additional Settings > the input port where HDMI from the dock is connected.
- Enable HDMI Ultra HD Deep Color and check if that clears the issue.

Enable HDMI Ultra HD Color for the Port the Dock is Connected
9. Edit Windows Settings on the Deck
If you are using Windows on your deck and the dock is failing to work with that, editing certain Windows settings will solve the problem.
Enable HD Audio Device in the Device Manager
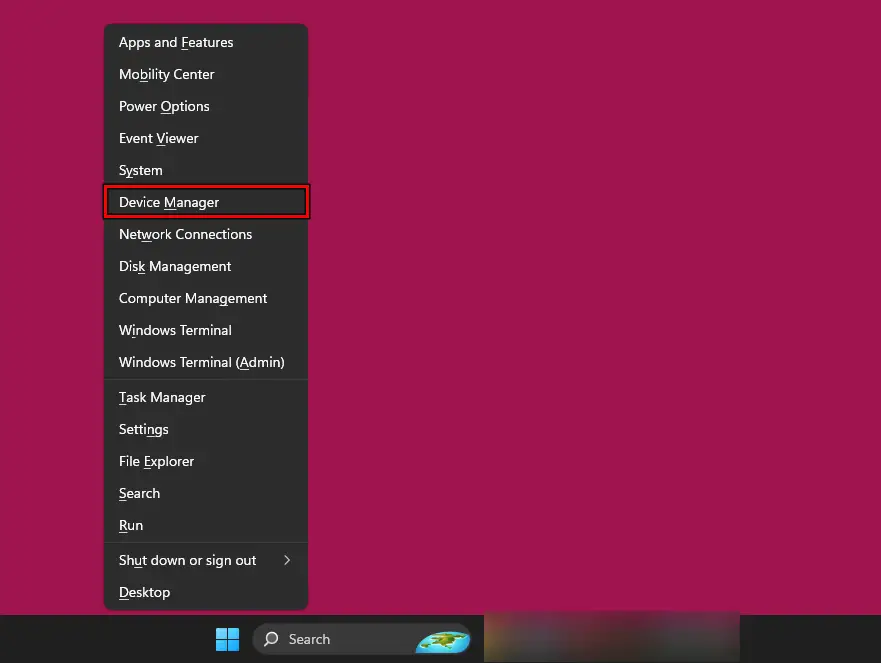
- Right-click Windows and select Device Manager.
- Expand System Devices and enable High Definition Audio. If it is already enabled, disable it and then enable it. Check if the problem is solved.

Enable HD Audio Controller in the System Devices of Windows

Reinstall APU Drivers
- Download the latest APU driver of the Steam Deck.
- Open Device Manager and right-click on the APU Drivers.

Open Device Manager Through the Quick Access Menu - Select Uninstall Device and checkmark Attempt to Remove the Driver of This Device.
- Click on Uninstall and once done, restart the deck.
- Reinstall the APU Driver as an administrator and once done, check if the dock issue is cleared.
10. Reset the TV to the Factory Defaults
The dock will not be able to output the deck’s screen to the TV if the TV holds inaccurate configurations for the HDMI ports. This might have occurred when hot-swapping the HDMI cable from the deck to other devices (such as Xbox, PS4, etc.).
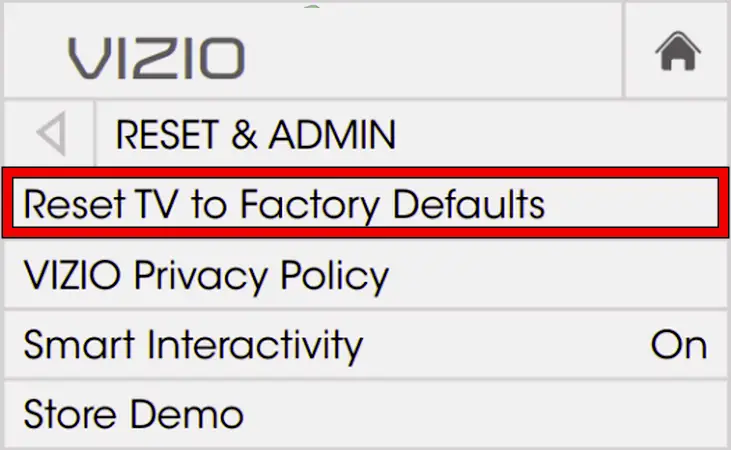
Here, resetting your TV to the factory defaults will solve the problem. Before resetting, do not forget to back up the essentials. To reset a Vizio TV:
- Launch the Vizio TV Settings and go to System > Reset and Admin.
- Select Reset TV to Factory Defaults and confirm to do so.

Reset the Vizio TV to the Factory Defaults - Once completed, set up the TV as per your requirements and check if the dock is working.
If the issue persists, you may reset the Steam Deck to the factory defaults and check if that resolves the issue. If this does not work, contact Steam or Valve support and if the deck is under warranty, claim a replacement deck.