Before Windows 8, people used a local account to sign in to their Windows computers or laptops and use its services. But ever since Microsoft released Windows 8 and Windows 10, the company has put an option of getting started with a Microsoft account to get some extra privacy and other features.
How does Microsoft Prioritize the Microsoft Account Over Local Account?
To prioritize the Microsoft account, Microsoft has put the option of signing in or signing up with a Microsoft account first while setting up Windows. So, most users click on that option. But there is also an option that says ‘Continue with Limited setup’ and clicking on that will begin the local account creation process.
A lot of users miss this little detail and that is why we have come up with a procedure for how to switch from a Microsoft to a local account.
Why Would You Need to Switch to a Local account?
There can be numerous reasons including you wanting to sign out of your Microsoft account if you are transferring your machine to someone else.
The switching is also useful when troubleshooting some issues related to Windows 10.
How to Switch from a Microsoft to a Local Account? – The Steps
We have followed the steps according to Windows 10 but the same steps apply to Windows 8 and 8.1. No doubt the interface will be different, but you can look for the same ‘Settings’ in Windows 8 or 8.1.
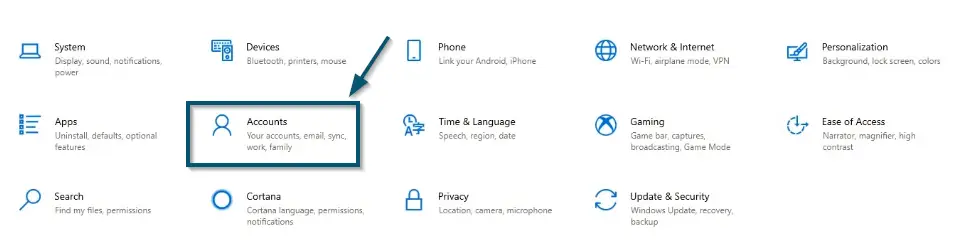
- First, head over to the Settings option from the start menu.

Clicking on the ‘Windows’ icon and then, clicking on the ‘Settings’ option to open the ‘Settings - Then, choose the ‘Accounts’ option inside the ‘Settings’ window.

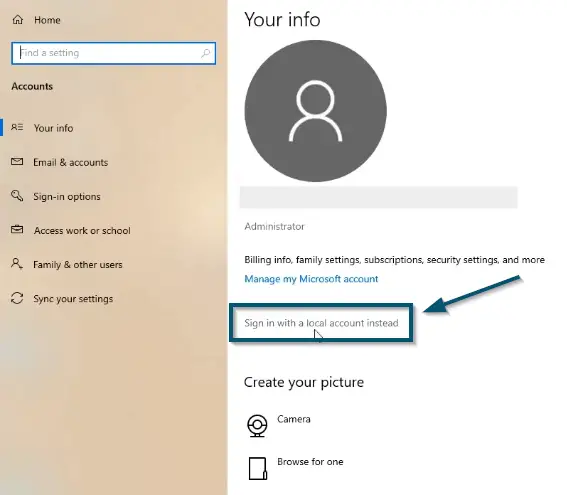
Choosing the ‘Accounts’ option inside the ‘Settings’ window - After that, you’ll click on the ‘Sign in with a local account instead’ option in the ‘Your info’ option.

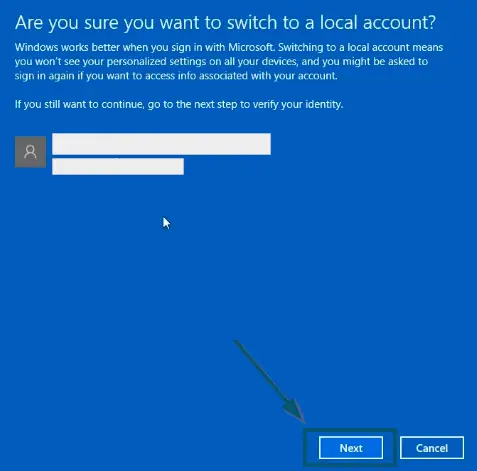
Clicking on the ‘Sign in with a local account instead’ option - Windows will show some details regarding how you won’t be able to see the personalized settings on other devices using the same Microsoft account. So, click on the ‘Next’ button.

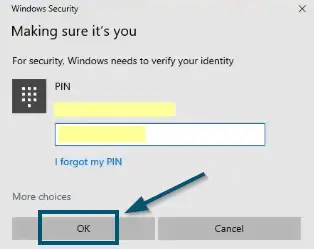
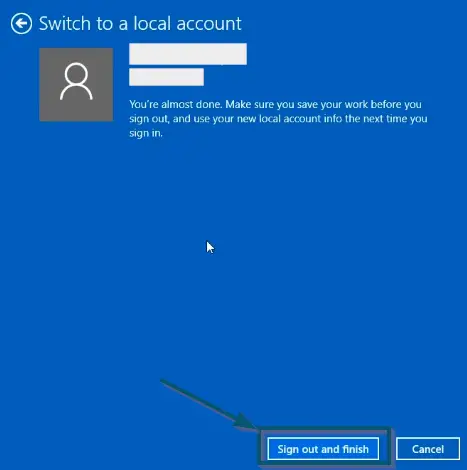
Clicking on the ‘Sign out and finish’ button to complete the switching from Microsoft to a local account process - Now, Windows will ask you to enter your local account pin. Input the pin and hit the ‘Enter’ key. Keep in mind that you will use this pin to login into your computer. So, choose a pin you can remember.

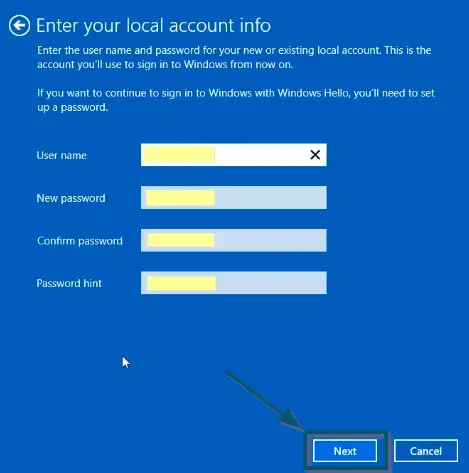
Entering the pin of your local account - After that, Windows will ask you for some more details. So, input the required details and click on the ‘Next’ button.

Entering the required information for local account creation and clicking on the ‘OK’ button - Lastly, click on the ‘Sign out and finish’ button to complete the process.

Clicking on the ‘Sign out and finish’ button to complete the switching from Microsoft to local account process
Conclusion
This is the easiest method to switch from a Microsoft account to a local account. You can also switch to the local account through the command prompt but it is complicated and we recommend you follow this method.
