Nintendo Switch fails to connect to the WiFi network usually because of router problems and system glitches. Switch might not connect to your home network but easily connect with a mobile hotspot. This is a very common occurrence and happens every now and then in all Switch models.

What Causes this Issue
There can be numerous reasons for the connectivity issue between the WiFi and Nintendo Switch but the following are found to be mainly responsible for it:
- Outdated firmware of the Nintendo Switch: If the firmware of the Nintendo Switch is outdated, then its incompatibility with the router may cause connecting issues.
- Corrupt Cache of the Nintendo Switch: If the cache of the Nintendo Switch is corrupt, then Switch may fail to connect to WiFi as some of the essential network modules may fail to use the cache.
- Improper Value of the Nintendo Switch’s MTU: If the MTU value of the Nintendo Switch is not compatible with the router, then the router may not let the switch connect to it.
- Improper Configuration of the Router: There can be various router settings that may stop the switch from connecting to the WiFi. These settings may include maximum clients of the WiFi, MAC address filtering, high-performance network devices, a router encryption protocol, or frequency band of the router, etc.
How to Fix it
Here are some of the common workarounds that worked for numerous other users. Start with the first one and work your way down accordingly.
1. Restart Your Switch and Router
The WiFi connection issue of the Nintendo Switch could be the result of a temporary communication glitch between the router and the switch. Here, restarting both devices may solve the problem.
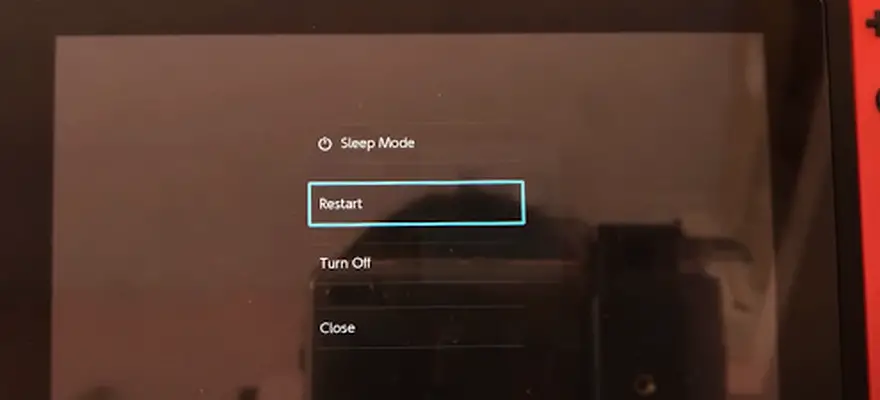
- Firstly, get close to the router as close as possible and then press/ hold the power button on the Nintendo Switch for 5 seconds to bring out the power menu.
- Now select Reboot and upon reboot, check if the Switch can be successfully connected to the WIFI.

Restart the Nintendo Switch - If the issue persists, then check if restarting the switch and router clears out the issue.
- If that did not work, check if fully draining the battery of the switch and then charging it back to full (i.e., 100%) solves the WIFI issue.
- If the issue continues, power off the switch and leave it overnight. Afterward, on the next morning, power on the switch and check if it is working fine.
Some users reported that the Switch lost the WiFi connectivity when connected to the dock or going to sleep, so, make sure that is not the case with you.
2. Update the Firmware to the Latest Build
If the firmware of your router is outdated, it may not be compatible with the router’s protocols and thus fail to connect to it. In this context, updating the firmware of the Nintendo Switch to the latest build may solve the problem. As the switch is not connecting to the WiFi, then you may either use an ethernet connection or try the phone’s hotspot.
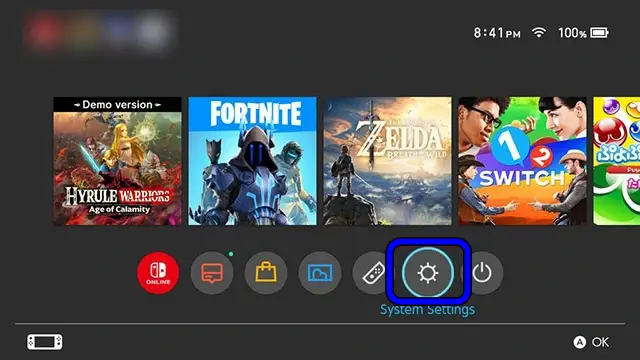
- Open System Settings of the Nintendo Switch and head to its System tab.

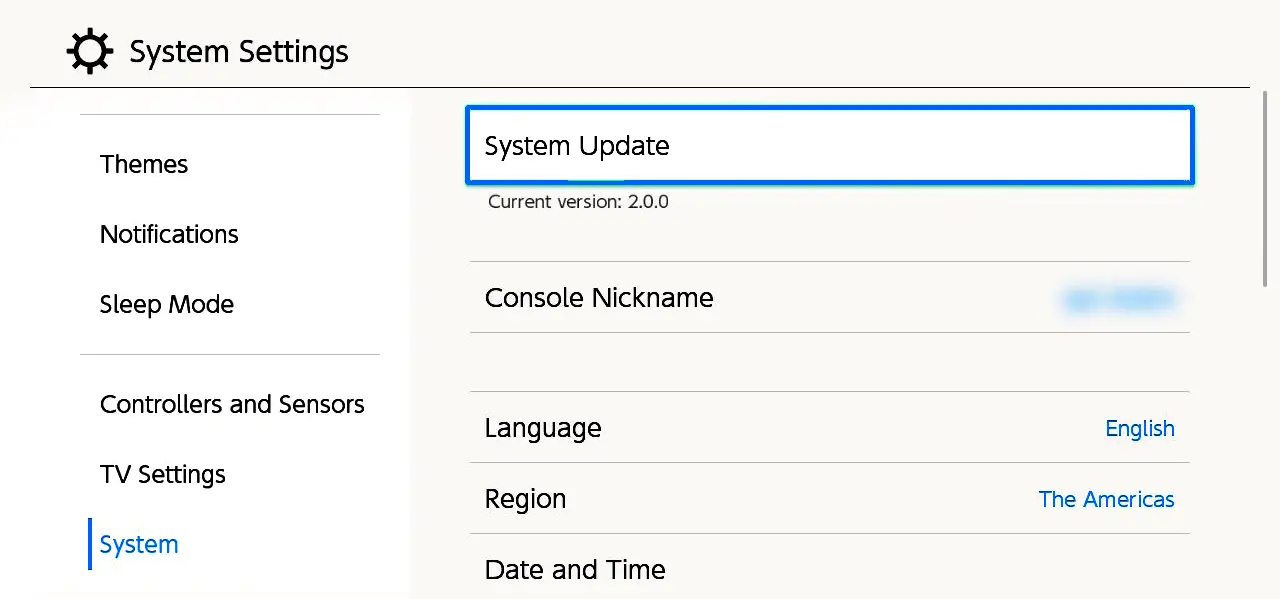
Open System Settings of the Nintendo Switch - Now click on the System Update option and if an update is available, download and install it.

System Update of the Nintendo Switch - Once updated, restart your switch and router.
- Upon restart of both devices, check if the Nintendo Switch can make a successful WIFI connection.
3. Re-Add the WiFi Network to the Nintendo Switch
The WiFi connection issue of the Nintendo Switch can be the result of a temporary glitch in the networking modules of the switch and re-adding the WiFi network may solve the problem. But before that, make sure to disconnect the joy-cons from the switch and leave them in another room as these are reported to cause interference with the WiFi signals.
- Open the System Settings of the Nintendo Switch and head to the Internet tab.
- Now, in the right pane, select Internet Settings and click on the problematic network.

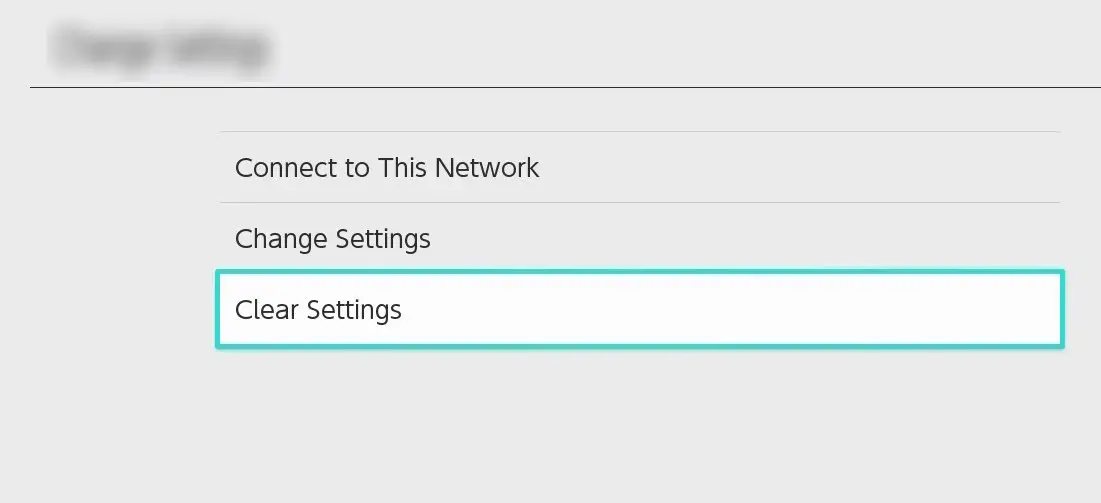
Open Internet Settings of the Nintendo Switch - Then click on Clear Settings and afterward, confirm to clear the WIFI network settings.

Select the Problematic WIFI in the Internet Settings of the Nintendo Switch - Now restart the Nintendo Switch and upon restart, re-add the WiFi network to check if the issue is resolved. You may have to press the Y button on the controller when at the Internet Settings screen to search for the network.

Clear Settings of the Problematic WIFI in the Nintendo Switch - If that did not work or you are one of those users for which the WiFi connects but no Internet connection is available to the switch, then check if adding another DNS (Google, Cloudflare, etc.) entry to the Internet Settings of the Nintendo Switch and setting a manual IP of the switch solves the issue.


4. Clear Cache of Nintendo Switch
If the cache of the Nintendo Switch is corrupt, then it may fail to connect to WiFi as many network modules use the cache for different operations. Here, clearing the Switch’s cache may solve the problem.
- Open the System Settings of the Nintendo Switch and head to its System tab.
- Now, in the right pane, click on the Formatting Options, and in the resulting window, click on Reset Cache.

Open Formatting Options of the Nintendo Switch - Then select the problematic user and click on Reset.

Clear Cache of the Nintendo Switch - Once the cache reset is complete, restart the switch and upon restart, check if the Nintendo Switch WIFI issue is resolved.


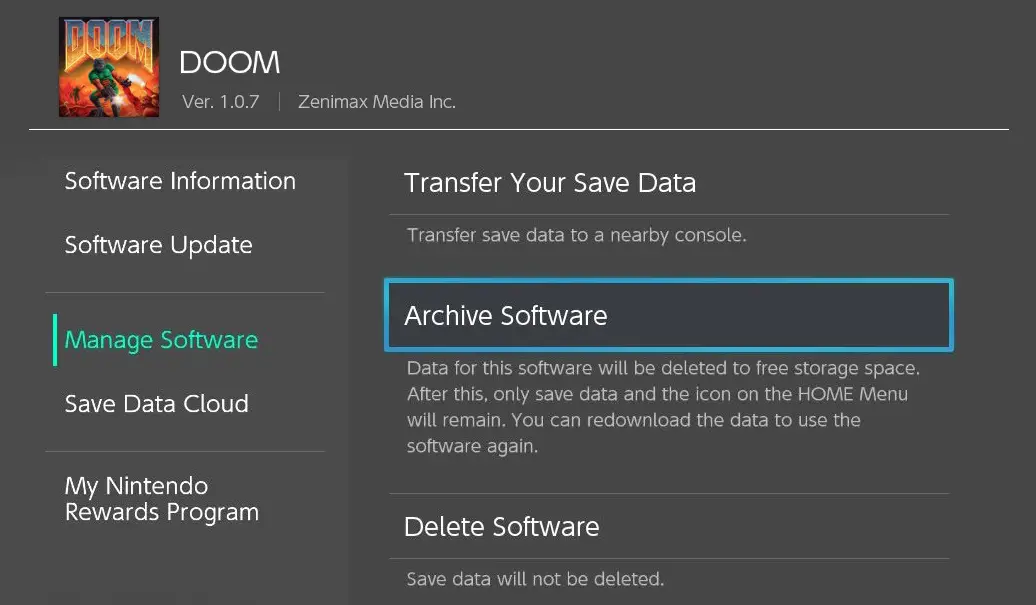
5. Uninstall or Archive Doom Game
The game Doom is reported to cause WiFi issues for many users and if you have installed the game on Nintendo Switch, then it may be the cause of the WiFi issue. Here, uninstalling or archiving the Doom game may solve the problem.
- Hover over the Doom game and open its Game Options.
- Now head to the Manage Software tab and select Archive Software.

Archive Doom Software on the Nintendo Switch - Then confirm to archive the game and afterward, check if the WiFi issue is resolved.
- If not, then check if deleting Doom on the Nintendo Switch solves the problem.
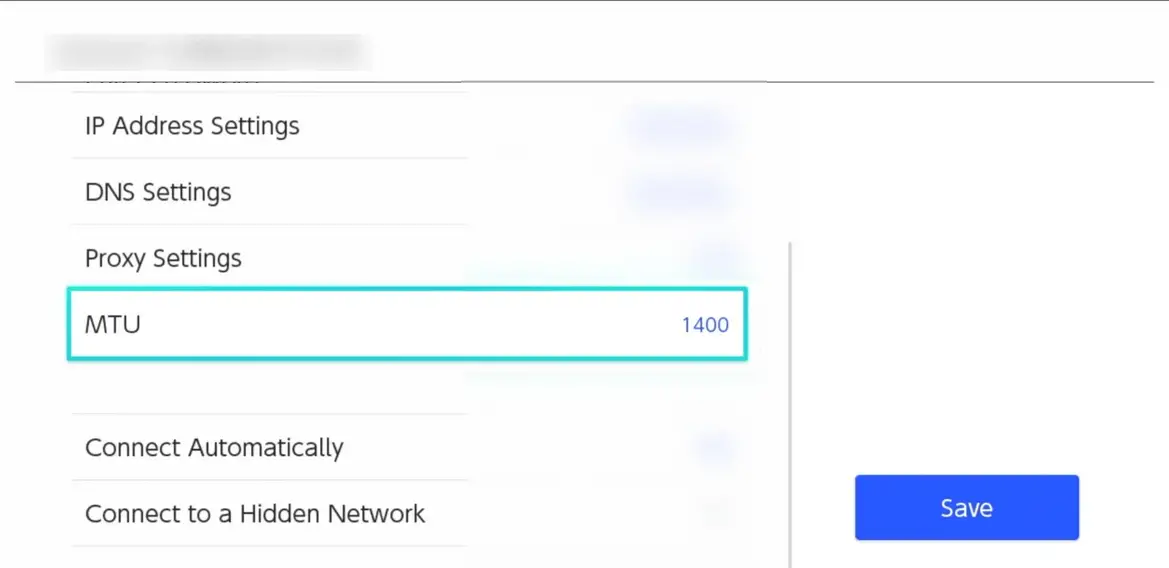
6. Change the MTU Value of Nintendo Switch
The MTU (Maximum Transmission Unit) is the size of the largest data packet that can be broadcasted in a single network-layer transaction. If the MTU value at which the Nintendo Switch is transmitting is not compatible with the router then Switch may fail to connect to the WiFi. In this scenario, changing the MTU value of the Nintendo Switch may solve the problem.
- Open the System Settings of the Nintendo Switch and head to the Internet tab.
- Now select Internet Settings and then open Connection Settings.
- Then select the Connection File you want to edit and click on Change Settings.
- Now select the Right Arrow and click on MTU Value.
- Then set the new entry to 1500 after deleting the old entry and apply your changes.

Set MTU Value of the Nintendo Switch to 1500 - Once done, restart your Nintendo Switch and router.
- Upon restart, check if the Nintendo Switch can connect to the WIFI.
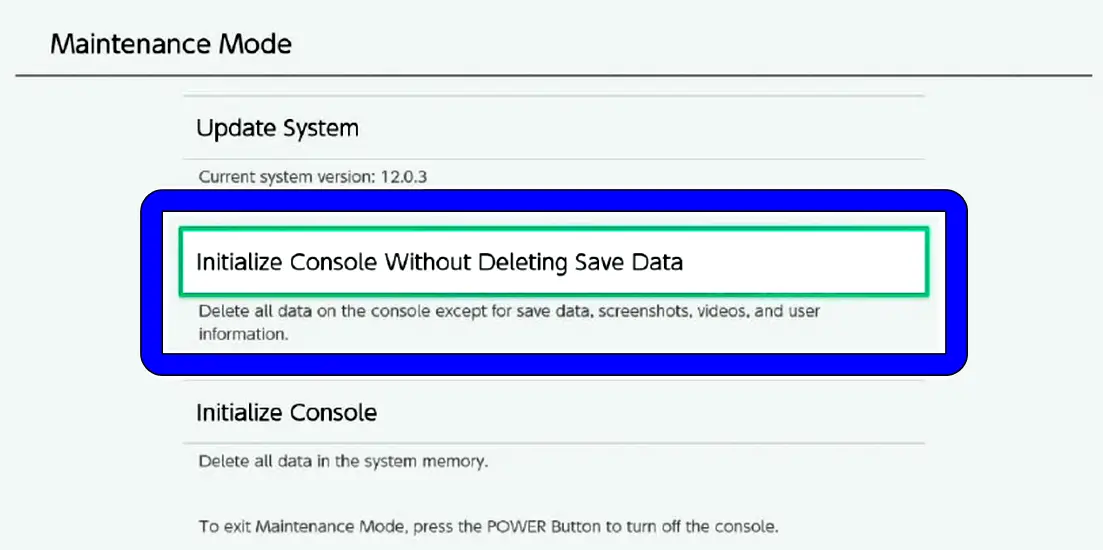
7. Initialize Nintendo Switch without Deleting Saved Data
If the WiFi connection was not added at the first initialization of Switch, then due to a glitch, it may fail to connect to the WiFi. In such a case, initializing Switch without deleting the saved data may solve the problem. Keep in mind that the saved data on the SD card will not be valid anymore after this step.
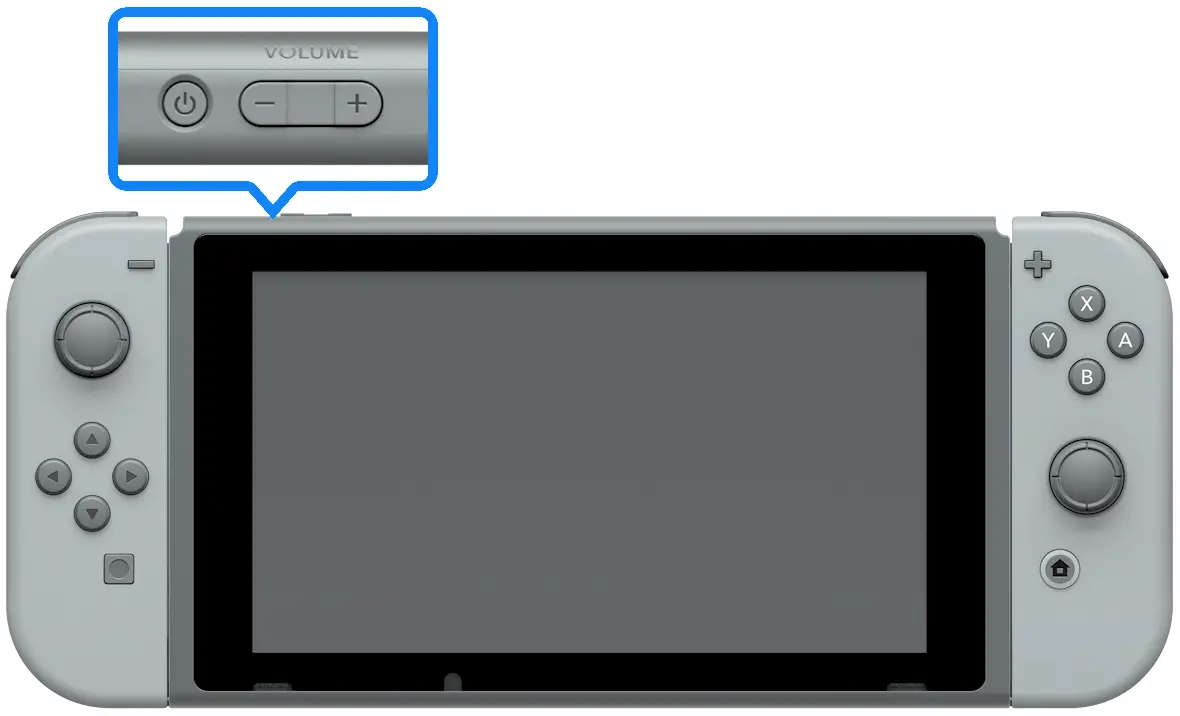
- Firstly, completely turn off Switch.
- Now, press/hold the Volume + and Volume – buttons.
- While keep holding both buttons, press (not hold) the Power button, and when the Maintenance Mode screen is shown, release the volume buttons.

Press, Hold the Volume Buttons, and Press the Power Button of the Nintendo Switch - Now, in the Maintenance Mode, select Initialize Console Without Deleting Saved Data and follow the instructions on the screen to complete the process.

Initialize Nintendo Console Without Deleting Saved Data - Once done, restart your switch and router.
- Upon restart, check if the Nintendo Switch can make a successful connection to the WiFi.
8. Edit the Router Settings
There can be many misconfigurations of your router that may stop the Nintendo Switch from connecting to the WiFi and properly configuring these settings might solve the problem. These settings may include encryption, MAC address blacklisting, high-performance devices, max connections, etc.
Keep in mind, due to the variety of the routers and manufacturers, the steps mentioned below might differ for some users, but general guidelines will be the same.
Increase Maximum Connections of the Router
- Navigate to the web portal of the router in a browser and head to its Wireless settings.
- Now, set the Maximum Clients to a higher limit (e.g., from 5 to 10) and apply your changes.

Increase Maximum Clients in the Router Settings - Then check if the Nintendo Switch can connect to the WIFI without any issue.

If that did not work, then check if disconnecting other devices (mobiles, laptops, etc.) from the WiFi solves the Nintendo Switch problem.
Whitelist the MAC Address of the Nintendo Switch in the Router Settings
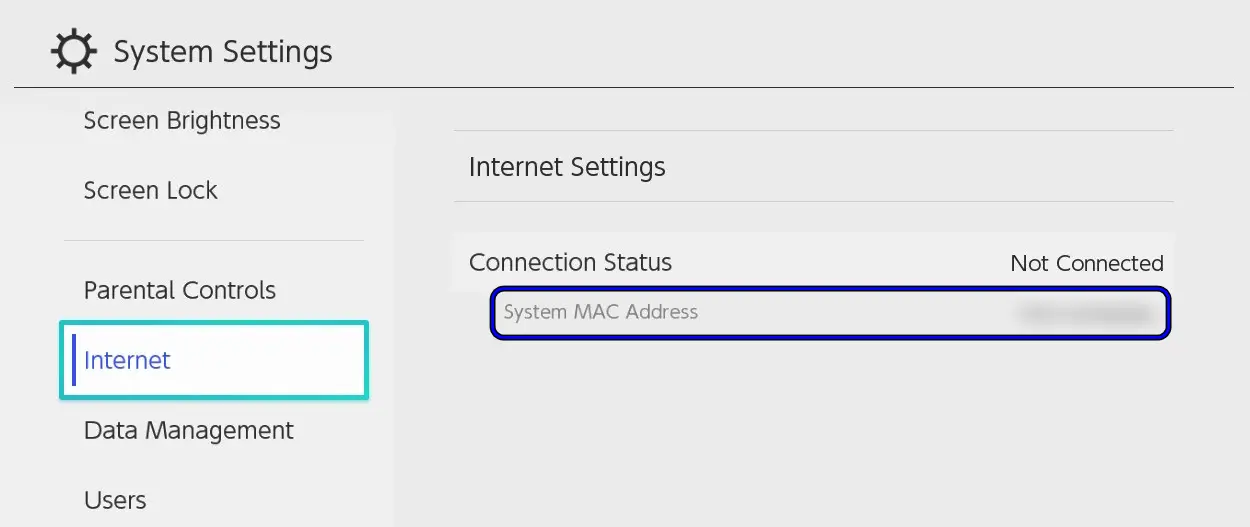
- Open the System Settings of the Nintendo Switch and head to its Internet tab.
- Now note down the Switch’s MAC address under System MAC Address and head to the web portal of the router in a browser.

Check the MAC Address of Nintendo Switch - Then, head to the Wireless or WLAN section and open the WLAN MAC Filter.
- Now, check if the MAC address of the Nintendo Switch is added to the Block List. If so, then remove the MAC Address of the Nintendo Switch and apply your changes. Afterward, check if Nintendo Switch’s WIFI issue is resolved.
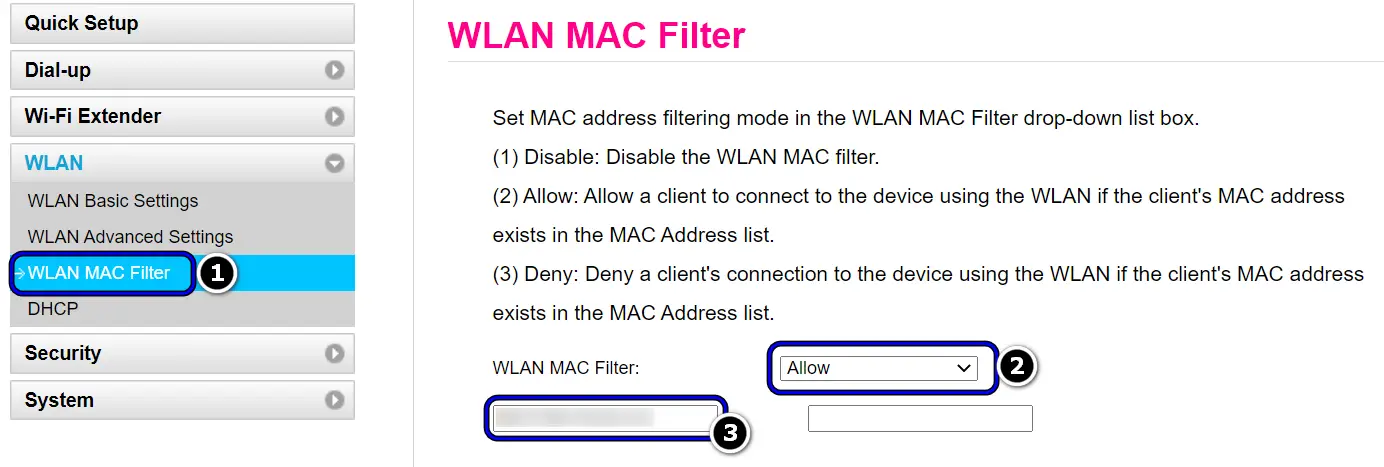
- If the issue persists or the MAC address is not added to the blocked list, open the dropdown of the MAC Filter in the router settings and select Allow.

Allow the MAC Address of the Nintendo Switch in the Router Settings - Now enter the Switch’s MAC filter in the relevant column and apply your changes.
- Then check if the Nintendo Switch is connecting to the WIFI.
- If that did not work, check if the Nintendo Switch’s IP address is not blocked in the WIFI settings. You may find the setting under Internet Access Control Planning. Keep in mind that many routers have the settings to block access by a device’s name, so, make sure that is not the case with the switch.
- If you have set up an Access Control on your router, then that may not let the switch connect to the WIFI. If so, then disable the Access Control in the router and retry to connect to the WIFI from the switch. Once connected, then you may enable back the access control in the router settings.
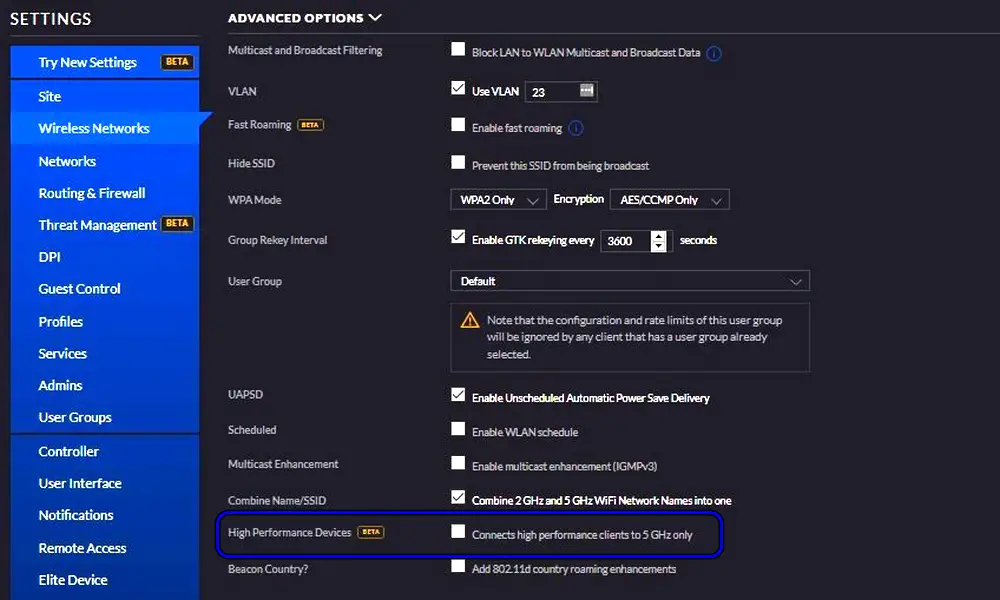
Disable High-Performance Devices or Auto-Optimize Network
- Navigate to the web portal of the router and head to its Wireless or WLAN section.
- Then select your network and click on Edit.
- Now click on Advanced and disable the High-Performance Devices option.

Disable High-Performance Devices in the Router Settings - Then apply your changes and restart your router to check if the Nintendo Switch’s WIFI issue is resolved.
- If not, head to the router’s web portal and open Network Settings.
- Now, disable Optimize network option and check if the Nintendo Switch is working fine.
Change the Router Encryption Protocol and Rename the WIFI
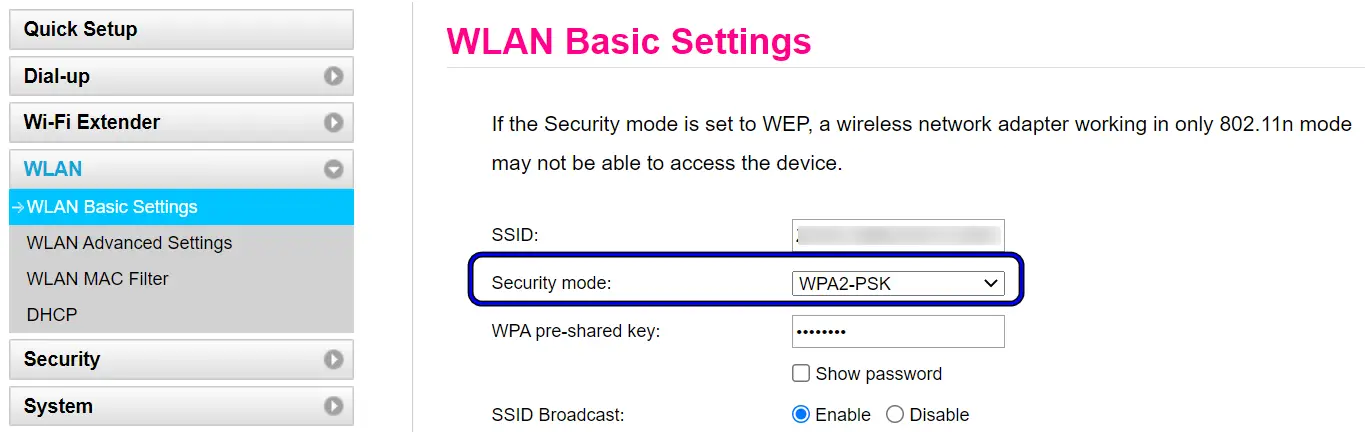
- Open a browser and navigate to the router’s web portal.
- Now, head to the Wireless or WLAN section and change the security mode of the WIFI to WPA2.

- Change the Security Mode of the WIFI to WPA2
- Then apply your changes and restart your router.
- Upon restart, check if the Nintendo Switch is making a successful connection to the WIFI.
- If not, check if setting the Security Mode of the WIFI to WPA/WPA2 solves the problem.
- If that did not work, check if reverting the router’s Security Mode of the router to the default clears out the issue.
- If that did not work, check if renaming the WIFI and creating a new password for it solves the problem.
Use the Other Frequency Band of the Router
- Launch the web portal of the router in a browser and head to its Settings.
- Now select Wireless and in the General tab, uncheck 2.4GHz WIFI.
- Then, checkmark Enable 5GHz WIFI and apply your changes.

- Enable 5GHz Band in the Router’s Settings
- Now check if the router can connect to the WIFI.
- If not, check if using the 2.4GHz after disabling the 5GHz in the router settings clears out the WIFI issue at hand.

If none of the bands did the trick, check if using the N Mode of the router clears out the issue.
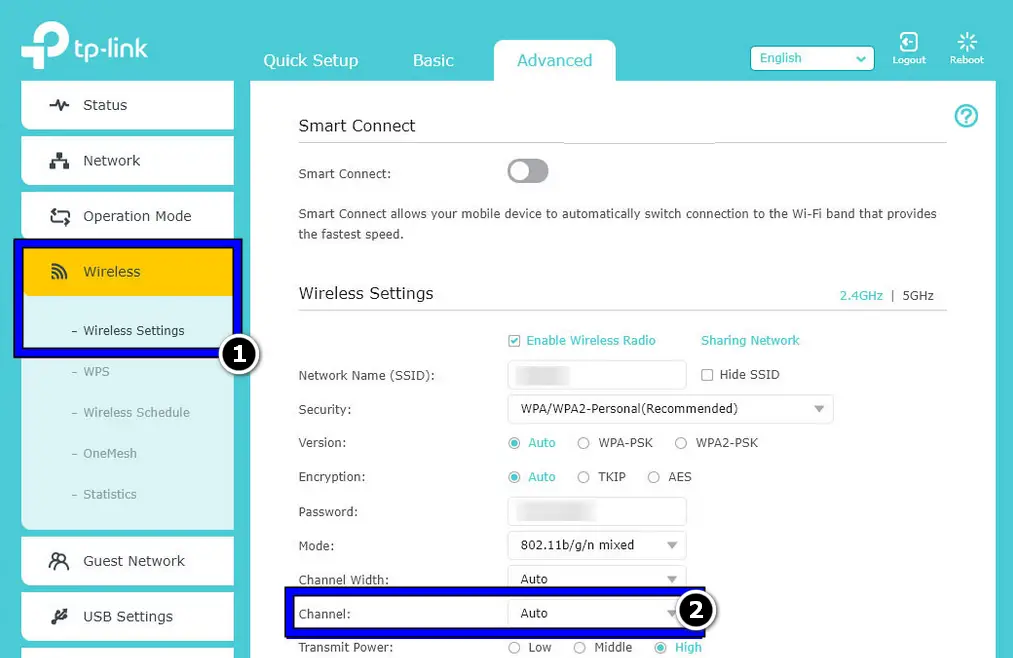
Change the Router’s Channel
- Navigate to the router’s web portal in a browser and head to its Advanced Settings.
- Then expand Wireless and expand the Channel dropdown.
- Now select a channel of 140 or above and check if that resolves the WIFI issue. In the case of a 5GHz band, you may set the channel to 48.
Reset the Router to the Factory Defaults
- Firstly, make sure to back up credentials and other settings that are required to set up your router.
- Now locate the reset button on the router (usually on the back or bottom) and press/hold the reset button (with a pointy object like a paper clip) till the router restarts.
- Then un-hold the reset button and set up the router as per the ISP’s instructions.
- Once done, check if the Nintendo Switch can connect to the WIFI.
If resetting the router did not do the trick, then check if updating the router’s firmware (either manually or automatically) solves the problem. If the issue persists, check if setting up a DMZ on the router (strictly, not recommended) clears out the issue. If none of the above did the trick, check if using another router or extender solves the problem.
