Windows has detected an IP Address Conflict occurs when the IP address on your Windows operating system is in conflict with another device using the same IP address. This is a very common networking issue that has been occurring since Windows was launched.
Over Windows’ recent iterations, this error is moved to Event Viewer logs and you can still see it when you open the entries. In older versions, you will probably get a pop-up error message whenever this happens.
What causes ‘Windows has detected an IP Address Conflict’
Let’s break it down in layman terms. Consider your router as a postman who delivers packets of data from the internet. The IP address assigned to your computer is your postal address.
Whenever the postman wants to deliver a packet of data to you, it looks up your IP address and delivers your packet. The IP Address Conflict occurs when more than one device has the same postal address. In this case, the postman gets confused and hence there is a conflict and you see the error message.
Difference in IP Address Conflict Errors in Windows 10 and Windows 8, and 7
In Windows 10, the IP address conflicts were removed as pop-up error messages and instead, were incorporated in your system error logs. This was confirmed by a Microsoft Network Engineer.
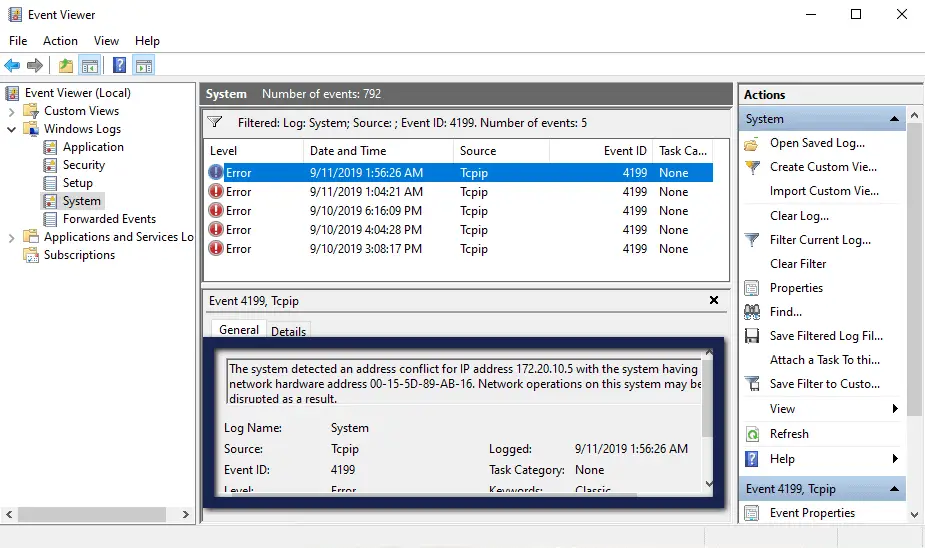
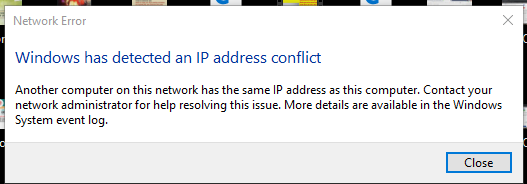
For Windows operating systems released prior to Windows 10, the error message is displayed in a dialogue box that pops up on your screen.
Is my Computer getting Hacked?
No, your computer is not getting hacked in any way. This networking error message is a very common issue and is mostly fixed by very simple workarounds that anyone can follow.
Even though it is ‘possible’ that your computer can get hacked, there is nearly a 99.99% chance that it isn’t considering that you are using a network at your house or in your workplace.
How to Fix ‘Windows has detected an IP Address Conflict’
There are usually two cases where you might experience this issue. Either at your own home with your personal network or in your workplace. In the case of your workplace, you should contact your network administrator to look into the issue as they might have assigned the IPs in a static manner.
1. Restart your Router
If you are using a home network, the first thing you should do is restart your router and your computer. This will force the DHCP to get reset and eventually assign your computer an IP address that doesn’t conflict with other devices.
- Disconnect your computer from the connected network.
- Next, plug out the power of your router from the main switch. If possible, press and hold the power button for 5 seconds additional power can be drained.
- After waiting for 2 minutes, plug everything back in and after your router has started working, connect to it again and see if the issue is resolved.
2. Refreshing your IP Address Manually
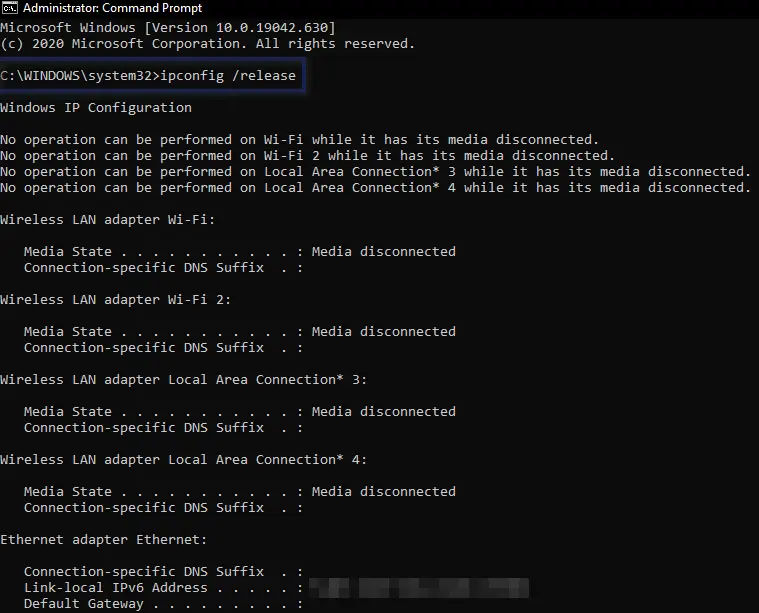
If power cycling your router doesn’t work, we can attempt to manually refresh your IP address from scratch and see if this does the trick. Windows has an inbuilt command to do this. First, we will ask it to release the IP address, and next, we will request a new one. This will resolve the conflict instantly.
- Search for ‘command prompt’ in the search dialogue box in Windows and click on Run as Administrator.
- After at the elevated command prompt, write the following commands followed by an enter after each one:
ipconfig /release

ipconfig /release – Windows ipconfig /renew

ipconfig /renew – Windows - Now test your network and see if the conflict is resolved.

3. Removing Static IP Address
Another reason why you might be getting ‘Windows has detected an IP Address Conflict‘ is because you have a static IP address set in your network adapter’s settings. A static IP address is an IP address that you define explicitly. You will not be assigned a random IP address by the router.
In this case, if another computer has got the static IP assigned by the router, you will enter a conflict. Here, we will navigate to your adapter settings and remove the static IP address.
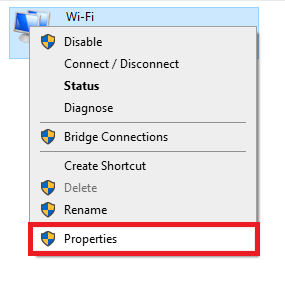
- Press Windows + R, type ‘ncpa.cpl‘ in the dialogue box and press Enter.
- Here, all your computer’s adapters will be listed. Right-click on the one you are using and select Properties.

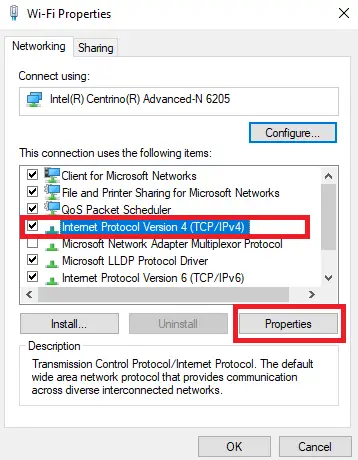
Properties of Network Adapter - Next, click on ‘Internet Protocol Version 4 (TCP/IPv4)’ select ‘Properties’.

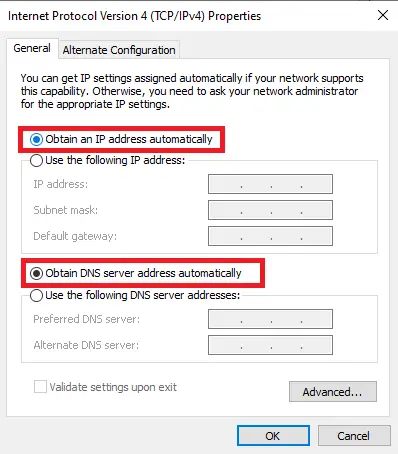
IPv4 settings of Network Adapter - Now select the following options:
Obtain an IP address automatically
Obtain DNS server address automatically

Removing Static IPs - Save changes and exit. Reconnect to your network after disconnecting and see if the issue is resolved.
Note: You can also try disabling and then enabling your network adapter and see if this does the trick. You can get this option when you right-click on your adapter as we did in this solution.
4. Disabling IPv6
We came across numerous cases where users who were connected via USB tethering or mobile hotspot were encountering the IP address conflict because the phone was giving both, an IPv4 and an IPv6 address to the computer.
The same can be said about routers; the modern ones nowadays assign both these protocols as the internet is slowly moving towards IPv6. However, having both of these can cause IP address conflicts. The quickest way to resolve these issues is to disable IPv6 from your network adapter.
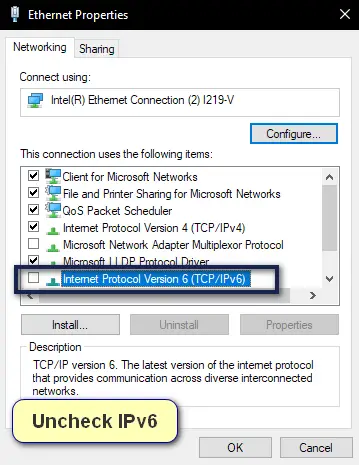
- Follow steps 1 – 3 as of the previous solution and navigate to the Properties of the network adapter that you are using.
- Once you are in your network adapter properties, uncheck the option of Internet Protocol Version 6 (TCP/IPv6).

Disabling IPv6 – Windows - Press OK to save changes and exit. Restart your computer and reconnect to your router or mobile phone and see if the issue is resolved.
5. For Large Networks: Use Workaround Provided by CISCO
This method isn’t intended for the normal user. This method is targeted toward large custom networks usually involving servers connected to Cisco network equipment. In most cases, a static IP is configured in these. To be specific, the users encounter the following error message:
The system detected an address conflict for the IP address 0.0.0.0 with the system having the network hardware address of XX XX XX XX XX XX. Network operations on this system may be disrupted as a result.
It seems that the module present in Windows for detecting IP conflicts clashes with Cisco’s networking equipment which uses the address 0.0.0.0 to maintain a network cache. This is documented by Cisco officially and you can check it out in their article Troubleshoot “Duplicate IP Address 0.0.0.0”
