There is no doubt that Windows is one of the most popular operating systems. But day by day, the new versions of Windows are annoying the users with bugs. One such issue is the high resource usage of the ‘MsMpEng.exe’ file.

What is the ‘MsMpEng.exe’ File?
‘MsMpEng.exe’ is an executable file that runs as a background service. This file is related to Windows Defender and it checks the downloaded files on the system for malware and spyware. Windows keeps running this process/file in the background to provide real-time protection against cyber-attacks, malware, and viruses. In the newer version of Windows, Microsoft has renamed this executable file as ‘Antimalware Service Executable.‘
But as mentioned earlier, users have faced high CPU, Disk, and RAM usage issues with this executable. So, due to the high resource utilization of this executable file, people get confused about its authenticity. Hence, let’s check its authenticity first before moving on to how to stop MsMpEng.exe.
Is it Harmful?
Before classifying this executable file as harmful, let’s first understand the possibilities that might be the reason for high resource utilization.
- As mentioned earlier, this process needs to keep running to provide real-time protection against threats and viruses. So, this could be the reason for its high resource utilization.
- If you are using Windows on low-end hardware, this service will definitely consume maximum resources. So, we recommend checking Microsoft’s recommended requirements for using Windows.
- Sometimes, outdated Windows Defender definitions can also cause this issue.
- If you use the ‘Full Scan’ feature of Windows Defender, that feature will definitely consume maximum system resources.
If none of the above reasons are true, then this file can be a virus. Because often, malware creators deliberately use the same names to inject malware into a system. Hence, it’s better to check the authenticity of this file before classifying MsMpEng.exe as a virus.
How to Stop MsMpEng.exe Process?
After checking the authenticity of the MsMpEng.exe file, if you are convinced that this file is not a virus, then we won’t recommend disabling it. However, if you still want MsMpEng.exe disabled, keep in mind that disabling it will cause the system to be more vulnerable to threats and malware. So, perform it at your own risk.
1. Adding the ‘MsMpEng.exe’ File to the Exclusion List
When Windows Defender performs a scan, it checks all the files, including the under-discussed executable file. That is why you may be facing a high resource consumption issue with the ‘MsMpEng.exe’ file on your system. So, adding this file to the exclusion list will fix this issue.
- First of all, search ‘Windows Security’ in the search bar and open it.

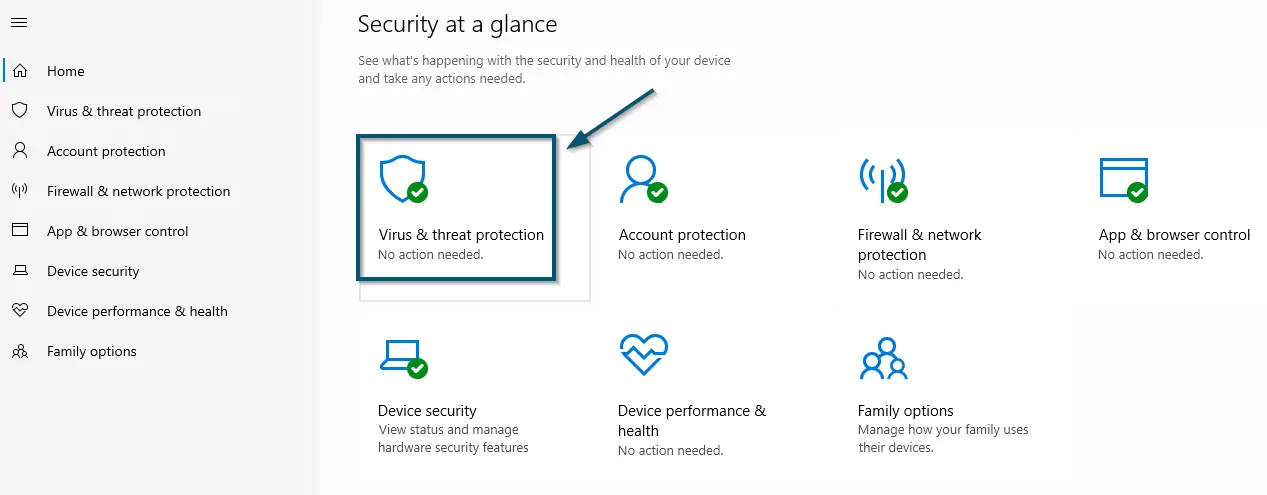
Searching ‘Windows Security’ in the search bar and opening it - After that, click on the ‘Virus & threat protection’ option inside the ‘Home’ tab of ‘Windows Security.’

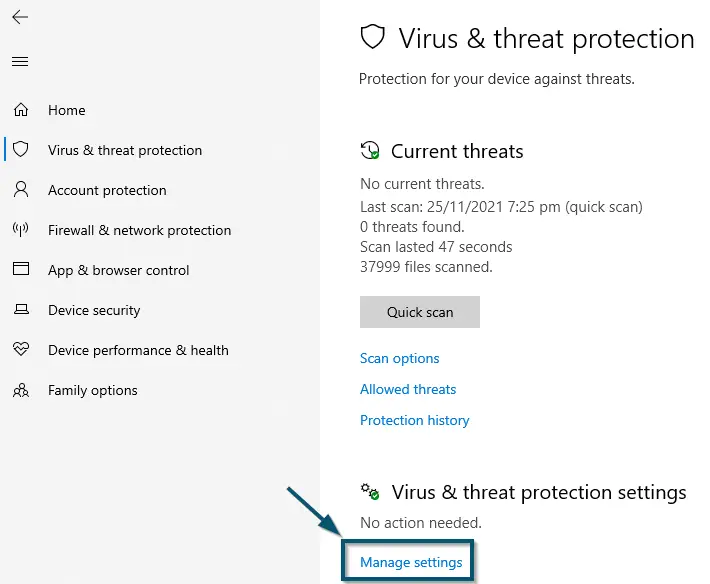
Clicking on the ‘Virus & threat protection’ option inside the ‘Home’ tab of ‘Windows Security’ - Now, click on the ‘Manage settings’ option under the ‘Virus & threat protection settings’ section.

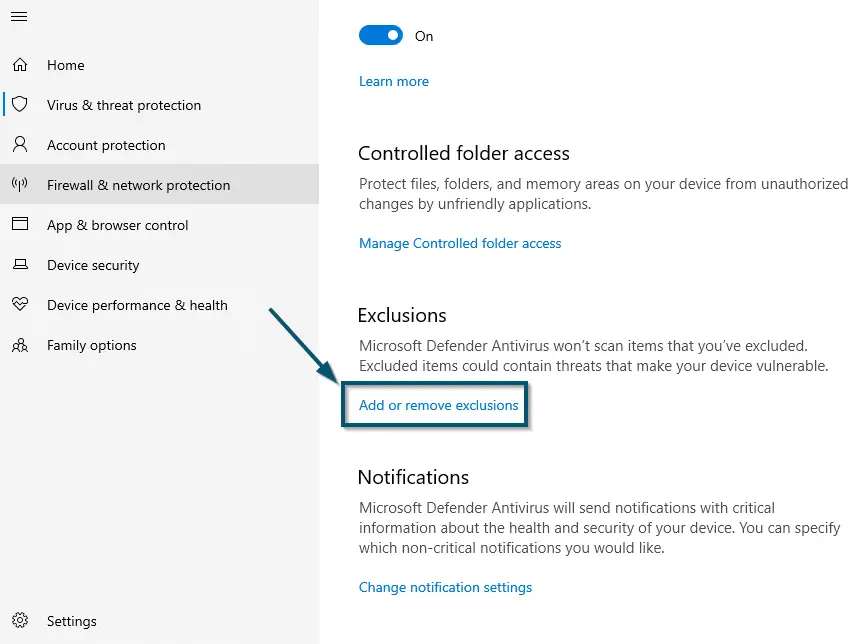
Clicking on the ‘Manage settings’ option under ‘Virus & threat protection settings’ section - In the new window, scroll down to find the ‘Exclusions’ section and click on the ‘Add or remove exclusions’ option.

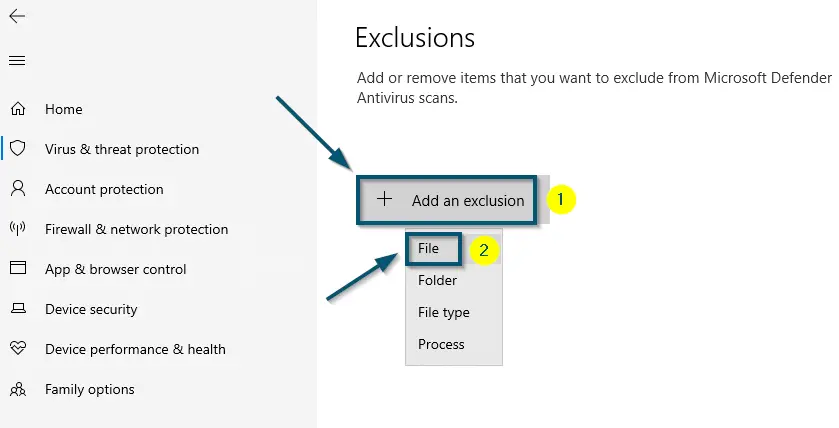
Clicking on the ‘Add or remove exclusions’ option inside the ‘Virus & threat protection settings’ window - Now, click on the ‘Add an exclusion’ button and this will reveal the drop-down options. So, choose the ‘File’ option.

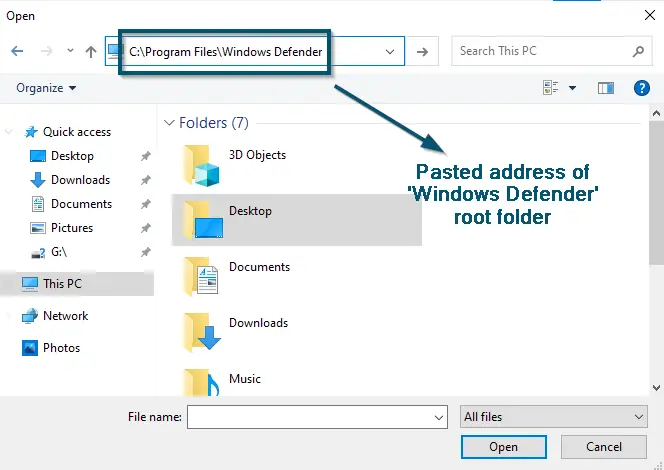
Clicking on ‘Add an exclusion’ and then choosing the ‘File’ as an option - A new sub-window will open. So, paste the following link to the address bar and hit the ‘Enter’ key to reach the ‘Windows Defender’ root folder.

C:\Program Files\Windows Defender
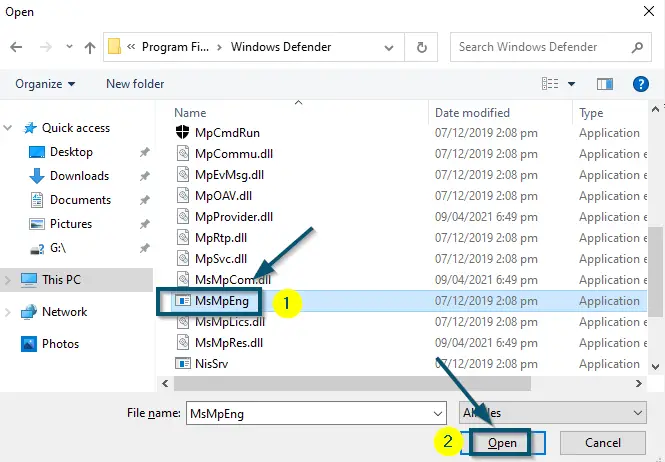
- Now, scroll down inside the ‘Windows Defender’ folder to find the ‘MsMpEng.exe’ file. Once you have found the required file, select it and click on the ‘Open’ button.

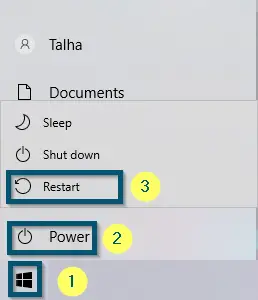
Selecting the ‘MsMpEng.exe’ file and clicking on the ‘Open’ button to select this file for exclusion - Once you have added the ‘MsMpEng.exe’ file to the exclusion list, then restart your system.

Restarting the system
After the system restart, check whether this solution has resolved the ‘MsMpEng.exe’ high resource consumption issue or not. If yes, then good for you. Otherwise, try the next solution.
2. Rescheduling ‘Windows Defender’ Properly
Several Windows users have reported that they have faced this issue when the ‘Windows Defender’ runs ‘Full Scan.’ You can schedule the ‘Windows Defender’ to run when your system is in an idle state (or when you are not using your system).
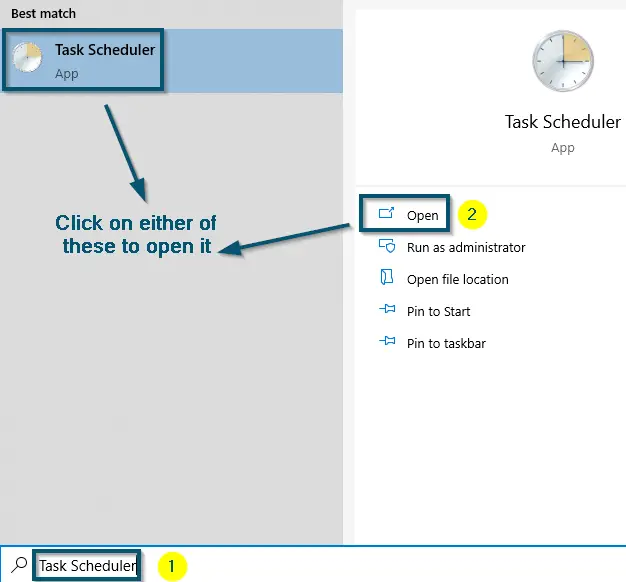
- First of all, open the ‘Task Scheduler.’

Opening the ‘Task Scheduler’ from the ‘Start menu’ - Now, from the left pane of the ‘Task Scheduler’ window, go to ‘Library < Microsoft < Windows < Windows Defender’ options.
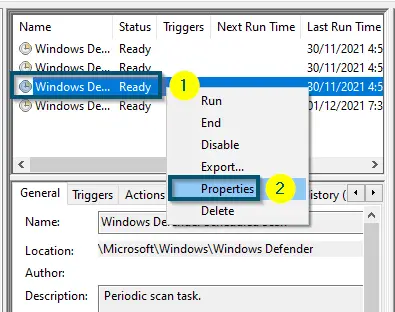
- After that, pick the entry named ‘Windows Defender Scheduled Scan’ and click on it to highlight it.
Note: We will show the procedure for one entry and you can do the same for other entries. For more details, check step number 12
- Then, right-click on it and choose the ‘Properties’ option.

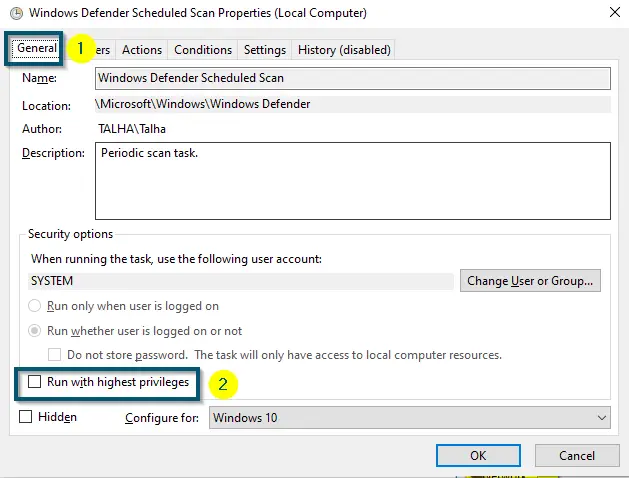
Opening the ‘Properties’ of ‘Windows Defender Scheduled Scan’ - Now, inside the ‘General’ tab, uncheck the ‘Run with Highest Privileges’ option.

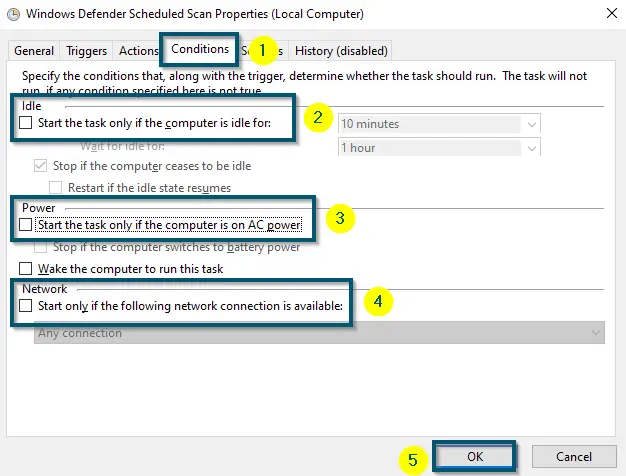
Unchecking the ‘Run with Highest Privileges’ option inside the ‘General’ tab - After that, move to the ‘Conditions’ tab and uncheck the options under ‘Idle,’ ‘Power’ and ‘Network’ sections.
- Then, click on the ‘OK’ button to save the changes.

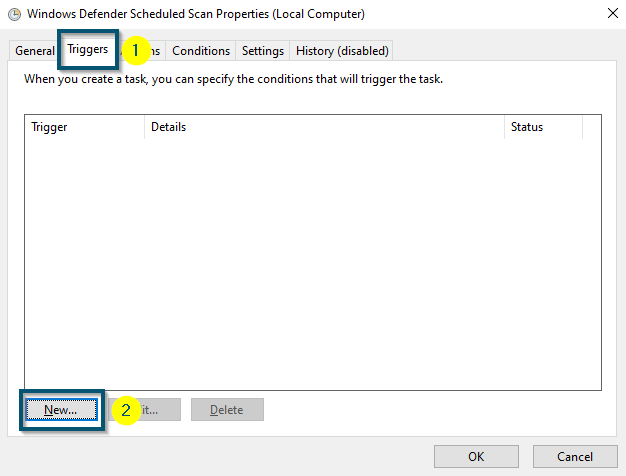
Unchecking the options under ‘Idle,’ ‘Power’ and ‘Network’ sections. Then, clicking on the ‘OK’ button to confirm the changes - Now, go to the ‘Properties’ of ‘Windows Defender Scheduled Scan’ again according to ‘Steps 3 and 4.’
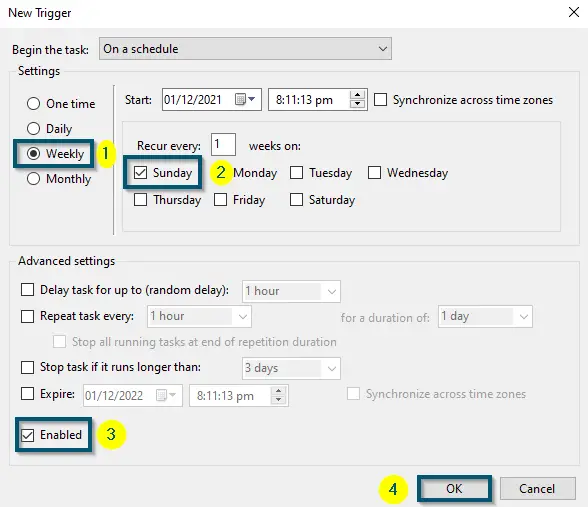
- Navigate to the ‘Triggers’ tab this time and click on the ‘New…’ button.
Clicking on the ‘Triggers’ tab and then, clicking on the ‘New…’ button - A new window will appear. So, choose either the ‘Weekly’ or ‘Monthly’ option according to your choice.
- After that, choose the ‘Day’ and click on the ‘OK’ button. But make sure that the ‘Enabled’ option is checked.

Choosing the ‘Weekly’ option, picking a ‘Day,’ checking the ‘Enabled’ option and clicking on the ‘OK’ button - Now, apply the same procedure for ‘Windows Defender Cache Maintenance,’ ‘Windows Defender Cleanup’ and ‘Windows Defender Verification.’
- After that, if you are already running a scan, wait till the scan is finished because it will show results once the system has completed the current (ongoing) scan.
After following the above steps, you will get high resources utilization only for the specified schedule. So, if you think that this solution is good enough for you, skip other solutions. Otherwise, try the next one.
3. Disabling ‘Windows Defender’ Using the ‘Local Group Policy Editor’
In this solution, we will disable the ‘Windows Defender’ using ‘Group Policy Editor.’ You can also disable it with the ‘Registry Editor,’ but that procedure didn’t prove useful for users. We picked this one as this has solved the high resource utilization issue for several users.
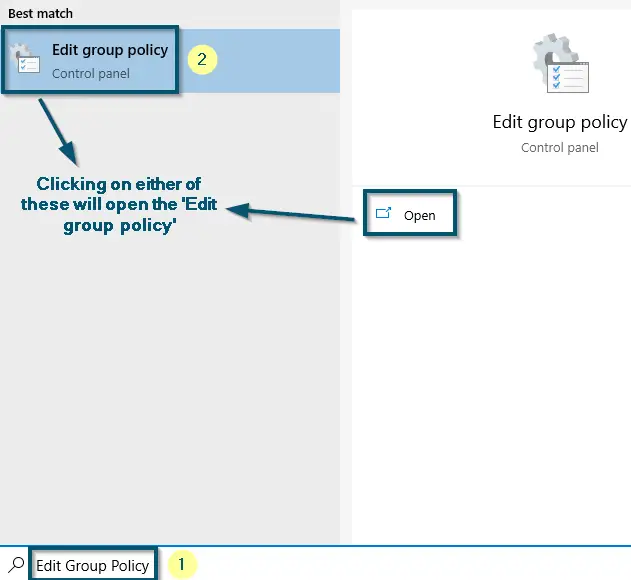
- First of all, open the ‘Edit group policy.’

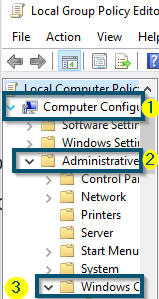
Opening the ‘Edit group policy’ from the ‘Start menu’ - Then, expand the ‘Computer Configuration < Administrative Templates < Windows Components’ options inside ‘Local Group Policy Editor.’

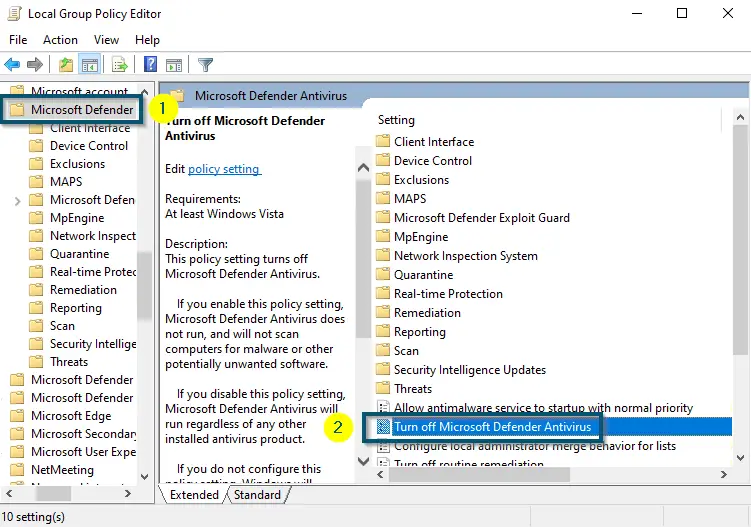
Expanding ‘Computer Configuration,’ ‘Administrative Templates’ and ‘Windows Components’ options inside ‘Local Group Policy Editor’ - Now, scroll down to find the ‘Microsoft Defender Antivirus’ and click on it.
Note: In other versions of Windows, Microsoft has renamed the ‘Microsoft Defender Antivirus’ as ‘Windows Defender Antivirus.’ So, expand the folder before performing any operation and check whether your folder has the same files as shown in the picture or not
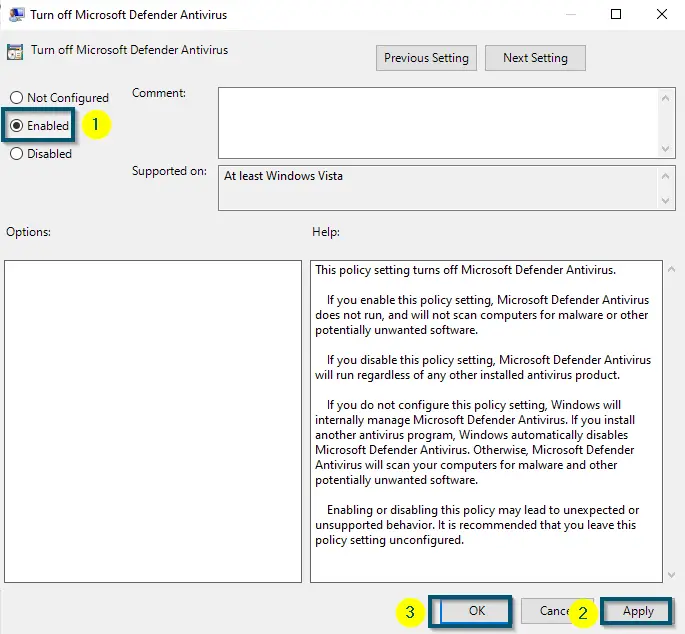
- Then, double-click on the ‘Turn off Microsoft Defender Antivirus’ option.

Scrolling down to find the ‘Microsoft Defender Antivirus’ folder and clicking on It. Then, choosing the ‘Turn off Microsoft Defender Antivirus’ option - After that, choose the ‘Enabled’ option and apply the settings by clicking on the ‘Apply’ < ‘OK’ buttons.

Choosing the ‘Enabled’ option for turning off the ‘Windows Defender’ option and applying the Settings - Now, perform a system restart.
Restarting the system
After the system restarts, check whether this solution has proved useful for you or not. If yes, then good for you. Otherwise, try the next solution.
4. Removing Root Directories of ‘Antimalware Service Executable’ Using Windows Recovery Environment (WRE)
In this solution, we will delete the root directories of the ‘MsMpEng.exe’ file using the command prompt. But we won’t do it by opening CMD and running the commands because Windows boots from the ‘C:/’ drive. So, it won’t let you delete the directories inside that drive. That is why we will use ‘Windows Recovery Environment’ (WRE), but you can also do it with ‘Windows Preinstallation Environment’ (WinPE).
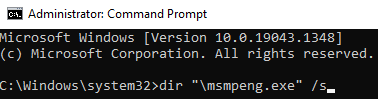
- First of all, we will find the directories of ‘Windows Defender’ in our system because the number of directories and their location is different from system to system. So, open the ‘Command Prompt’ (CMD) as administrator and type the following command.
dir “\msmpeng.exe” /s
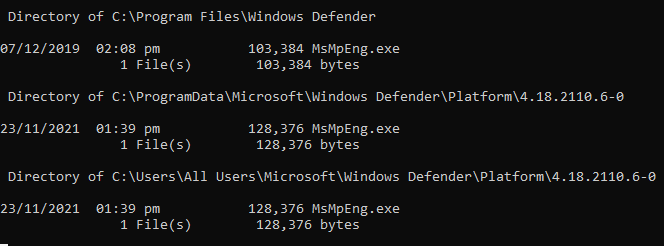
- After that, the CMD window will show different directories. So, ignore the ones starting with ‘C:\Windows\WinSxS’ and ‘ C:\Windows\servicing.’
- Now, write down the other directories and close the CMD window.

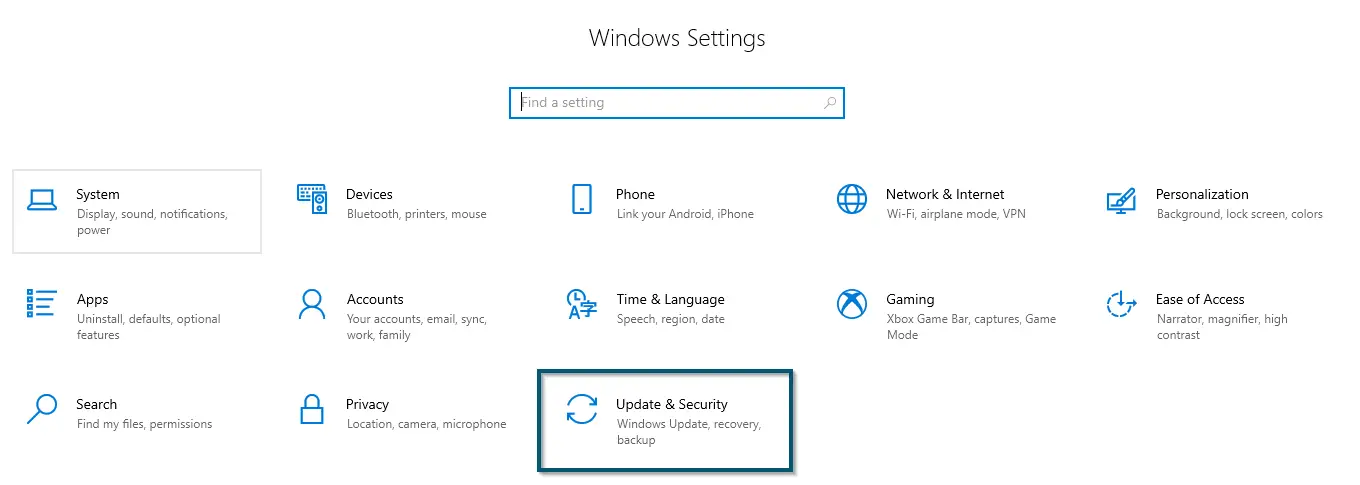
Useful directories of ‘MsMpEng.exe’ - After that, go to the ‘Settings’ and click on the ‘Update & Security’ option.

Clicking on the ‘Windows’ icon and then, clicking on the ‘Settings’ option to open the ‘Settings 
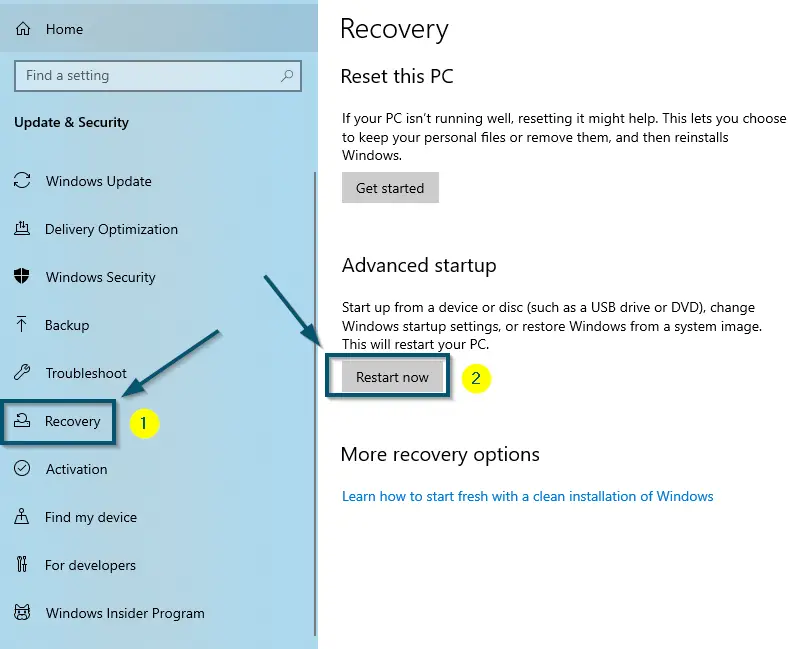
Choose ‘Update & Security’ option in the ‘Settings’ window - Now, click on the ‘Recovery’ option and click on the ‘Restart now’ button under the ‘Advanced startup’ section. Your system will restart in the ‘Windows Recovery Environment’ mode.

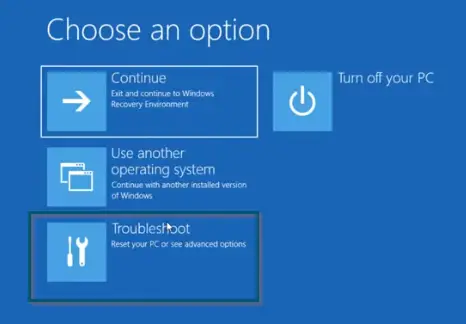
Going to the ‘Recovery’ tab and clicking on the ‘Restart now’ button - So, choose the ‘Troubleshoot’ option first.

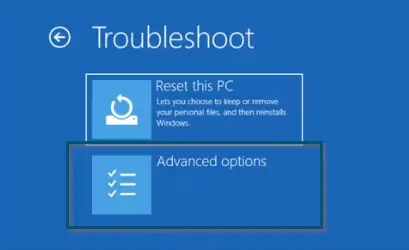
Choosing the ‘Troubleshoot option’ - Then, choose the ‘Advanced options’ in the ‘Troubleshoot’ window.

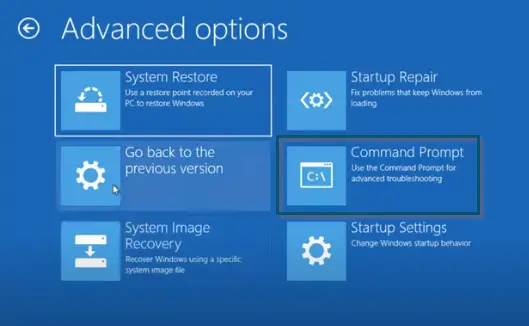
Choosing ‘Advanced options’ in the ‘Troubleshoot’ Window - After that, click on the ‘Command Prompt’ option in the ‘Advanced options’ window to open the CMD window.

Choosing ‘Command Prompt’ in ‘Advanced options’ Window - Now, type the following commands in the CMD window.
RD “C:\ProgramData\Microsoft\Windows Defender\” /S /Q

RD “C:\Program Files\Windows Defender\” /S /Q

RD “C:\Users\All Users\Microsoft\Windows Defender\” /S /Q
Note: Type the above commands according to the directories of the ‘Windows Defender’ folder in your case
After that, boot your system as usual and enjoy your system without ‘MsMpEng.exe.’ Make sure to use some lightweight alternative of ‘MsMpEng.exe’ because we don’t recommend running a system that is vulnerable to viruses and malware.
Wrapping Up
We recommend removing ‘MsMpEng.exe’ only if it is a virus. But if it’s not a virus, still you want to remove it, then use a trusted alternative before stopping the executable because if you don’t use an antivirus on your system, your system will be more vulnerable.
