Quick UCP Internet Connections (aka QUIC) is a next-generation protocol over UDP developed by Google to enhance the web’s security and speed. It also helps accelerate internet surfing because it reduces the latencies and response times of the connection.
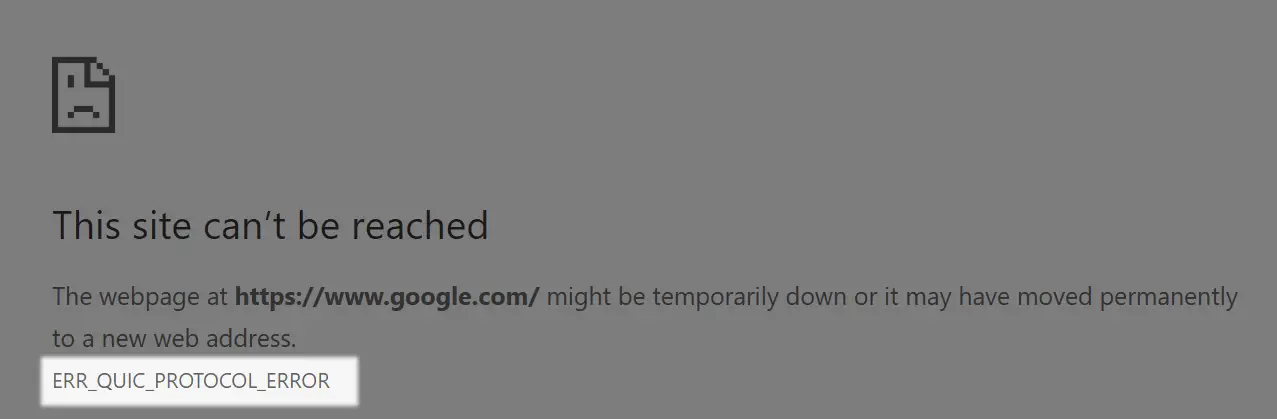
Despite its release in 2013, it is still in its early days from a standard protocol point of view. Many users faced the error ‘err_quic_protocol_error‘ when browsing a particular website, Google-related websites, or all the websites. The issue is mainly reported to occur on Google Chrome and Microsoft Edge. However, only 3.2% of the websites use this protocol, which means you won’t face this error message with all the websites.
Reasons for this Error
The err_QUIC_protocol_error simply means that the QUIC protocol failed and this failure can occur due to many reasons; from a simple communication glitch to failing hardware. Here are some of the major causes we came across in our research:
| Cause | Explanation |
|---|---|
| A Network Socket Error or Corrupt DNS Cache of the System | If any of the system’s network sockets is in an error state or the DNS cache of the system is corrupt, then it may result in the QUIC protocol error as these may limit the browser’s access to a resource essential for QUIC protocol. |
| Interference from the System’s Security Software | There are many security applications like McAfee that are not fully compatible with QUIC protocol and if any such product is present on the system, then its incompatibility with the QUIC protocol may the error message. |
| DNS Server Incompatibility | If the system’s DNS server is failing to resolve an essential web address of QUIC protocol, then it may result in a QUIC protocol issue at hand. |
| The Problematic Website’s Incompatibility | If a website is not properly configured for the QUIC protocol (e.g., Cloudflare is not properly configured to pass the traffic to the website if traffic is using QUIC protocol), then it can also result in the QUIC protocol issue. |
| Faulty browser extension | In case you are using a browser extension that isn't compatible with the protocol; you will receive this error message. |
Pre-requisites
1. Disabling Browser Extension(s)
Sometimes newly installed extensions or plugins create conflict with the ‘QUIC’ protocol. Disabling these extensions one by one will help in diagnosing if any extension is the root of the problem.
- First, click on the Settings icon of your browser. Then, choose the ‘Extensions’ option.

Clicking on the Settings icon and choosing the ‘Extensions’ option - Now, turn off the toggle for each extension to disable it.

Disabling all the (Installed) browser extensions - Then, restart your browser. After restarting the browser, click on the Settings icon and choose the ‘Extensions’ option (again).
- Turn on the toggle of any one extension and check whether or not the problem persists. Repeat this process until you’ve checked all the extensions.

If you have found the extension that creates conflict with the ‘QUIC’ protocol, then remove that extension by clicking on the ‘Remove’ button on the extensions page
2. Disabling Connected Proxy Server(s)
Proxies are sometimes used in corporate environments which help keep the network and enterprise information secure and out of reach. In some cases, proxies are known to conflict with newer protocols like QUIC. Here, trying out the webpage with the proxies disabled can help diagnose the problem.
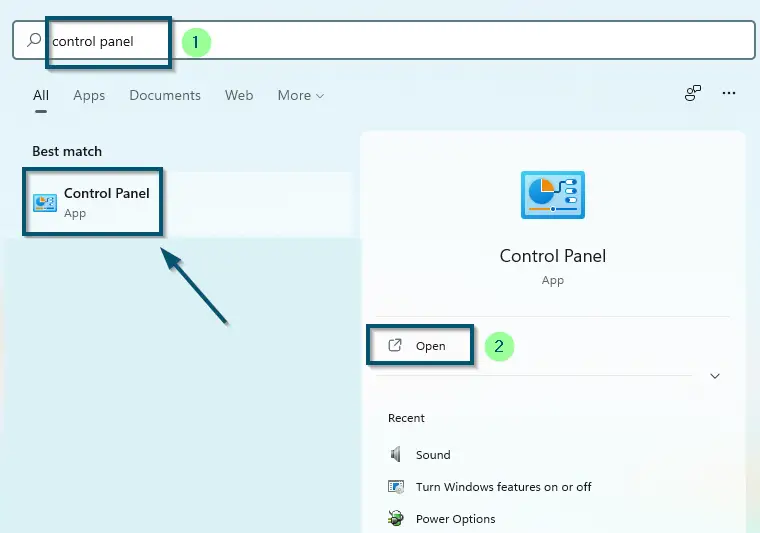
- First, open the ‘Control Panel.’

Opening ‘Control Panel’ via ‘Start menu’ - Then, switch the ‘Category’ to ‘Large Icons’ and click on the ‘Internet Options.’

Changing the ‘View by:’ to ‘Large icons’ from ‘Category’ in the main window of ‘Control Panel’ 
Clicking on the ‘Internet Options’ in the ‘Large Icons’ category of ‘Control Panel’ - After that, switch to the ‘Connections’ tab and click on the ‘LAN settings’ button.

Switching to the ‘Connections’ tab and clicking on the ‘LAN settings’ button - Then, uncheck the ‘Use a proxy server for your LAN (These settings will not apply to dial-up or VPN connection).’ option and click on the ‘OK’ button.

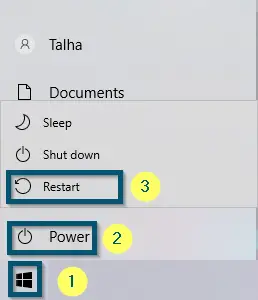
Unchecking the checkbox against the ‘Use a proxy server for your LAN (These settings will not apply to dial-up or VPN connection).’ option and clicking on the ‘OK’ button - Now, apply the settings and restart your system.

Restarting the system


Check whether this tip has solved your issue or not. If not, try the main solutions.
Note: If the ‘Use a proxy server for your LAN (These settings will not apply to dial-up or VPN connection)’ option is already unchecked, leave this solution and move to the main ones.
Fixes for ‘ERR_Quic_Protocol_Error’
As we saw by our research, this error is mostly tied to the networking tied with your computer and system. We will start with the most basic workarounds and work towards more complex ones. All of these workarounds are verified and tested by end-users.
1. Power-cycling your System and Networking Equipment
A temporary communication glitch of the system or networking device like a router could cause the QUIC protocol error at hand. Here, performing a cold restart of the system and networking device may solve the problem.
Power cycling is simply an act of completely shutting down the equipment or devices and turning them on again. This simple act makes sure all the internal configurations inside the devices are reset and
- Power off the system and networking device (like a router, Wi-Fi extender, etc.).
- Now unplug both devices from the power source and wait for at least 5 minutes.
- Then plug back both the devices into the power source and power on the router.
- Once the router is properly powered on, power on the system, and afterward, check if the QUIC protocol problem is solved.
2. Perform a Winsock Reset of the System
A network socket error on your PC may cause the QUIC protocol not to communicate with resources that are essential for the protocol.
When we reset your Winsock, we reset your networking sockets. If any of these were in an error state or were not working correctly, our commands will reset their initial state and they will be turning on again with fresh configurations.
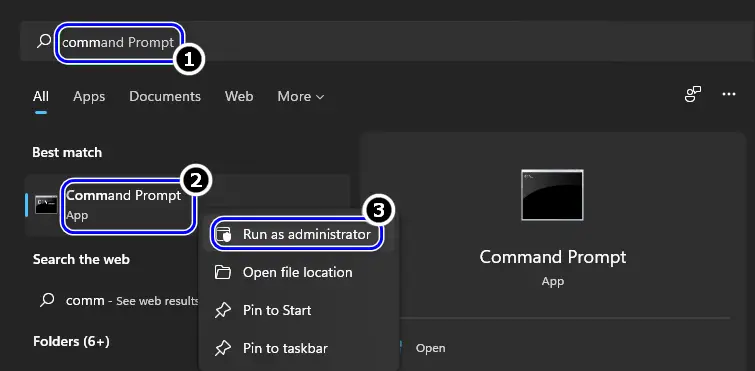
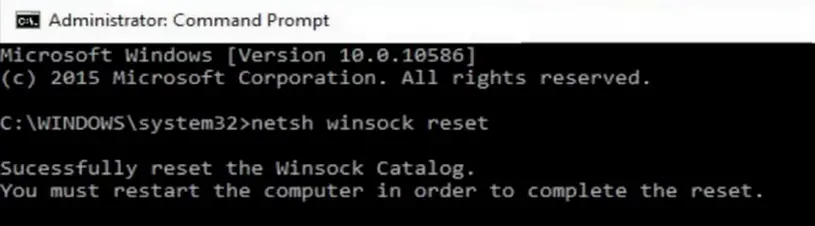
- Click Windows, search and right-click on Command Prompt.

Opening Command Prompt as Administrator - Now select Run as Administrator and in the resulting Command Prompt window, execute the following:
netsh winsock reset

Resetting the Winsock - Once the reset is complete, close the Command Prompt window and restart your PC.
- Upon restart, check if the QUIC protocol issue is resolved.
3. Flushing the DNS Cache
DNS Cache is a temporary database that is maintained by your networking modules in your operating system. This cache contains records of recent visits to websites or services. In some cases, the information in the cache gets corrupt and this, in turn, causes a failure to reach the website.
This is not as uncommon as you might think. When we flush the DNS Cache, it will ensure that all the records are erased. Then it will store and cache fresh information and solve the problem if you had a corrupt record.
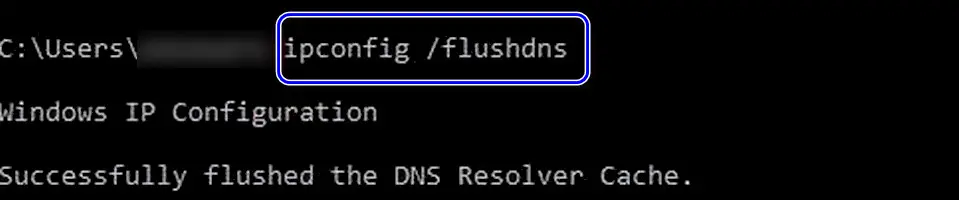
- Click Windows, search CMD, right-click on the Command Prompt result, and select Run as Administrator.
- Now execute the following in the Command Prompt window:
ipconfig /flushdns

Flushing DNS of Your System - Then close the Command Prompt and restart the PC.
- Upon restart, check if the system is clear of the QUIC protocol issue.
4. Perform a Clean Boot of the System
‘Clean booting’ a system means disabling all third-party applications and booting your Windows system with these updated configurations. Clean booting helps here by making sure no third-party application or service was the cause of the issue we are facing.
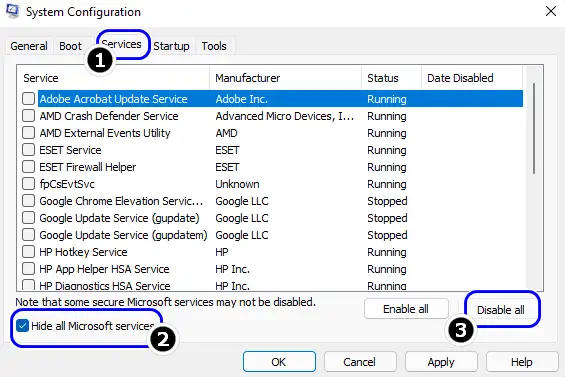
If everything works perfectly after clean booting our system, it means there was a problematic third-party app/service which was causing conflicts. Now, we can enable this one by one until the issue surfaces again. By doing this, we will be able to pinpoint which one was causing problems.
You can check out our detailed guide on How to Clean Boot your system.
5. Disable the QUIC Flag in the Browser’s Settings
If any networking layer between the user’s system and the target servers is not compatible with the QUIC protocol, it will return back the error message we are discussing. The same can be said if the website is incompatible with the mentioned protocol.
In some cases, we saw that websites that were using Cloudflare caused this error message. To remedy this, we can disable the ‘QUIC’ flag in your browser’s settings.
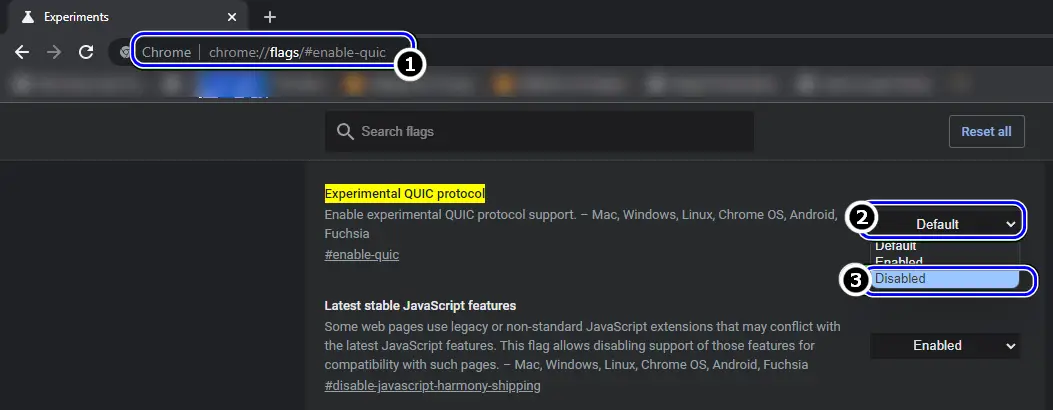
Disable QUIC Protocol in Chrome
You can get rid of the QUIC protocol in Chrome by following the steps below:
- Launch the Chrome browser and enter the following in the browser’s address bar:
chrome://flags/#enable-quic
- Then set the dropdown of the Experimental QUIC Protocol to Disabled and relaunch the Chrome browser to check if the issue is resolved.

Disabling Experimental QUIC Protocol in Chrome
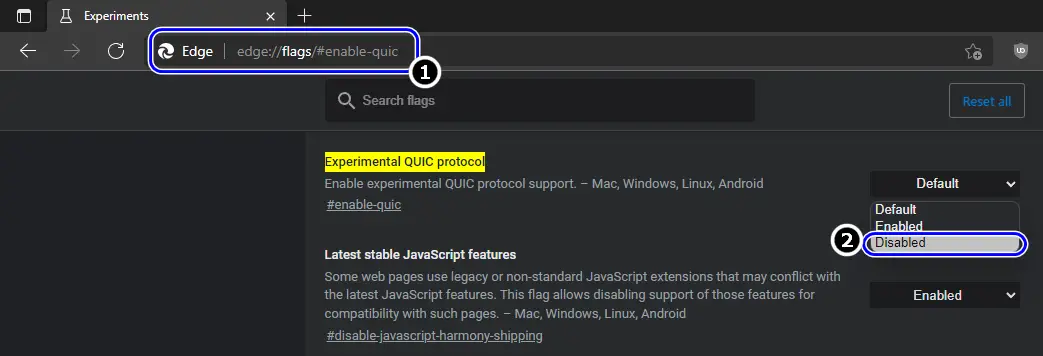
Disable QUIC Protocol in Edge
- Launch the Edge browser and enter the following in the address bar:
edge://flags/#enable-quic
- Now set the Experimental QUIC Protocol to Disabled and relaunch the Edge browser to check if it is working fine.

Disable Experimental QUIC Protocol in Edge
6. Use a Public DNS Server
DNS servers may seem very trivial nowadays but they are the main mechanism that resolves the name of the website you are trying to access to their hosting IP behind the scenes. By default, we use pre-defined DNS servers which usually belong to an ISP or a specific network region.
It is possible that the DNS you are using is either not compatible with QUIC protocol or it is not correctly resolving the name behind the scenes. In this workaround, we will manually set our DNS to Google’s DNS. It should be noted that the QUIC protocol is also developed and maintained by Google.
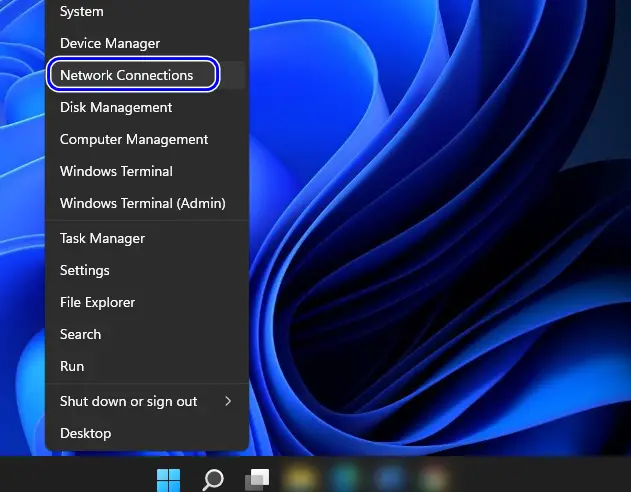
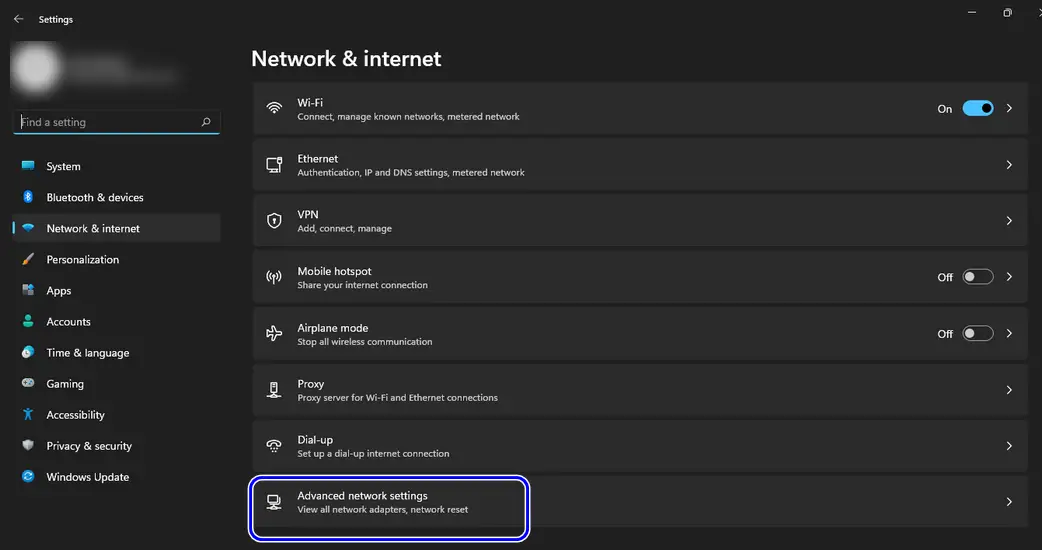
- Right-click Windows and select Network Connections.

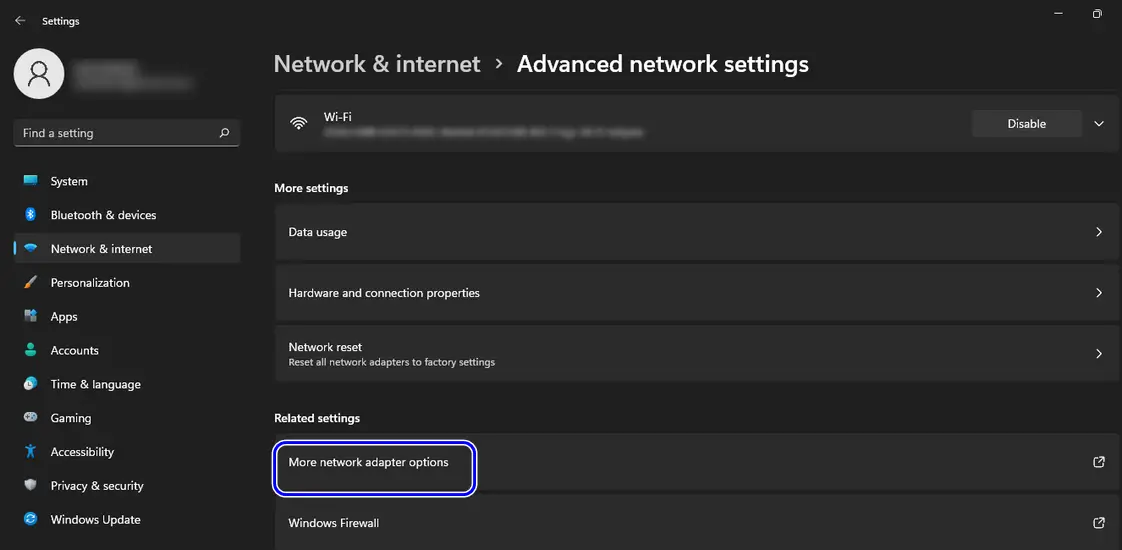
Open Network Connection through the Quick Access Menu - Now open Advanced Network Settings and click on More Network Adapter Options.

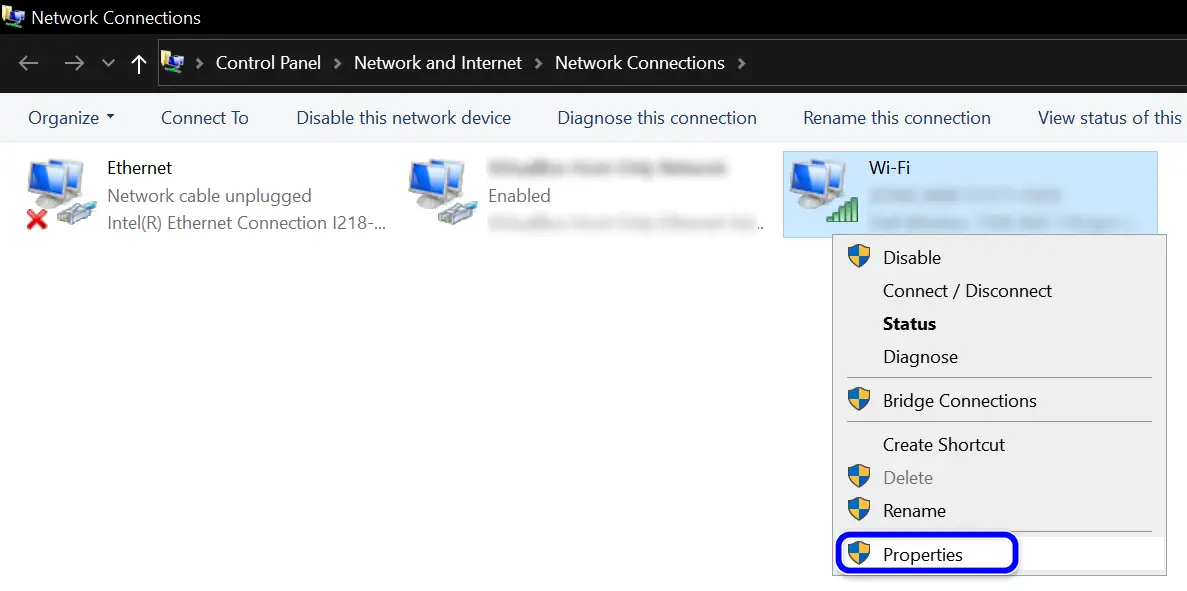
Open Advanced Network Settings - Then in the resulting Control Panel applet, right-click on the network adapter in use (like Wi-Fi) and open Properties.

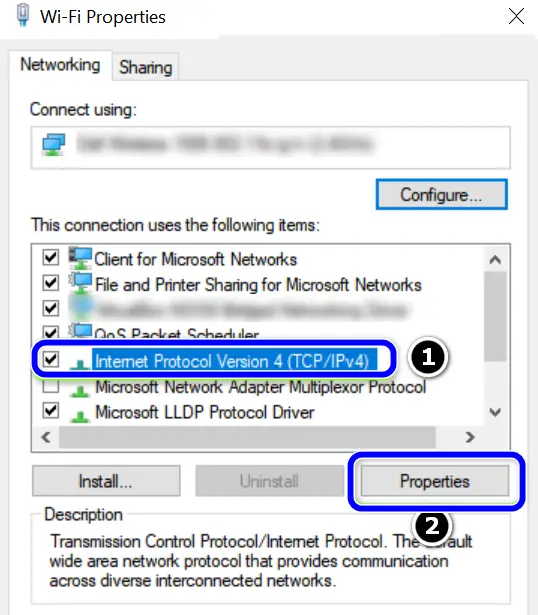
Click More Network Adapter Options - Now select Internet Protocol Version 4 (TCP/IPv4) and open Properties.

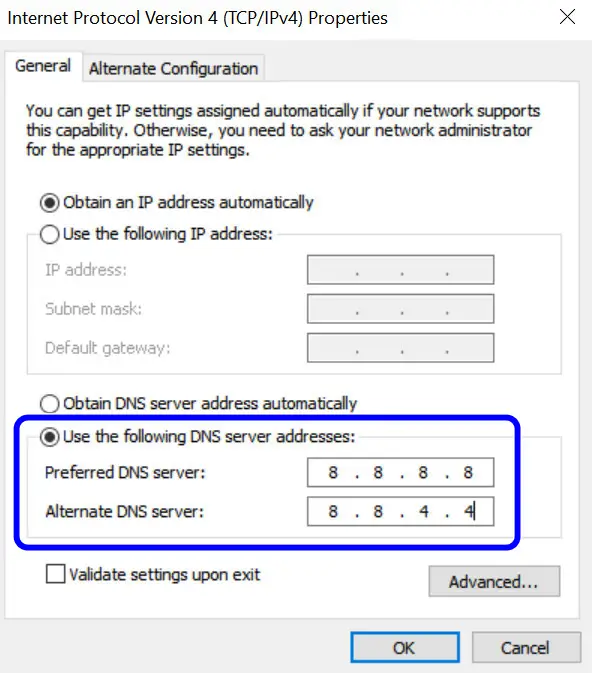
Open Properties of the Network Adapter - Then select Use the Following DNS Server Addresses and enter the undermentioned values as per the relevant field:
Preferred DNS Server: 8.8.8.8

Alternate DNS Server: 8.8.4.4

Open Properties of Internet Protocol Version 4 (TCP IPv4) - Now apply the changes made and restart your PC.

Changing the DNS Server - Upon restart, check if the QUIC protocol problem is solved.
7. Disable the Security Application of the System
Another reason why you might be encountering the ‘err_quic_protcol_error’ error might be due to a false positive by your third-party antivirus or firewall application. According to our research, there are several applications that are not fully compatible with the QUIC protocol. This includes McAfee Antivirus.
In this case, temporarily disabling protection and firewall will help single out this issue. If this doesn’t work, you can always turn the security back up.
Warning:
Advance with utmost care and at your own risk as disabling the system’s security product (antivirus, firewall, antimalware, etc.) may expose the system and its data to security threats.
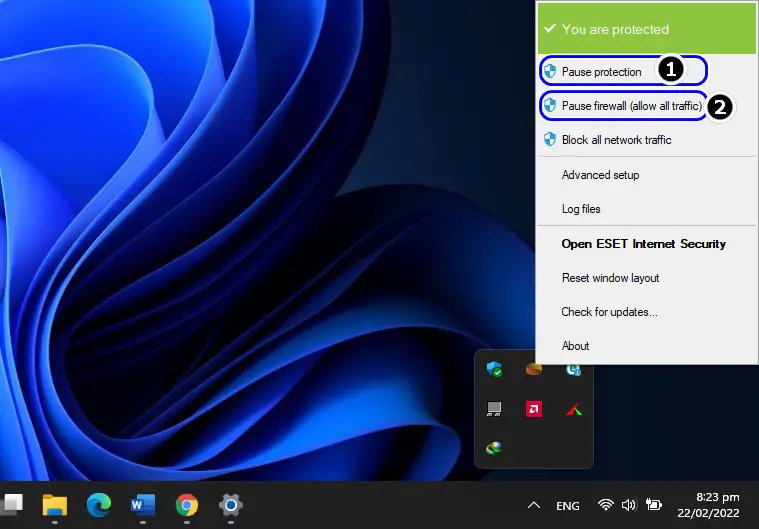
- Expand the hidden icons of the system’s tray and right-click on the security application (like ESET).
- Now select Pause Protection and if a UAC prompt is displayed, click on Yes.

Pause ESET Protection and Firewall - Then confirm to disable the security product and again, right-click on the security software in the system’s tray.
- Now select Pause Firewall and afterward, confirm to disable the firewall. Now open a fresh instance of a browser and see if the issue still persists.
8. Changing Network Type or Just the Network
The QUIC protocol could be an issue caused by a certain network type (like a failing Wi-Fi card) or if the ISP is hindering the operation of the QUIC protocol. Here, trying another network type or network may solve the problem.
- Firstly, switch to the other network type i.e., if using Wi-Fi, connect the PC by using an ethernet cable (or vice versa) and check if the QUIC Protocol error is cleared. If so, then, the issue might be caused by a hardware issue (like a failing Wi-Fi card).
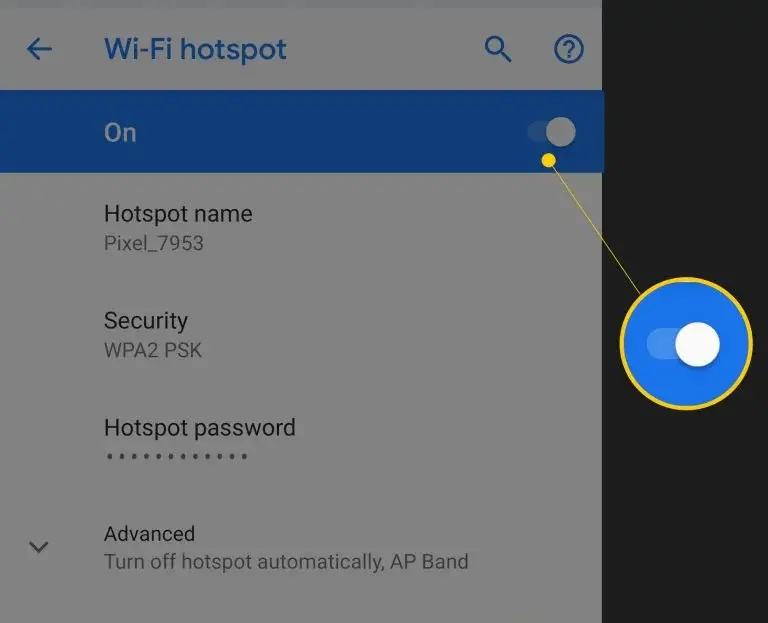
- If the issue persists with the other network type, then disconnect the system from the current network and connect it to another network (like a hotspot from the mobile phone).

Enable Hotspot of Your Phone - Now check if the err_quic_protocol_error is cleared. If so, then the issue may be caused by ISP/network or the network router.
9. Clear Browser Data and Enable Cache
You may encounter the QUIC protocol error if the browser’s data or cache is either corrupt or it is disabled. This can cause the browser to be incompatible with the QUIC protocol requirements. Here, enabling the browser’s cache or clearing the browser’s cache/data may solve the problem.
Make sure to back up the essential info/data (website’s logins, etc.). For elucidation, we will discuss the process of enabling cache and clearing cache/data of Chrome.
- Launch Chrome and open the problematic website.
- Afterward, when the site refuses to load with the QUIC protocol error, hit the F12 key on the keyboard to open Chrome’s Developer Tools and head to the Network tab of the Developer Tools.

Uncheck Disable Cache in the Chrome’s Developer Tools - Then remove the checkmark of the Disable Cache option and afterward, reload the page to check if the QUIC protocol error is cleared.
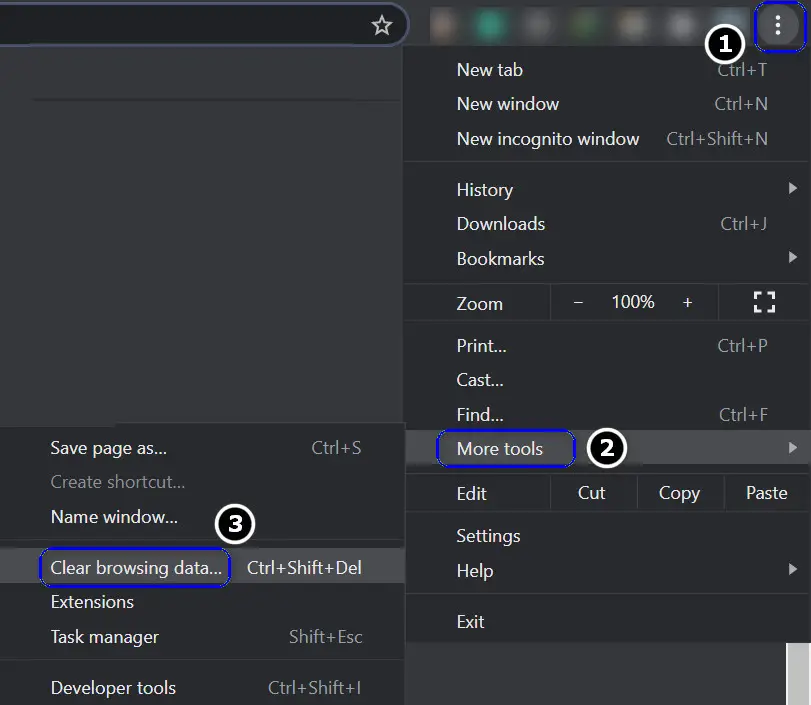
- If not, launch the Chrome browser and open its Menu (click on the three vertical ellipses in the top right of the Chrome window).
- Now, select More Tools and click on Clear Browsing Data.

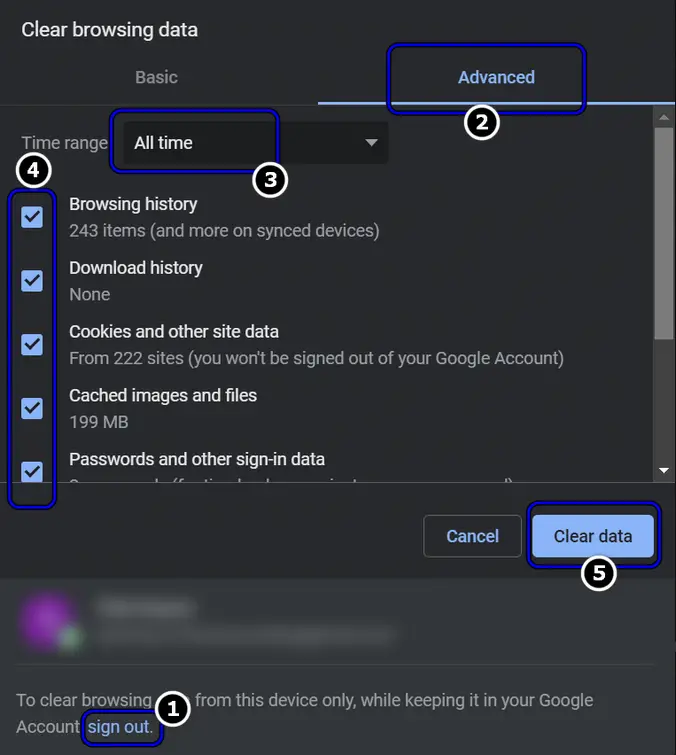
Open Clear Browsing Data in the Chrome Menu - Then, switch to the Advanced tab and click on the Sign Out button (near the bottom of the menu), if you do not want to sync these changes (clearing history, etc.) to the Google account.
- Now set the Time Range dropdown to All-Time and then select all the categories by check-marking the relevant check boxes.
- Then click on the Clear Data button and wait till the data is cleared.

Clear Browsing Data of All Time in Chrome - Once done, relaunch the Chrome browser and check if it is clear of the QUIC protocol browser.

10. Add Google to Allowed Domains in Router’s Parental Controls
If the issue is occurring on multiple browsers on multiple devices connected to a single router, then the issue can be caused by the parental controls or web filters of the router. A blockage from these to an essential Google service or URL can trigger the QUIC protocol problem at hand. Here, adding Google to the allowed domains of the router’s parental control/web filters may solve the problem.
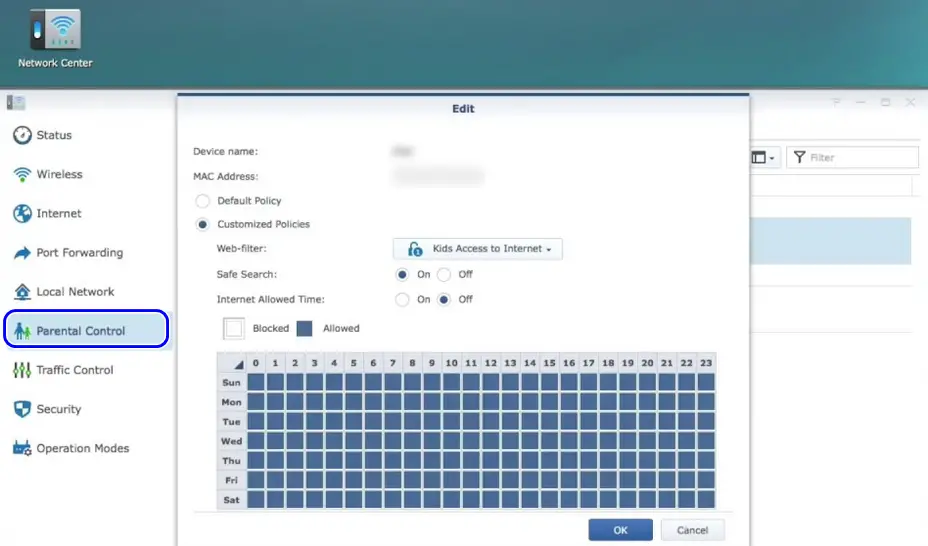
- Launch a web browser and steer to the web portal of the router (like Synology RT1900AC).
- Now head to Network Center and open Parental Controls.
 Whitelist Google Websites in the Parental Controls of the Router’s Settings
 - Then select Web Filter and make sure to add Google (like googladservices.com) to the list of allowed domains of the router.
- Now apply the changes and afterward, hopefully, the QUIC protocol problem is cleared.
- If not, check if disabling (at your own risk) parental control, web filter, firewall, etc. in the router’s settings solves the problem.
 Whitelist Google Websites in the Parental Controls of the Router’s Settings
If all above fails, then get your system (especially, if the issue is occurring on a ChromeOS device) checked for any hardware issue.
11. Resetting the Settings of Browser to Default
If the error message still persists even after applying all the fixes and you’ve determined that the issue is with your PC only, the last resort is to completely reset the settings of the browser to the default state. This will ‘soft reset’ your browser and it will be as if you just installed a new version.
This will rule out any possibility that your browser is corrupt or is not allowing the website to go through due to some internal misconfiguration.
- First, open the ‘Google Chrome’ browser.
- Then, click on the three dots icon to reveal a drop-down menu of options.
- From there, choose the ‘Settings’ option.

Clicking on the three dots icon and choosing the ‘Settings’ option in ‘Google Chrome’ - (Inside the ‘Settings’ window of ‘Google Chrome’) Then, expand the ‘Advanced’ option.
- After that, scroll down and click on the ‘Reset and clean up’ option.

Expanding the ‘Advanced’ option and clicking on the ‘Reset and clean up’ option

Note: If you are facing the ‘ERR_QUIC_PROTOCOL_ERROR Mac’ issue or using Chromebook and Linux systems, you will see the ‘Reset settings’ option (after expanding the ‘Advanced’ option) instead of the ‘Reset and clean up’ option
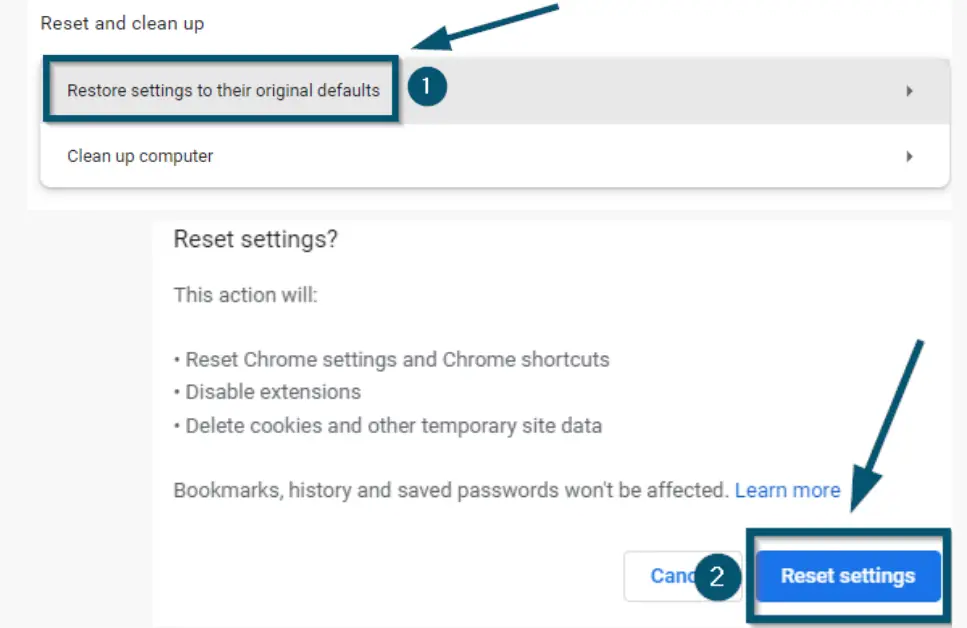
- Now, click on the ‘Reset settings to their original defaults’ option.
- Then, Google Chrome will display a small window. So, click on the ‘Reset settings’ button in that window to reset your browser’s settings.

Choosing the ‘Restore settings to their original defaults’ option and Clicking on the ‘Reset settings’ button
- Now, restart your browser.
Pro Tip: Resetting the browser to its default will affect the following things:
-
- Cookies and site data
- Details, like allowing a website to use your microphone or show you pop-ups
- Homepage, Tabs, and the New Tab page
- Pinned tabs
- Search Engine (will set to default search engine, which is Google in Google Chrome)
- Tabs you (may) have pinned
- Themes and Extensions
You can also re-sign into your Google account if all the settings of the browser were getting synced. Everything will be restored.