Disney Plus Error Code 42 occurs when the system is unable to connect to Disney servers. If the connection is unsuccessful, no media files get transferred and you are unable to stream anything. This error message is more common in older devices such as Roku 2 but is reported to occur in newer streaming devices as well. Overall, it is not platform-specific.
The error is also seen through the following error message:
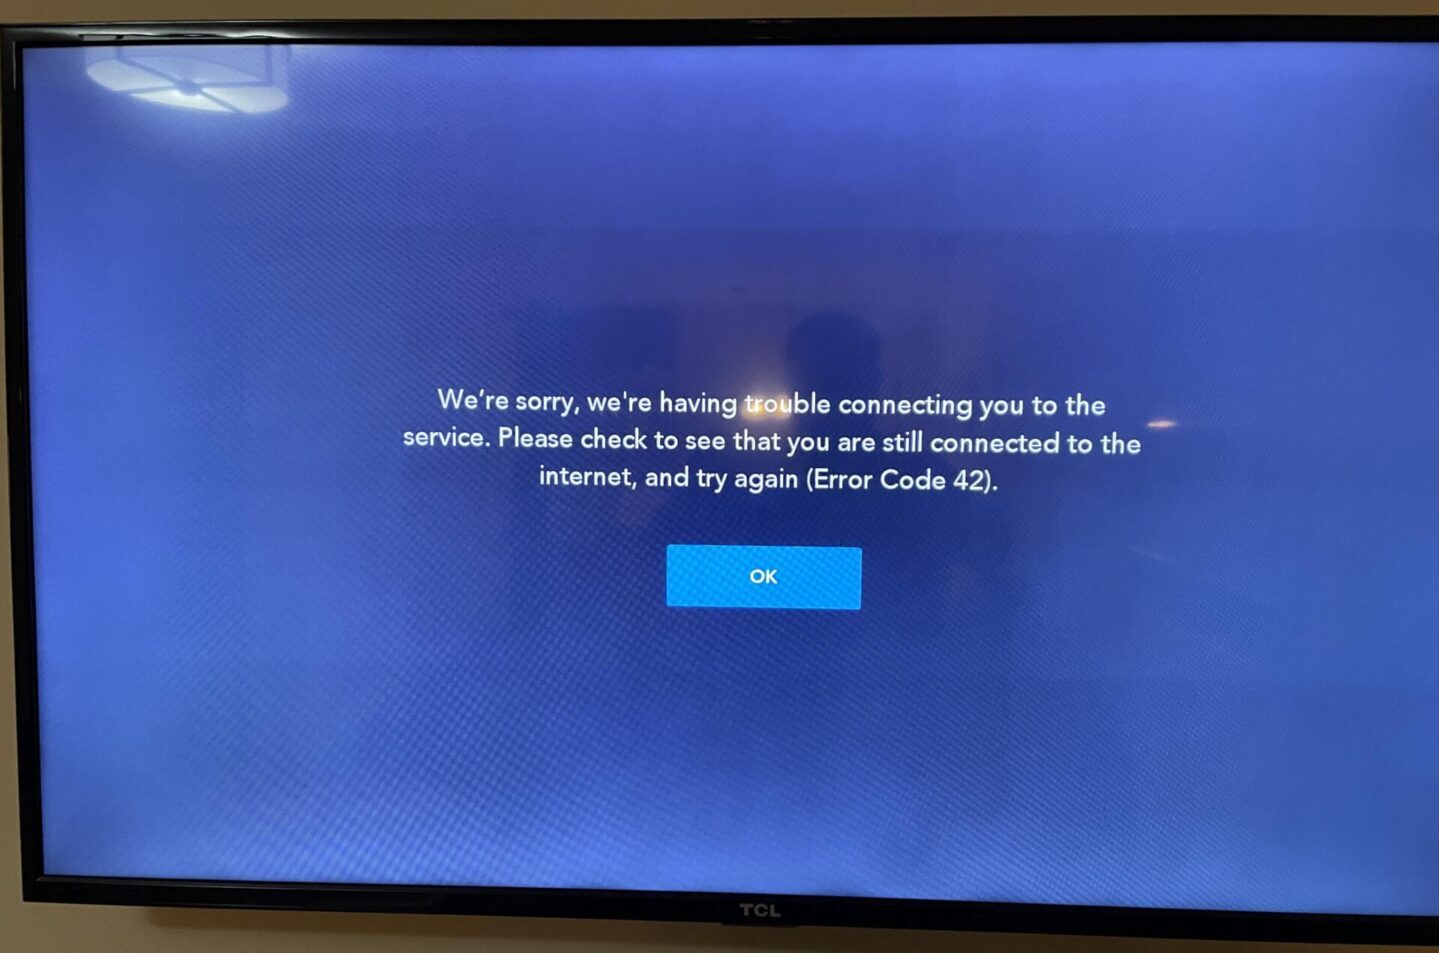
Unable to connect to Disney+
There seems to be an issue connecting to the Disney+ service. Please try again later if the issue persists.
What Does Disney Plus Error Code 42 Mean?
Error 42 means that the Disney+ client on your device is unable to reach Disney servers. The connection to the streaming was unsuccessful even if you were able to view the catalog of different shows.
The error message primarily states the issue is ‘Slow internet speeds’ but this issue occurred for users having more than enough bandwidth. This is a very common error getting encountered on all sorts of devices like Fire TV, Roku, Android TVs, PS, Xbox, and other devices.
Why Does Disney Plus Error Code 42 Occur?
Error 42 can occur due to several reasons but most of them are related to external factors rather than the application or device itself. It should be noted that this is a known issue for Disney.
| Cause(s) | Explanation(s) |
|---|---|
| Bad DNS Settings | DNS settings route traffic to correct IP address. If this isn't working, no traffic will go through. |
| Disney+ (Channel or App) Issue | A corrupt installation or missing files of the application can cause this issue as well. |
| Overloaded Servers of Disney Plus | In some cases, servers of Disney+ get overloaded due to spikes in traffic. If the servers are getting overloaded, you might not be able to stream anything for some time. |
| Slow Internet Connection | Streaming services like Disney+ require a strong internet connection. If the bandwidth of your connection doesn't meet the network requirements of Disney Plus, your video will stutter and eventually lead to an error message. |
| Rights Availability | If this issue is associated with streaming a particular video, then the availability of its rights could be the reason for this issue. According to an official response by Disney, this is the primary cause of this error. |
| Using a VPN | Browsing through a VPN masks your location which conflicts with Disney's streaming guidelines as they have different content licenses for different regions. |
Pre-Requisites To Solve Disney Plus Error Code 42
Before we dive deep into the workarounds of this error message, let’s discuss some simple workarounds that could also solve your issue.
Check Disney Plus Server Status
As mentioned earlier, overloaded Disney+ servers could cause this issue. You should check whether the Disney+ servers are working fine or not in your region.
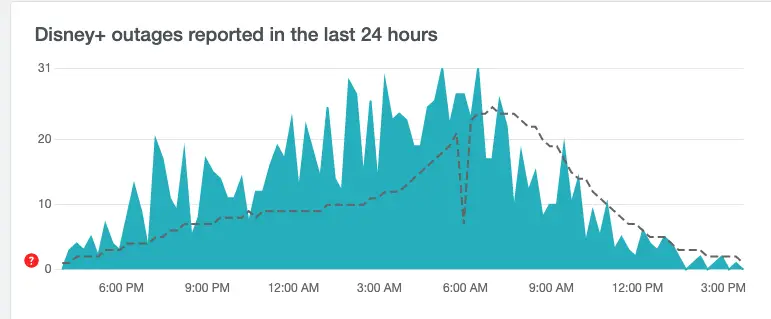
For this, you can use services like ‘DownDetector’ or ‘IsItDownRightNow.’ Similarly, you can search for ‘is Disney plus down’ or ‘is Disney plus down on Roku’ on Twitter and other forums.
Check the Stability Of Your Internet Connection
Disney+ requires at least 5mbps of bandwidth for playing High Definition (HD) video and an internet connection of 25mbps for playing the video in 4K.
Check if your network bandwidth meets the network requirements of Disney+. If yes, then move to the next solution. Otherwise, contact your ISP to increase the bandwidth of your internet connection.
Avoid The Use Of VPN Or Proxy Services
As mentioned before, using a VPN masks your original location which violates Disney’s streaming guidelines. Disney has different streaming licenses for different locations. You might get some shows available in the region and not available in another one.
Because of this, Disney has invested in the detection of VPNs and they immediately deny service if it is detected. Turn off your VPN or Proxy and try accessing the platform again.
Fixes For Disney Plus Error Code 42
We’ll start with the most basic solutions and move towards complex workarounds gradually. Make sure you have your credentials for Disney Plus at hand before proceeding.
Reload The Video
Users may face an unexpected condition where they only hear the audio of the show with a black screen. After a while, error 42 is thrown before the show shuts down.
This is a very common behavior and a known ‘glitch’. In this case, simply try reloading the video or restarting your device. The modules get reset and the app will work as expected.
Clear The Device’s Cache
Your device has temporary storage (cache) which stores all temporary configurations. These configurations and settings are fetched by the system every time when they are needed by any process of Disney Plus. There are several instances where the cache gets corrupt and keeps serving bad data to the application which in turn causes the error message.
In this case, we can try clearing the cache and see if this does the trick. However, unlike other streaming devices, the method of clearing the cache on Roku streaming devices is a bit odd. So, try the following steps.
- Put your Roku TV on the ‘Home’ tab.

Home Tab - Then, press the ‘Home’ button on your remote. (5 times)
- After that, press the ‘^’ (up arrow) button on your remote. (1 time)
- Now, press the ⏪ (rewind) button. (2 times)
- Then, press the ⏩ (fast forward) button. (2 times)

Roku TV Remote

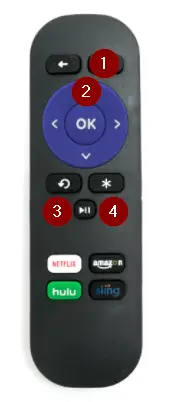
Note: In the above picture, ‘1’ is the ‘Home button,’ ‘2’ is the ‘Up Arrow button,’ ‘3’ is the ‘Rewind button’ and ‘4’ is the ‘Fast-Forward button’
- Once you have pressed all the (mentioned) buttons, your TV screen will be black.
- Then, after a few (about 15-30) seconds, it will reboot. Doing this will clear the cache of your TV.
Now, open the ‘Disney+’ channel on your Roku TV again and check if this method has proved useful. But if this method has not proved useful, try some other solution.
Change The Google DNS IP Address On Router
DNS (Domain name system) is used to resolve the correct IP addresses mapped against a worded address (like google.com to 1.1.1.1). DNS is provided by your ISP and there are several instances where they are using an improperly configured resolver. In a case like this, the correct address will not be resolved and you will issue errors like the one under discussion.
In this case, we can manually set our DNS to Google’s Public DNS and see if this fixes the problem. You can always revert changes if this doesn’t work.
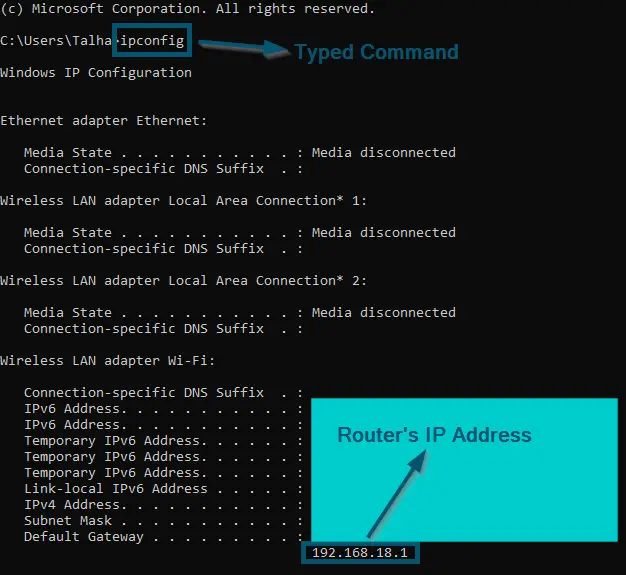
- Open ‘Command Prompt’ on your PC and type the following command:
ipconfig
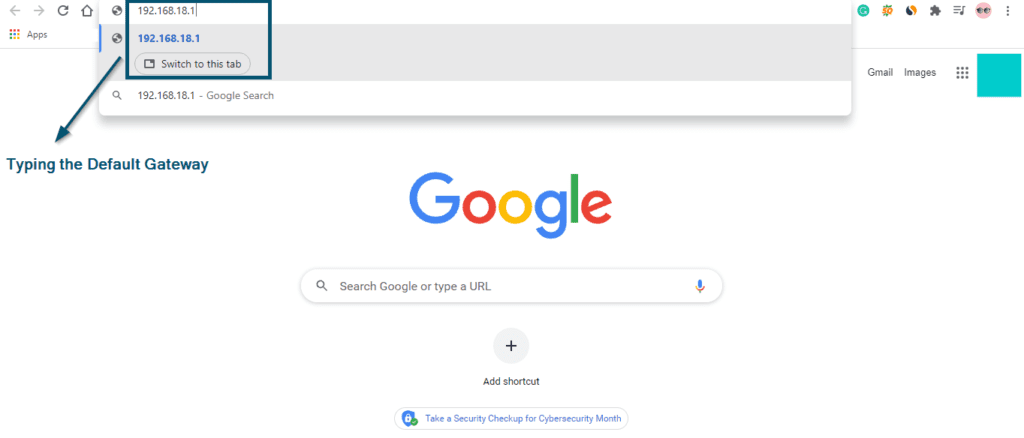
- Once you’ve executed the command, you can scroll down to find the entry named ‘Default Gateway’ because this is the IP address of your router.

Router’s IP Address - Now, open any browser on your computer and type your router’s IP address in the search bar, and hit the ‘Enter’ key.

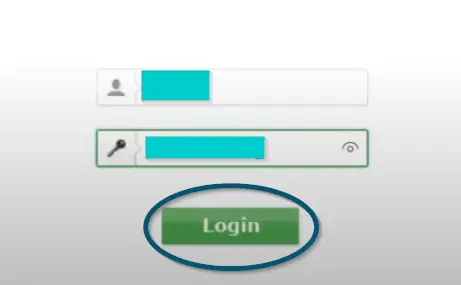
Default Gateway - Once you are on the login page, enter your router’s credentials and click on the ‘Login’ button.

Login Page
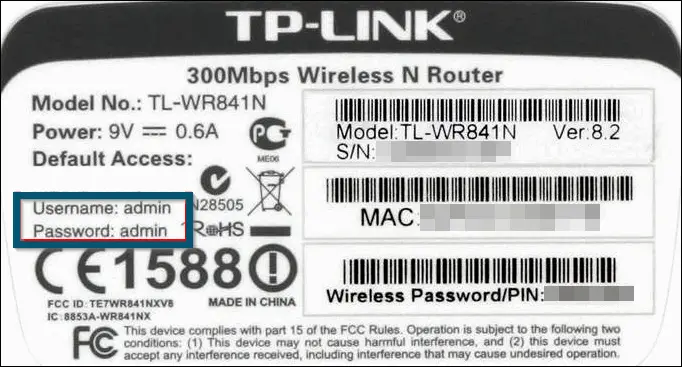
Note: If you don’t know the credentials of your router, you can check the back of your router and pick the entries labeled as ‘username’ and ‘password’
- After entering the credentials, you will get inside the router’s configurations page.
Note: The UI of the router’s configuration page varies from router to router. So, we will perform the operations according to our router’s page and you can find the same settings in your case
- Then, click on the ‘Network’ option on the right side and choose ‘WAN’ inside the ‘Network’ option.

Network Tab - Now, change the ‘Primary DNS:’ and ‘Secondary DNS:’ values according to the Google public DNS IP address.
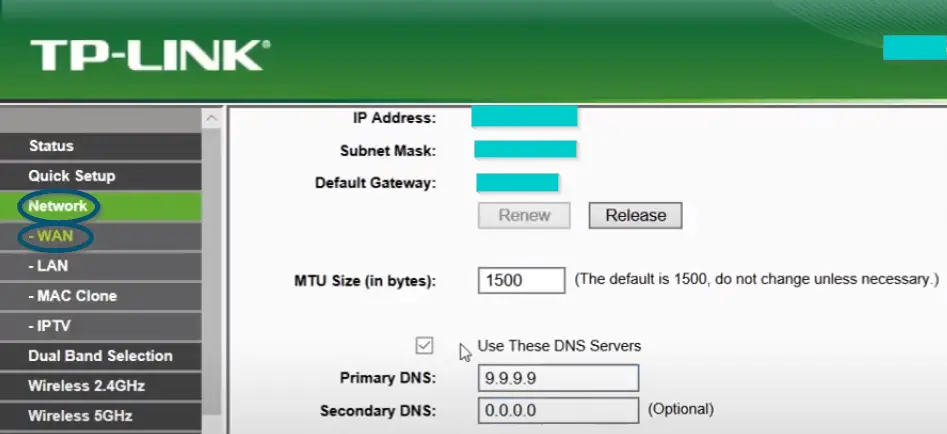
Primary DNS: 8.8.8.8

Secondary DNS: 8.8.4.4
- After entering the above-mentioned values, click on the ‘Save’ button.
Note: Reconnect the internet on your streaming device after changing the DNS server settings
Now, open the ‘Disney+’ channel/app again and check if this solution has proved valuable for you. If not, try the next solution.
Set The DNS Configurations Of The Router To Auto
If changing your router’s DNS settings to Google DNS doesn’t resolve the error code 42, you can set the DNS configuration of your router to auto. This way, your router will automatically pick the best DNS settings according to your ISP’s instructions.
- Follow the first six steps of the previous solution to reach the ‘WAN’ section of the router’s configuration page.
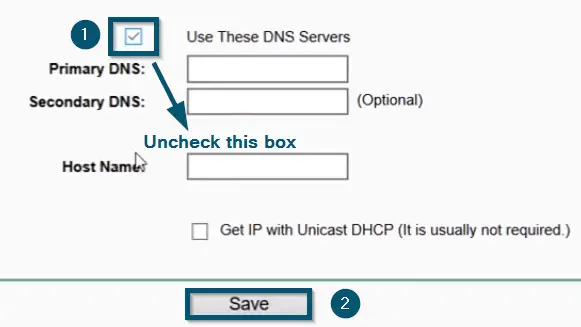
- Then, uncheck the ‘Use These DNS Servers’ option and click on the ‘Save’ button. Doing this will allow your router to configure the DNS server settings automatically.

Uncheck DNS Servers
Note: Reconnect the internet on your streaming device after changing the DNS server settings
Now, check if the ‘Disney+’ application works on your streaming device.
Disable IPv6 Routing/Addressing On The Router
IPv6 is the latest addition to the list of internet protocols. Apart from the 32-bit (IPv4) and 128-bit (IPv6) hexadecimal addressing mechanism, its working is pretty similar to IPv4. So, if the ‘Disney plus error code 42’ error message persists even after using Google’s DNS or auto DNS server settings, we recommend disabling the IPv6 on your router’s settings page.
This technique has solved the error message for others. So, hopefully, it will work for you as well.
- Again, navigate to your router’s configuration page by following the first five steps of the third solution.
Note: The UI of the router’s configuration page varies from router to router. So, we will perform the operations according to our router’s page and you can find the same settings in your case
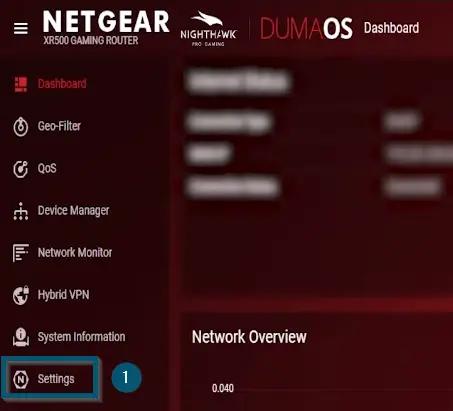
- Then, choose the ‘Settings’ option.

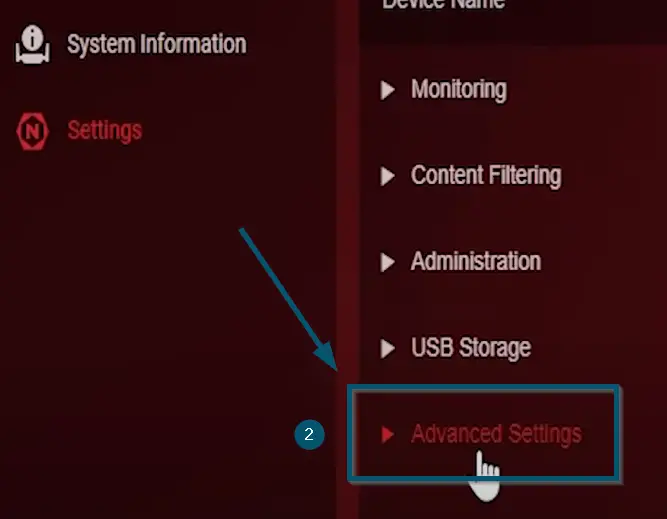
Settings Option - After that, click on the ‘Advanced Settings’ option.

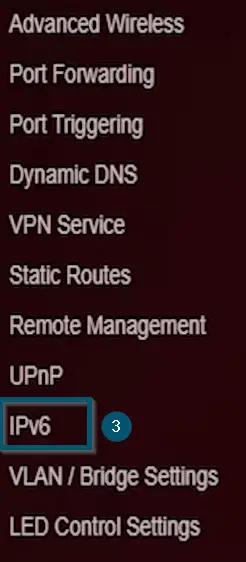
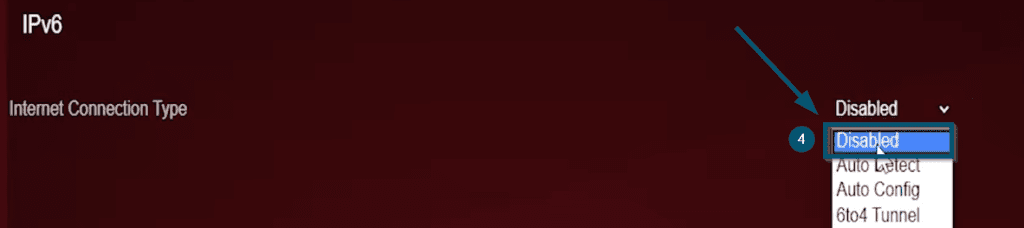
Advanced Settings Tab - (Inside the ‘Advanced Settings’ option) Choose the ‘IPv6’ option.

IPv6 option - Then, select the ‘Disabled’ option for the ‘IPv6’ settings.

Disable IPv6 - Now, apply the new settings.
Note: Reconnect the internet on your streaming device after changing the DNS server settings
Check if the ‘Disney+’ channel/application works on your streaming device.
General Solutions For Disney Plus Error Code 42
If none of the above methods work for you, we recommend contacting the support team at Disney. Since this is a paid service, they will go over your case and make sure it is remedied. You can also try reinstalling your Disney Plus App or restarting your device.
Conclusion
Disney Plus Error Code 42 is an annoying issue that will disrupt your streaming. This error can be caused by various factors like using VPNs or DNS configuration issues. But with our comprehensive guide, you can resolve this issue. You can try reloading the video, clearing the device’s cache, changing the DNS IP address on the router, and setting the DNS configurations to auto among other solutions. If none solutions work for you, you can contact Disney Plus support and report your issue. Hope to see you again.