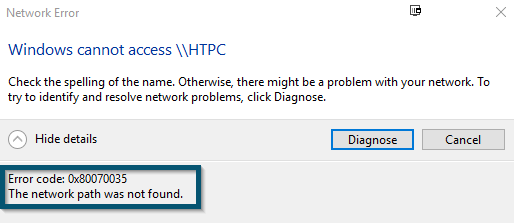
The error message: ‘Error code 0x80070035 the network path was not found’ occurs while trying to share files between two systems connected to the same network. Intra-network file sharing requires specific network paths for access and transmission of files. This error primarily means that no established path was found.
Several users have reported this error message even after the folder administrator has enabled access to the intended user.
Why does this Error Occur?
Although the reasons for this error message vary from situation to situation, we have found the following common reasons after researching this issue for several days.
- Sharing Access is disabled of the folder/drive.
- Network Discovery is turned off.
- ‘AllowInsecureGuestAuth’ is disabled.
- System OS is outdated.
- A recent update broke the network sharing mechanism.
- The destination IP Address is wrongly typed.
- Unreliable multicast protocols can hinder sharing.
- Trusted network entry from Firewall is removed by Windows.
- There might be faulty QNAP Firmware if you are using QNAP for managing your Network Attached Storage (NAS).
How to Fix Error Code 0x80070035?
Start with the first solution and work your way down accordingly.
1. Enabling the ‘Turn on Network Discovery’ Option
Turning on Network discovery will make sure that other computers in the network will be able to locate you in the local network which will initiate the sharing process. Having this option turned off will restrict your presence on any network.
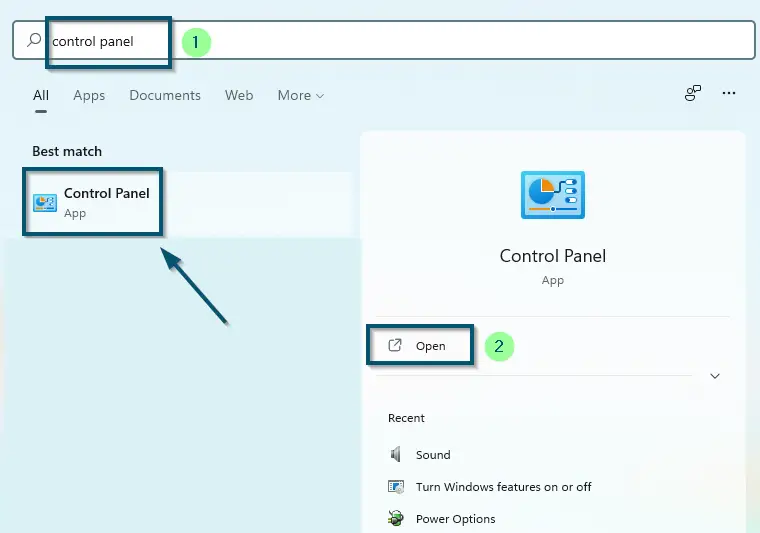
- First, open the ‘Control Panel’ on your Windows system.

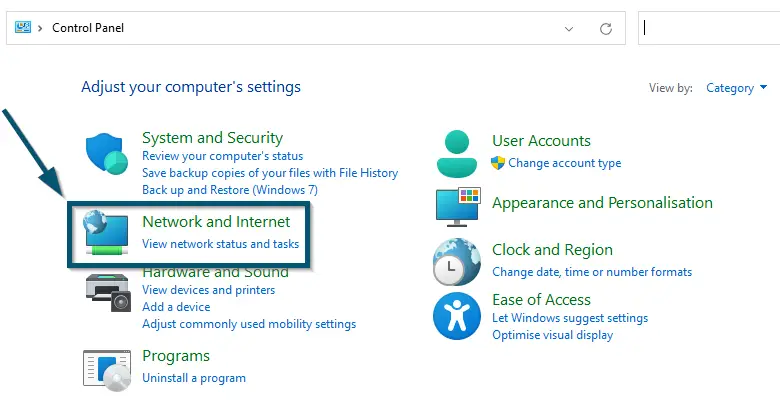
Opening ‘Control Panel’ via ‘Start menu’ - Then, click on the ‘Network and Internet’ option in the ‘Control Panel’ window.

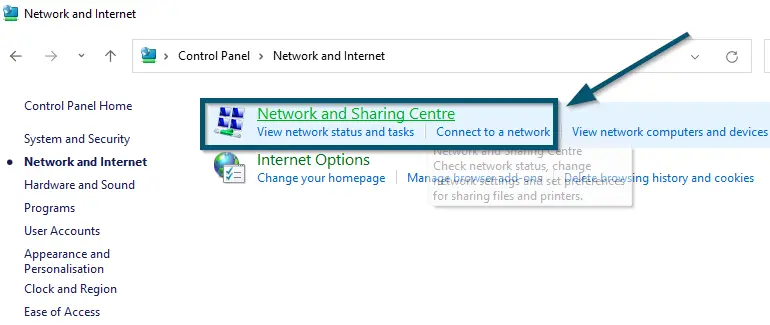
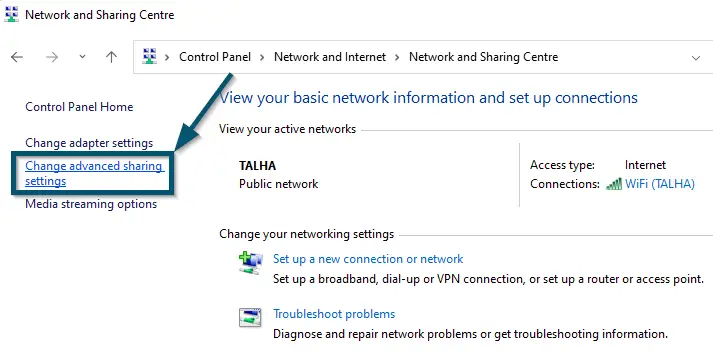
Clicking on the ‘Network and Internet’ option in the ‘Control Panel’ window - Now, click on the ‘Network and Sharing Centre’ option to open the ‘Network and Sharing Centre’ window.

Clicking on the ‘Network and Sharing Center’ option inside the ‘Network and Internet’ option - After that, click on the ‘Change advanced sharing settings’ option from the side options.

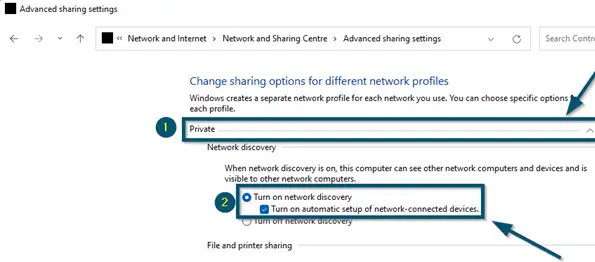
Clicking on the ‘Change advanced sharing settings’ option - Now, expand the ‘Private’ section inside the ‘Advanced sharing settings’ window.
- Then, select the option that says ‘Turn on network discovery’ and check the ‘Turn on automatic setup of network connected devices’ check box.

Expanding the ‘Private’ section and enabling the ‘Turn on network discovery’ and ‘Turn on automatic setup of network connected devices’ options Note: Also, make sure that the ‘Turn on file and printer sharing’ option is checked in your case
- After that, click on the ‘Save changes’ button.
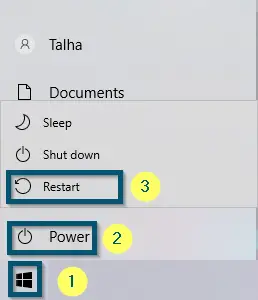
- Now, restart your system by going to the ‘Start’ < ‘Power’ < ‘Restart’ options.

Restarting the system
2. Making Sure Sharing is Enabled on the Folder
Sometimes the sharing option on the folder you are trying to share is disabled. This will automatically restrict the sharing process by the operating system.
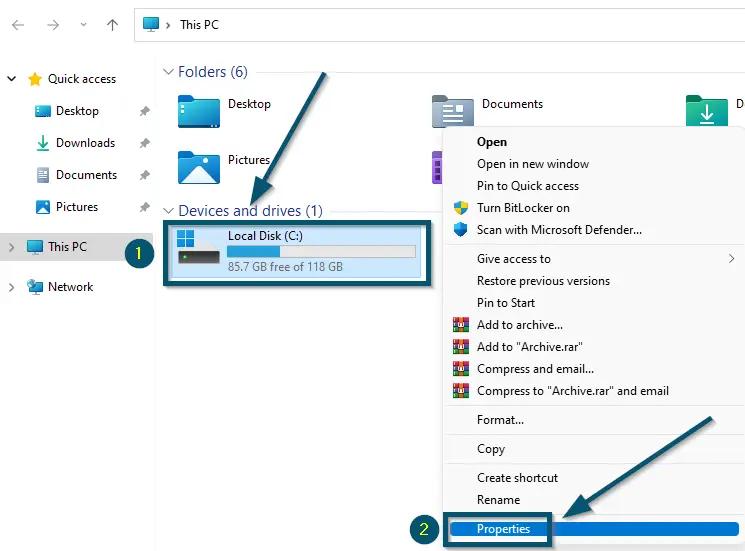
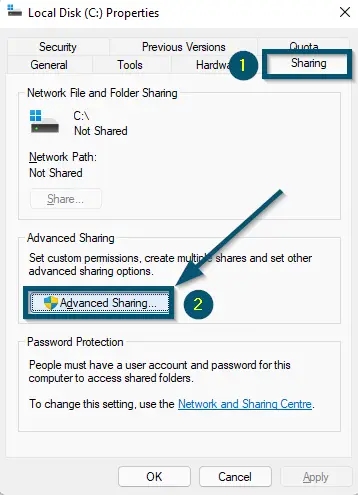
- First, open the ‘File Explorer’ and right-click on the drive of the target computer.
- Then, choose the ‘Properties’ option.

Going to the ‘Properties’ of the drive (which contains the content to be shared) on the target computer - Switch to the ‘Sharing’ tab in the ‘Properties’ sub-window.
Note: You could see the ‘Network Path’ says ‘Not shared.’ So, if that is your case, follow the next steps of this solution. Otherwise, try the next solution
- Then, click on the ‘Advanced Sharing…’ button.

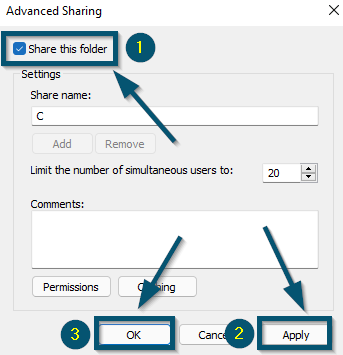
Switching to the ‘Sharing’ tab and clicking on the ‘Ádvanced Sharing…’ button - A new sub-window will open. So, check the ‘Share this folder’ option.
- Then, click on the ‘Apply’ and ‘OK’ buttons to save the new settings.

Checking the ‘Share this folder’ option and applying the settings
3. Enabling the ‘SMB 1.0/CIFS File Sharing Support’ Feature
Some features of Windows require you to enable some additional features through the ‘Control Panel’ of your system. The same is the case with file-sharing between the two Windows systems using the default file-sharing feature.
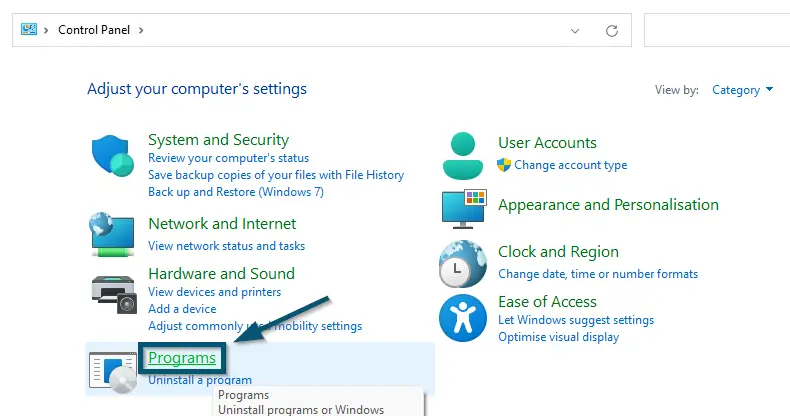
- First, go to the ‘Control Panel’ of your system.
- Then, click on the ‘Programs’ option.

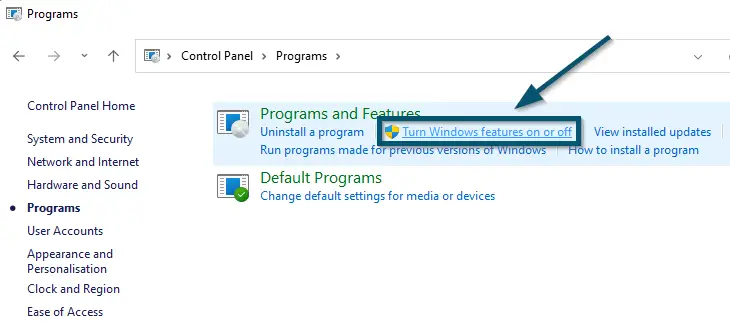
Clicking on the ‘Programs’ category from the main page of the ‘Control Panel’ window - Now, click on the ‘Turn Windows features on or off’ option under the ‘Programs and Features’ option.

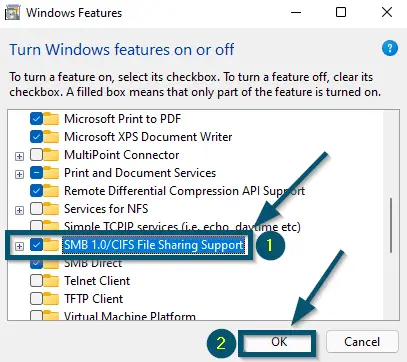
Clicking on the ‘Turn Windows feature on or off’ option under the ‘Programs and Features’ section - A sub-window will open. So, scroll down to find the ‘SMB 1.0/CIFS File Sharing Support’ option and click the checkbox against it to turn it on.
- Then, click on the ‘OK’ button to apply the changes.

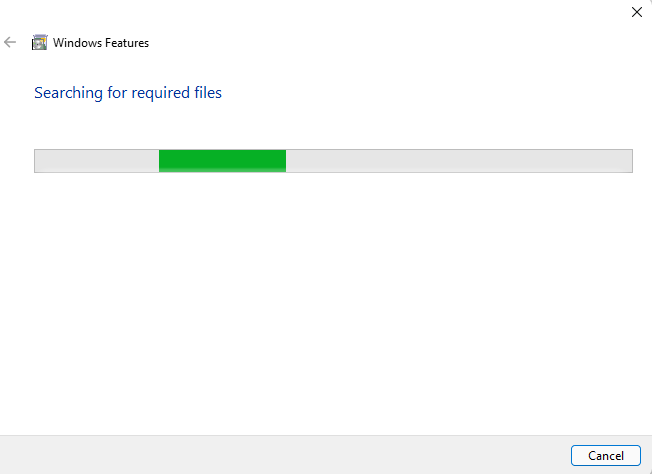
Enabling the ‘SMB 1.0/CIFS File Sharing Support’ option and applying the settings - Windows will start the search for the required files and apply the changes.

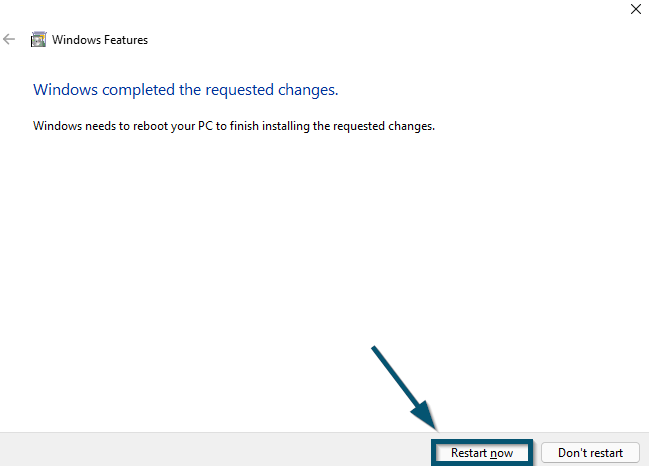
Windows is searching for required files for enabling the ‘SMB 1.0/CIFS File Sharing Support’ option - After some time, it will ask you to restart the system. So, click on the ‘Restart now’ option to restart your system.

Clicking on the ‘Restart now’ option to restart the system and finish the installation changes
4. Adding Windows Credentials Using ‘Credentials Manager’
Tested for ‘Windows 10 Enterprise’ Versions as well
Sometimes, this error message occurs when the system’s credentials for file sharing are not correct. We can access Windows Credentials and add them through the manager.
- Open the ‘Control Panel’ of your system.
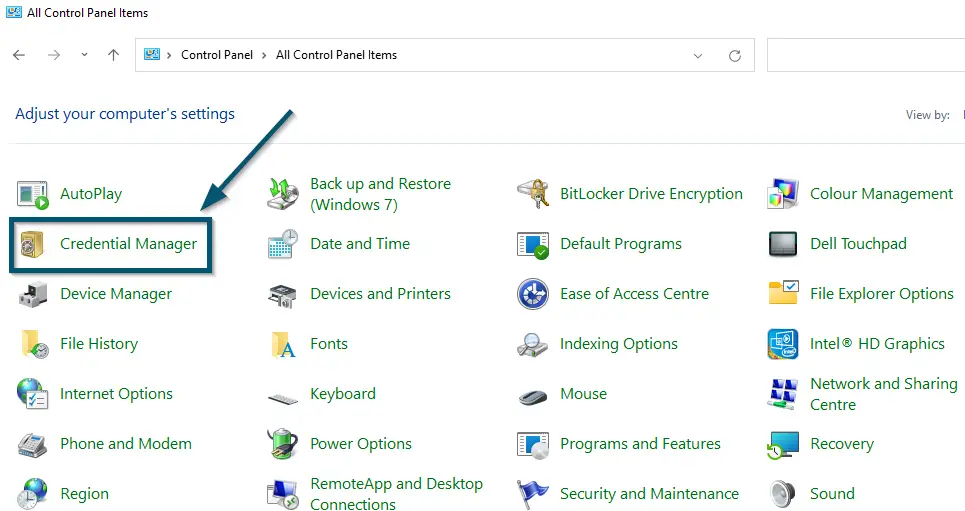
- Then, change the ‘View by:’ to ‘Large icons’ first.

Switching the ‘View by:’ to ‘Large icons’ from the ‘Category’ option - After that, click on the ‘Credential Manager’ option.

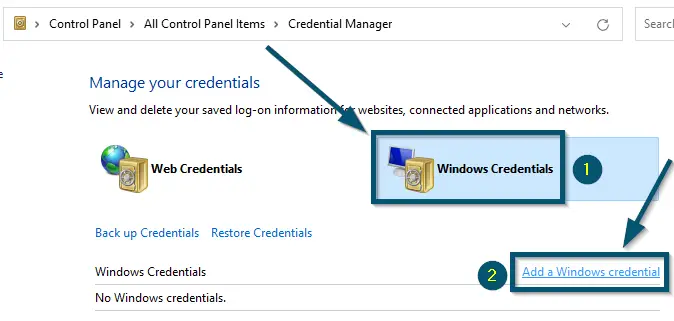
Clicking on the ‘Credential Manager’ option in the ‘All Control Panel Items’ window - Then, click on the ‘Windows Credentials’ option and, after that, choose the ‘Add a Windows credential’ option.

Clicking on the ‘Windows Credentials’ option and then, clicking on the ‘Add a Windows credential’ option - Now, add the credentials according to your use case and click on the ‘OK’ button.

Adding the credentials of a user having administrator permission on the share and clicking on the ‘OK’ button
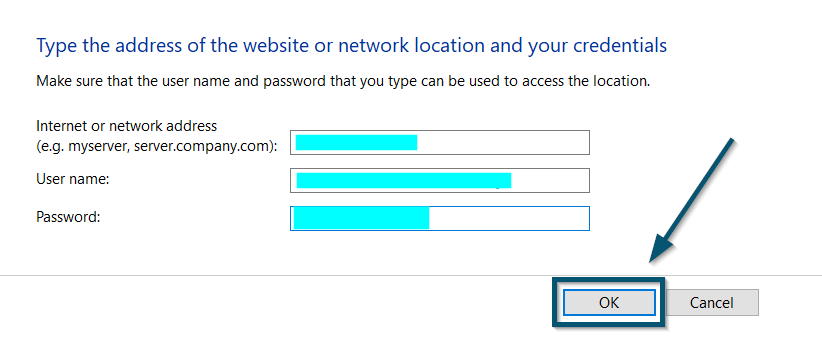
Important: Here, you will use the credential of a user on that computer, which has administrator permission on the share
5. Changing the Value of ‘AllowInsecureGuestAuth’
File servers allow unauthenticated access to the shared folder by using the insecure guests’ logons. So, if you have disabled the ‘AllowInsecureGuestAuth’ option, you might face this error. If this situation represents your use-case, enable the ‘AllowInsecureGuestAuth’ option via ‘Registry Editor.’
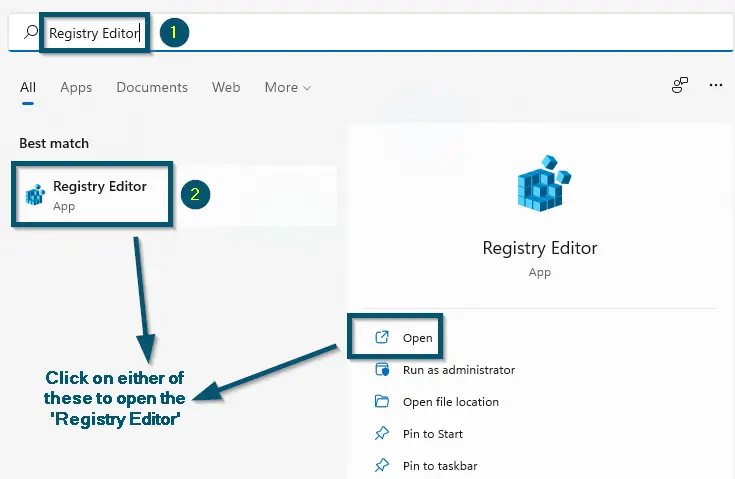
- First, open the ‘Registry Editor’ on your system.

Opening the ‘Registry Editor’ - Now, paste the following address after ‘Computer’ in the address bar of ‘Registry Editor.’
\HKEY_LOCAL_MACHINE\SYSTEM\CurrentControlSet\Services\LanmanWorkstation\Parameters
- Then, hit the ‘Enter’ key to reach the required ‘Parameters’ folder.

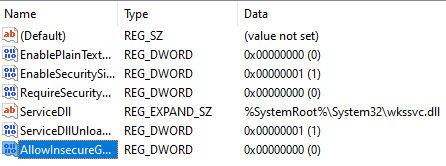
Pasting the Path of ‘Parameters’ folder in the address bar of ‘Registry Editor’ - Once you are in the ‘Parameters’ folder, open the ‘AllowInsecureGuestAuth’ entry by double-clicking on it.

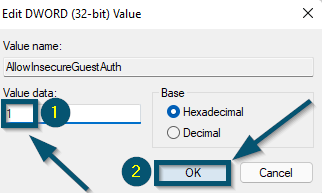
Selecting the ‘AllowInsecureGuestAuth’ entry in the ‘Parameter’s’ Folder of ‘Registry Editor’ - Then, change its value from ‘0’ to ‘1’ and click on the ‘OK’ button.

Changing the value of ‘AllowInsecureGuestAuth’ from ‘0’ to ‘1’ and clicking on the ‘OK’ button to save the changes

6. Enabling Insecure Guest Logons Using the ‘Local Group Policy Editor’
If you face the same error message on trying to open the drive of the second connected computer on the first one and you have double-checked everything, it might be because of the disabled ‘insecure guest logons.’
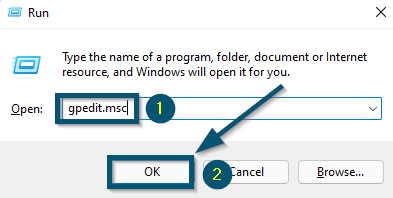
- First, open the ‘Run’ dialog box by pressing the ‘Windows + R’ keys.
- Then, type the following command and click on the ‘OK’ button.
gpedit.msc
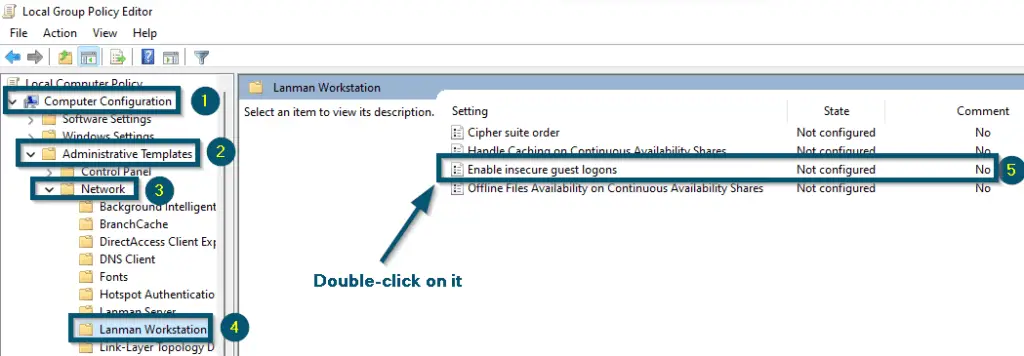
- Now, navigate to the path of the ‘Enable insecure guest logons’ file by going to the ‘Local Computer Policy’ < ‘Computer Configuration’ < ‘Administrative Templates’ < ‘Network’ < ‘Lanman Workstation’ options.
- Then, double-click on the ‘Enable insecure guest logons’ file.

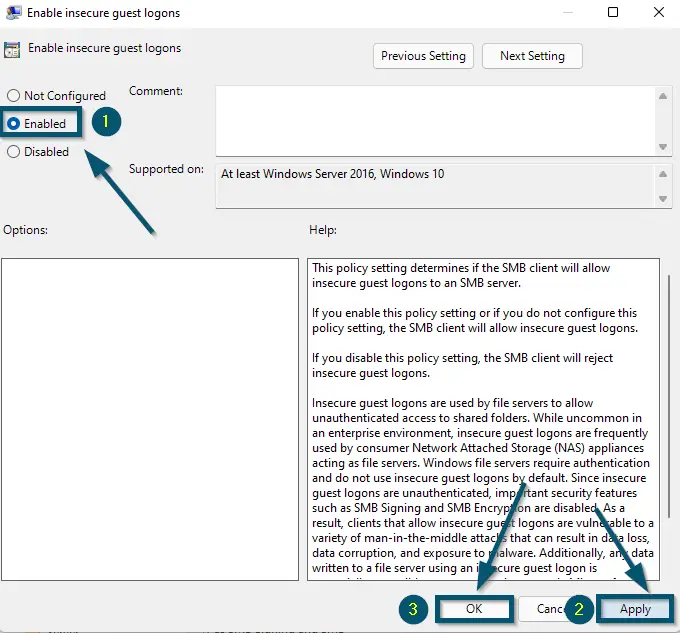
Navigating to the path on ‘Enable insecure guest logons’ and double-click on it - A sub-window will open. So, choose the ‘Enable’ option and apply the settings.

Enabling the ‘Enable insecure guest logons’ option and applying the settings
Check whether you can access your network share now or not. If yes, then good for you. Otherwise, try some other solution.
7. Flushing the DNS
When a particular web service doesn’t work on your system, flushing the DNS is one of the best remedies to apply in that situation.
- First, check whether or not flushing the DNS fixes this issue. If not, then try the next steps.
- However, if rebooting the system after DNS flushing hasn’t solved this issue, we recommend running the following commands in the same (Administrator-level window of) command prompt.
ipconfig /flushdns

nbtstat –r

netsh int ip reset

netsh winsock reset
Note: Hit the ‘Enter’ key after each command to execute that specific command
- Now, restart your system by going to the ‘Start’ < ‘Power’ < ‘Restart’ options.
Restarting the system
8. Updating the Windows to the Latest Version
Sometimes the error message ‘Error code: 0x80070035 Windows Server 2016’ occurs because of some bugs in your Windows OS. Installing the latest version will fix this problem.
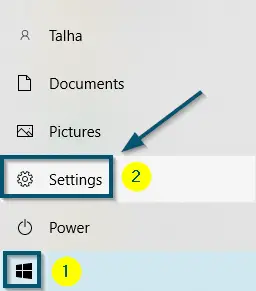
- First of all, open the ‘Settings’ of your Windows system.

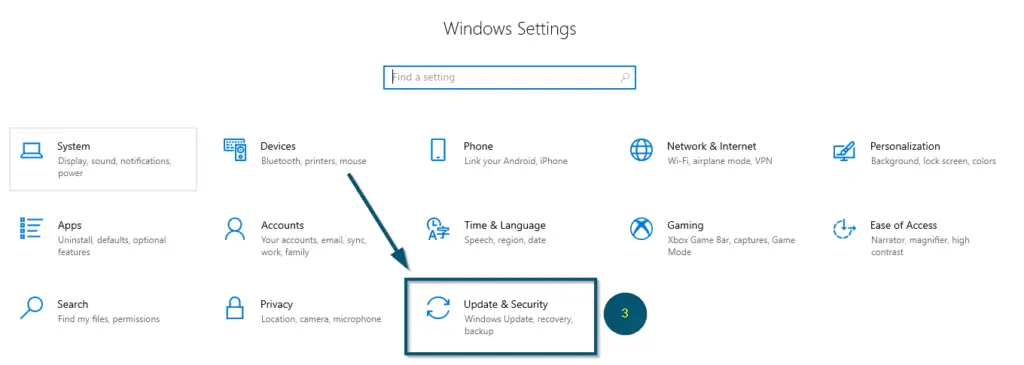
Going to the ‘Settings’ from the ‘Start menu’ - Then, click on the ‘Update & Security’ option.

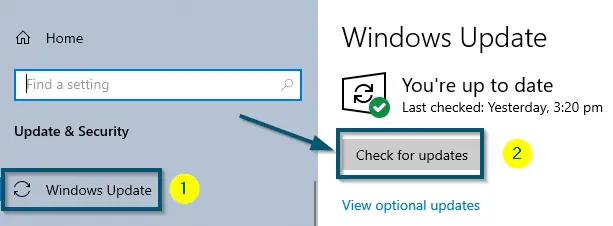
Clicking on the ‘Update & Security’ option - Now, click on the ‘Check for updates’ button to let Windows download the latest updates.

Clicking on the ‘Check for updates’ button
Note: Your system will restart while installing updates. So, don’t worry
9. Installing the ‘KB4487345’ Update
Valid for Windows 7 Users
If the error message persists after updating the system, we recommend checking whether you are using the ‘KB4480970’ version of Windows-7 or not. If yes, you should know that several users have reported the ‘Error code 0x80070035 the network path was not found Windows 7’ error message in the ‘KB4480970’ version.
So, uninstalling the ‘KB4480970’ update and installing the ‘KB4487345’ version will fix this issue. However, you will have to use Microsoft Update Catalog to install this particular version. So, check our complete guide regarding installing a Windows update manually.
Note: Once you have updated your system to the ‘KB4487345’ version, the system will automatically uninstall the previous version
10. Repairing ‘SMBv2’ Using ‘Command Prompt’
Tested for ‘Windows 7’ Users
If you don’t want to uninstall the faulty update or the error persists after applying the previous solutions, we recommend repairing the SMBv2. So, try the following steps.
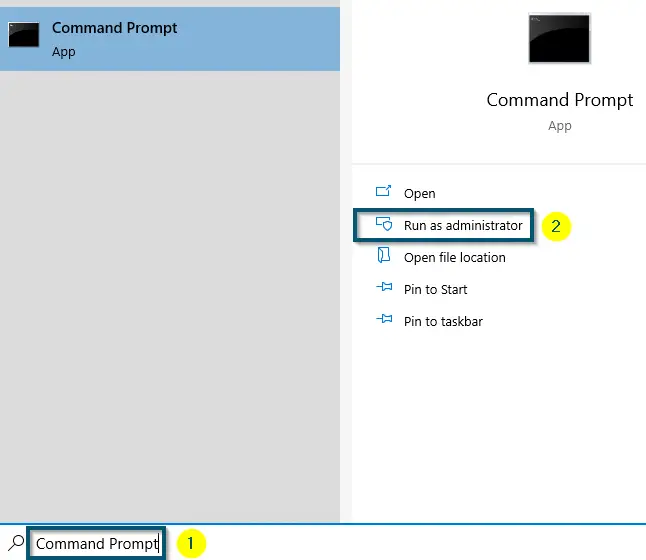
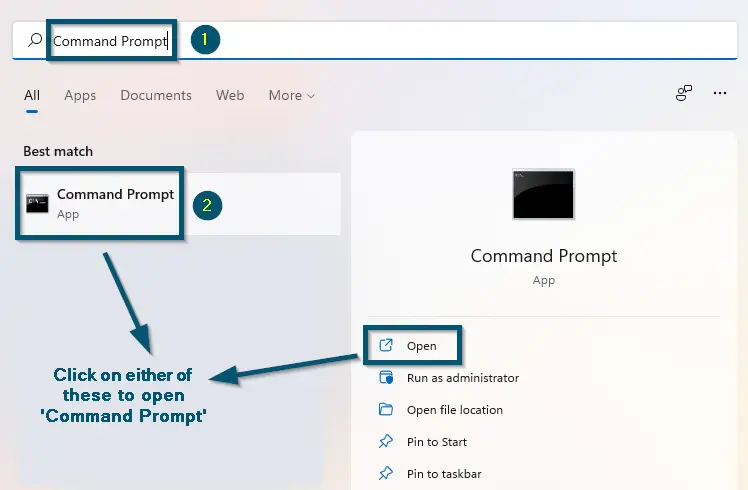
- First, open the ‘Command Prompt’ as administrator.

Opening ‘Command Prompt’ as ‘Administrator’ - Then, type the following command and hit the ‘Enter’ key to execute the command:
reg add HKLM\SOFTWARE\Microsoft\Windows\CurrentVersion\Policies\system /v LocalAccountTokenFilterPolicy /t REG_DWORD /d 1 /f

11. Connecting to the Target Computer Address Using IP Address
If the error message persists after following the above solutions, we recommend connecting to the target computer using the IP address. So, first, we’ll note down the IPv4 address of the system and, after that, we’ll connect to the target computer.
Steps for Finding the ‘IPv4 Address’
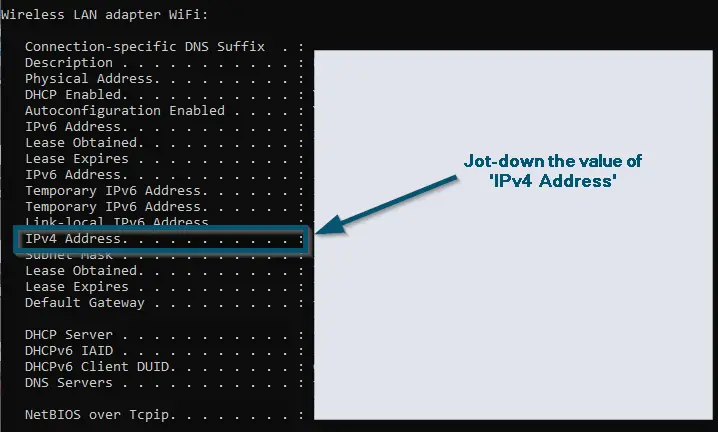
- First, open the ‘Command Prompt.’

Opening the ‘Command Prompt’ from ‘Start menu’ - Then, paste the following command and hit the ‘Enter’ key to execute it.
ipconfig /all
- Now, note down the address against the ‘IPv4 Address’ option.

Jotting down the value of ‘IPv4 Address’
Steps for Connecting to the Target System
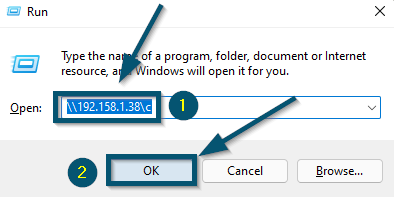
- Press the ‘Windows + R’ keys to open the ‘Run’ dialog box after jotting down the ‘IPv4 Address.’
- Then, type your IPv4 address in the following way:
\\192.158.1.38\c
Note: Replace the ‘192.158.1.38’ entry with the ‘IPv4 Address’ value and ‘c’ letter with the letter of the drive you want to access in your case
- Now, click on the ‘OK’ button.

Pasting the ‘IPv4 Address’ and the drive letter in the ‘Run’ dialog box and clicking on the ‘OK’ button
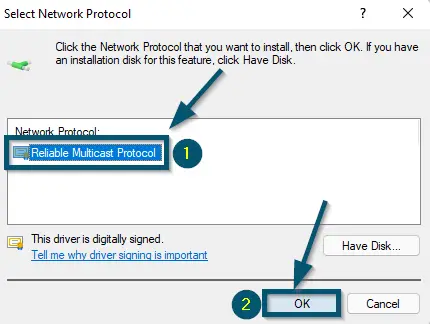
12. Adding a Reliable Protocol
Sometimes this error message might occur because of an unreliable multicast protocol. We can remedy this by adding a better protocol manually.
- First, press the ‘Windows + R’ keys to open the ‘Run’ dialog box.
- Then, type the following command in the ‘Run’ dialog box and click on the ‘OK’ button.
ncpa.cpl
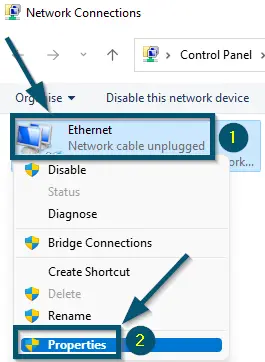
- Now, right-click on the ‘Ethernet’ network option and choose the ‘Properties’ option.

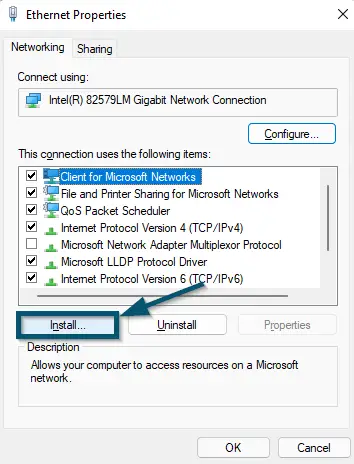
Selecting the ‘Ethernet’ network and right-clicking on it to select the ‘Properties’ option - Click on the ‘Install’ button in the ‘Ethernet Properties’ window.

Clicking on the ‘Install…’ button in the ‘Ethernet Properties’ window - A sub-window will open. So, select the ‘Protocol’ as your ‘Network Feature Type’ and click on the ‘Add…’ button.
- Now, select the ‘Reliable Multicast Protocol’ network protocol and click on the ‘OK’ button.

Selecting the ‘Reliable Multicast Protocol’ network protocol and clicking on the ‘Add’ button
13. Downgrading the Firmware of ‘QNAP’ from Version ‘4.3.6.1050’
If you face the ‘the network path was not found joining domain’ error message while trying to connect to QNAP through Windows networking, you might be using the faulty ‘4.3.6.1050’ firmware version. So, if this is your case, downgrade the QNAP firmware version.
Steps for Verifying the Model Number of Your Device
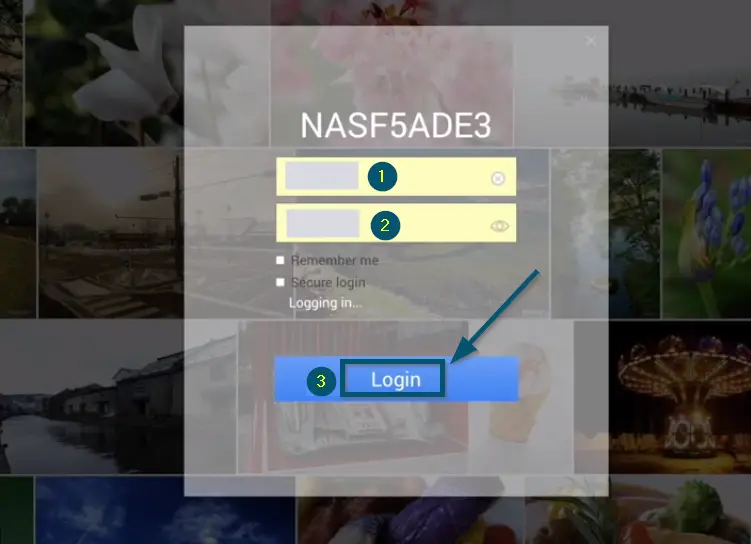
- First, log in to NAS as an admin user.

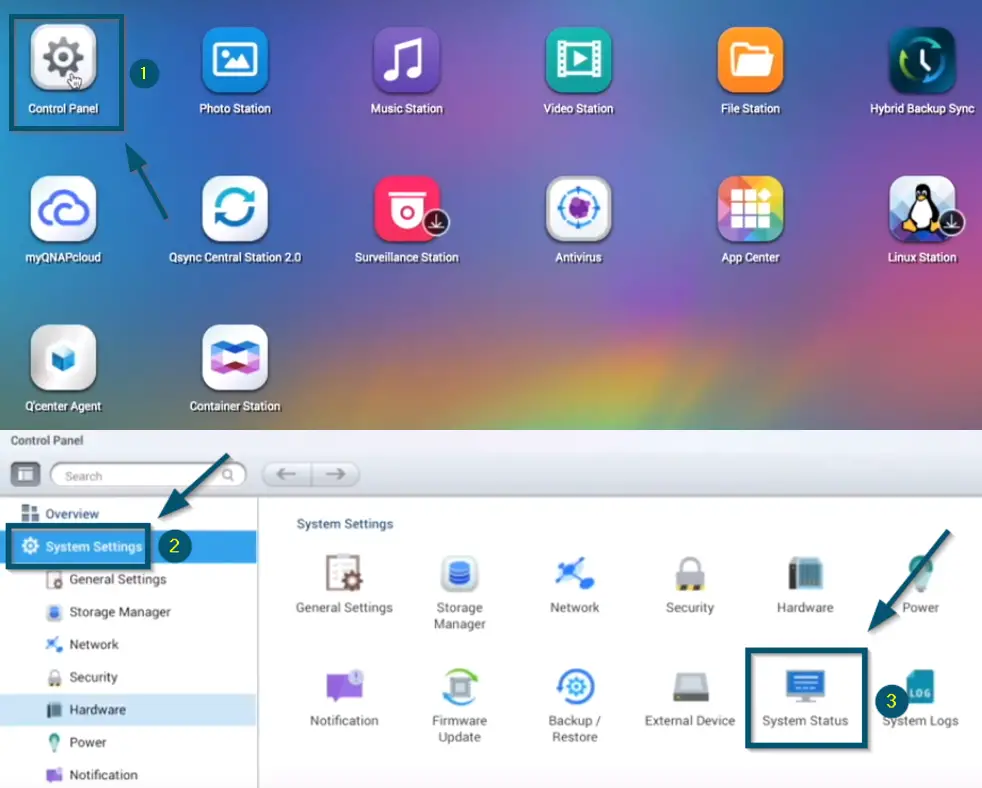
Logging into NAS as an admin user - Then, click on the ‘Control Panel’ option.
- Now, choose the ‘System’ option and after that, click on the ‘System Status’ option inside the ‘Control Panel’ option.

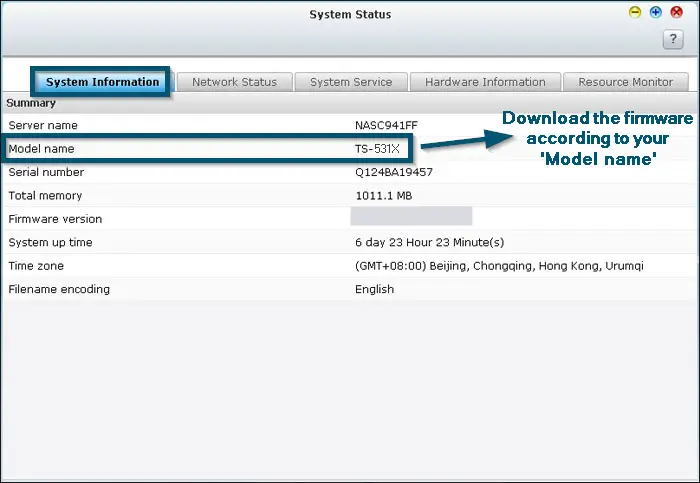
Going to the ‘Control Panel,’ then ‘System’ and ‘System Status’ option - Once you are in the ‘System Status’ window, jot down the ‘Model name’ in the ‘System Information’ tab.

Jotting down the ‘Model name’ of ‘QNAP Device’ from the ‘System Status’ window
Note: You will do the same procedure according to the model of your device in your case
Steps for Downloading the Firmware
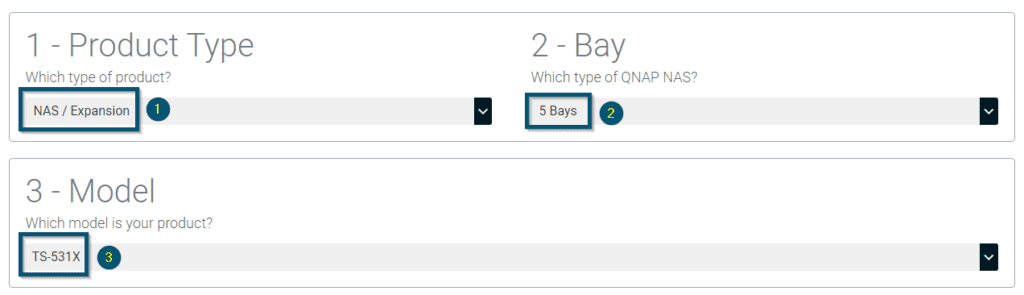
- Now, navigate to the official support page of QNAP.
- Then, select the ‘Product Type,’ ‘Bay’ and ‘Model’ according to your device.

Selecting the ‘Product Type,’ ‘Bay’ and ‘Model’ according to our device for revealing the available firmware - After that, scroll down to find the required firmware version and once you have found it, choose the region according to your location and click on it to begin the downloading.

Choosing the required firmware version and clicking on the region to begin the downloading

Steps for Downgrading the Firmware
Important: We recommend performing a complete backup of the data before proceeding
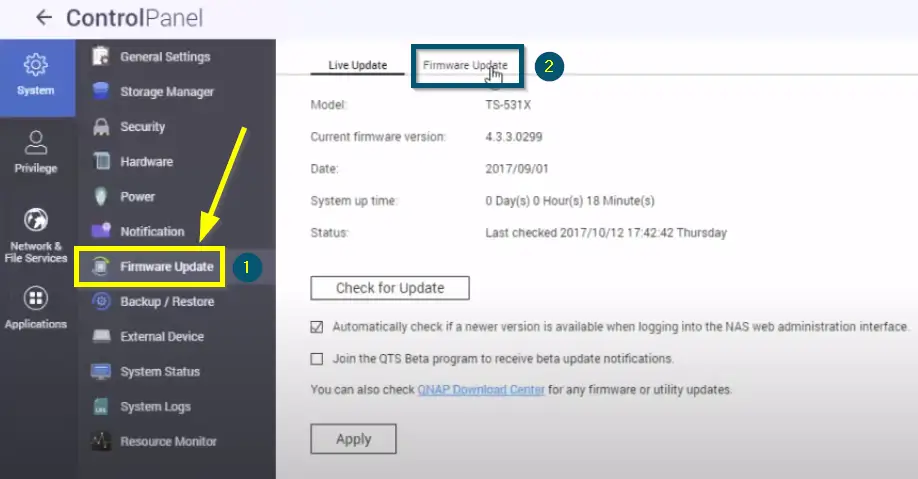
- Once the system has successfully downloaded the firmware, log in to NAS as an admin user and go to the ‘Control Panel’ (again).
Note: You can follow the ‘step number 1 and 2’ of this solution as a guideline
- Then, click on the ‘Firmware Update’ option and, after that, click on the ‘Firmware Update’ tab.

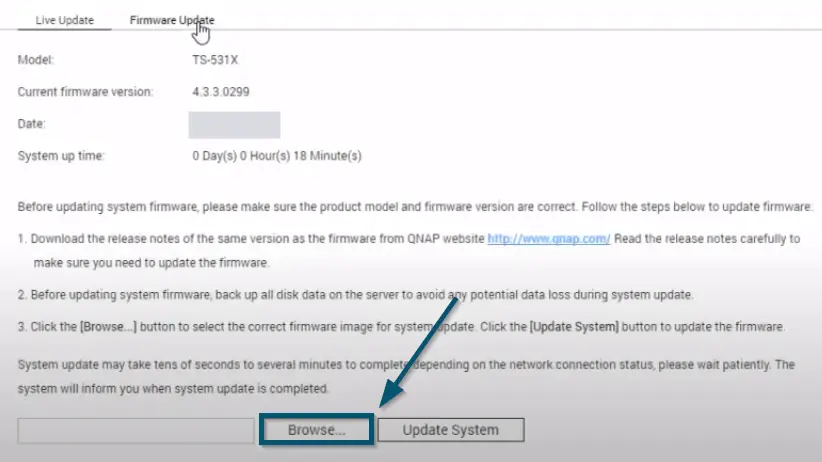
Clicking on the ‘Firmware Update’ option inside the ‘Control Panel’ - Next, click on the ‘Browse’ button to locate the downloaded firmware file of QNAP.

Clicking on the ‘Browse’ button inside the ‘Firmware Update’ option - A sub-window will open. So, select the downloaded firmware file and click on the ‘Open’ button.

Selecting the downloaded firmware file and clicking on the ‘Open’ button - Now, click on the ‘Update System’ option.

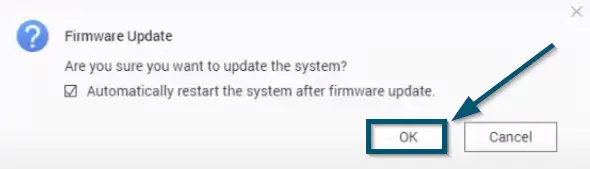
Clicking on the ‘Update System’ button after uploading the file to ‘NAS Control Panel’ - A confirmation box will appear. So, click on the ‘OK’ button to confirm the firmware updating process.

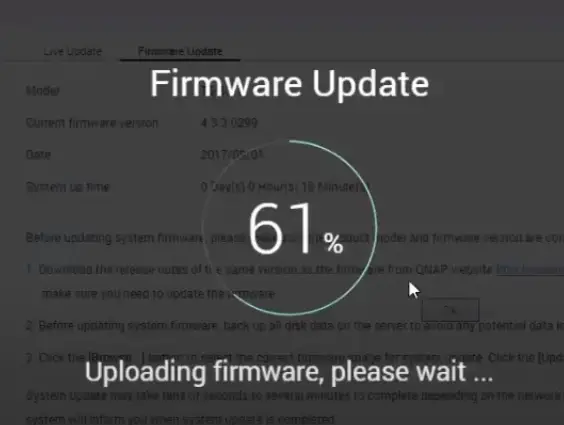
Clicking on the ‘OK’ button to confirm the ‘Firmware Update’ process - The control panel will upload the firmware and, after some time, it will start the update installation process.

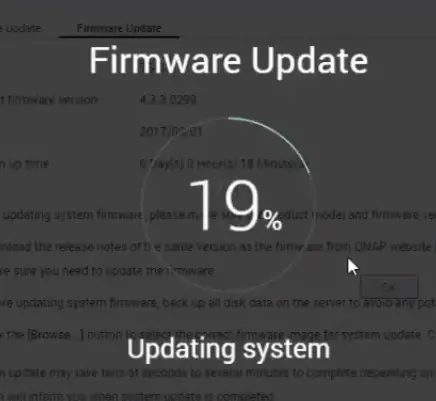
Control Panel uploading the firmware 
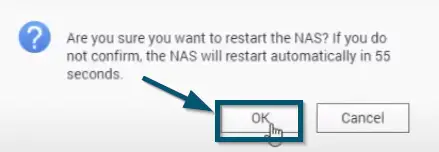
Control Panel updating the firmware - Once the installation is complete, the ‘Control Panel’ will ask you to restart the NAS. So, click on the ‘OK’ button.

Clicking on the ‘OK’ button to confirm the NAS restart - After the NAS restarts, log in to the NAS again as admin.
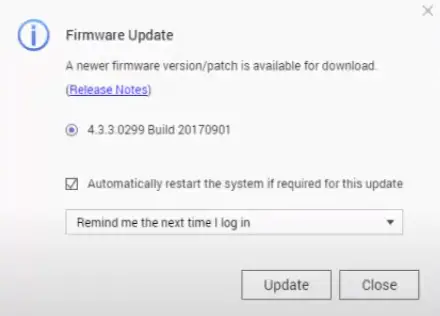
- Then, an update available message will appear, which indicates the success of the firmware downgrading procedure.

Message for an available firmware update, which indicates the success of firmware downgrading operation


14. Re-adding the Firewall Rules
If you have updated the Windows version of your server and, after updating it, it doesn’t let other machines connect to the shared folders, we recommend re-adding the firewall rules.
Sometimes, Windows deletes the entries for the trusted network and people face either ‘0x80070035’ or (while navigating to the shared address in File Explorer) ‘0x80004005’ error code.
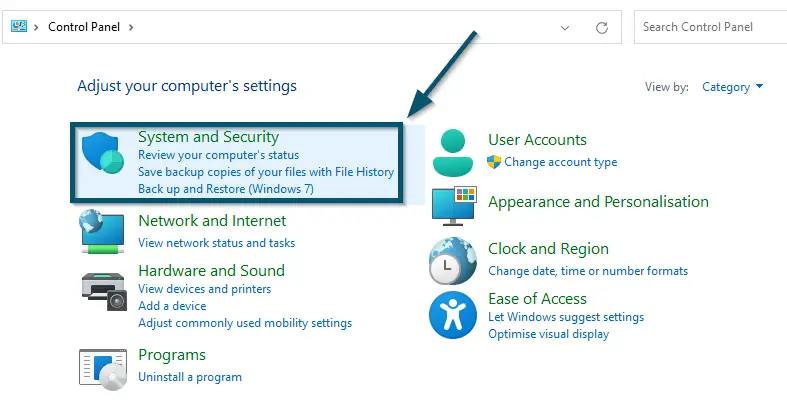
- First, go to the ‘Control Panel’ of your system.
- Then, click on the ‘System and Security’ option.

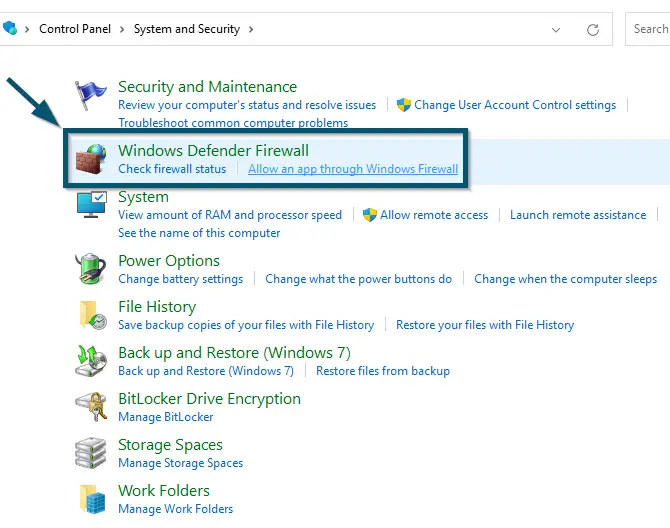
Clicking on the ‘System and Security’ option - Choose the ‘Windows Defender Firewall’ option in the new window.

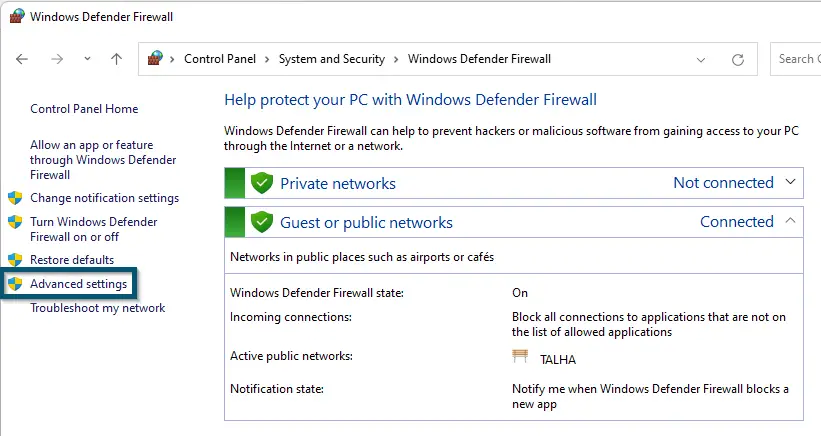
Choosing the ‘Windows Defender Firewall’ option inside the ‘System and Security’ window - Now, click on the ‘Advanced settings’ option from the side options.

Clicking on the ‘Advanced Settings’ option for ‘Windows Defender Firewall’ - Then, click on the ‘Inbound Rules’ first to open the ‘Inbound Rules’ window. After that, right-click on the ‘Inbound Rules’ option from the side options and choose the ‘New Rule…’ option.
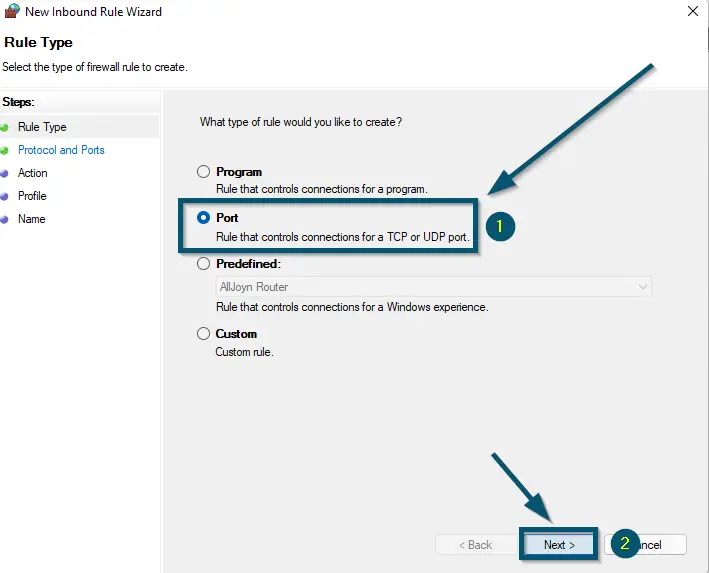
- A sub-window will open. So, choose the ‘Port’ option and click on the ‘Next’ button.

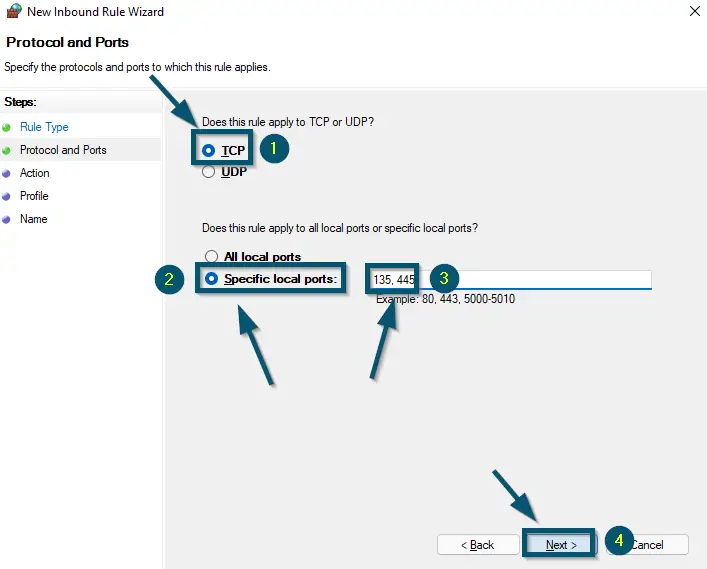
Choosing the ‘Port’ option in ‘New Inbound Rule Wizard’ and clicking on the ‘Next’ button - Then, choose the ‘TCP’ and ‘Specific local ports:’ options and add the ‘135, 445’ port numbers against the ‘Specific local ports:’ text box option.
- After that, click on the ‘Next’ button and perform the on-screen operations to complete the procedure.

Choosing the ‘TCP’ and ‘Specific location ports:’ options, typing the ports we want to enable and clicking on the ‘Next’ button
15. Resetting the Windows System
Last Resort
If the error message persists after trying all the above solutions, we recommend resetting your system by keeping the data. Resetting the Windows system will restore the network drive connections to the default settings. But this method should be your last resort.
The issue will resolve once the reset operation is successful. So, try the file-sharing again to ensure the success of this method.