WerFault.exe (Windows Error Reporting) is a process by Microsoft that is used to keep track of error logs of all applications and report crash reports to Microsoft. This process first came to light in February 2006 and has been around since.
There are several instances where this process starts consuming giving an Application Error or starts consuming CPU resources consistently. This mostly occurs due to an external application or when the process’s own files are corrupt.

What is WerFault.exe?
As mentioned before, ‘WerFault.exe’ is a genuine Windows process and is used to help log errors and crash reports. This is used by both; the computer and Microsoft. The computer uses the process to keep track of failing processes and Microsoft uses it to collect diagnostic data to improve the operating system.
You should find the process residing in the System32 folder on your computer.
Is WerFault.exe a Virus?
The complete form of the WerFault.exe process is Windows Error Reporting Fault. According to its definition, it is not a virus. Instead, it is an essential component of the Windows operating system. Hence, we don’t recommend disabling it.
But often, malware creators deceive Windows users by naming malware as the built-in Windows process. So, if the WerFault.exe process creates issues in your system, we recommend checking the safety of this process just to be sure about the authenticity of the application.
What is the WerFault.exe Application Error?
This error usually occurs when some files of the process are either missing from the operating system or the version present on your computer is outdated. In both cases, making sure that the files and the operating system are updated will fix the issue.

However, in some instances, some applications might be triggering the error message. In this case, we recommend opening the Event Viewer application and seeing the source of the error message. Then you can move forward to either updating the application, resolving the problem that is occurring, or uninstalling it altogether.
How to Disable WerFault.exe?
You can easily disable the process through the services interface in Windows. This will stop the application from spawning itself in the future. Disabling this process will not break your Windows but rather only strip the ability to properly log errors and crashes.
Most of the data generated by this process are only used by internal Microsoft staff so it shouldn’t have any visible effects on your operating system.
Note: If you are experiencing the Application error, make sure to try the steps listed below before you disable the process completely.
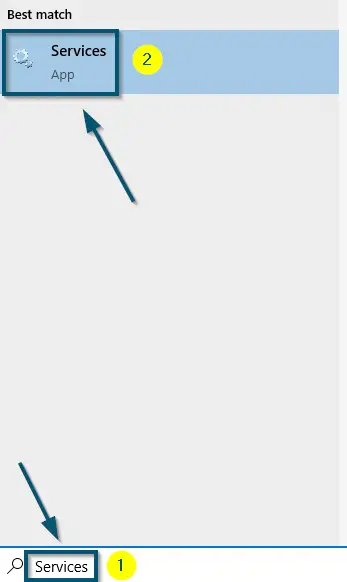
- Open the ‘Services’ application on your system.
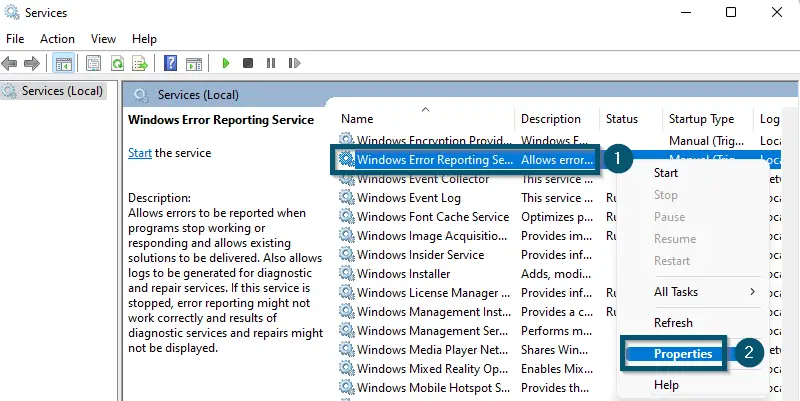
Opening the ‘Services’ application from the ‘Start menu’ - Now, scroll down to find the ‘Windows Error Reporting Service’ entry and right-click on it.
- Then, choose the ‘Properties’ option.
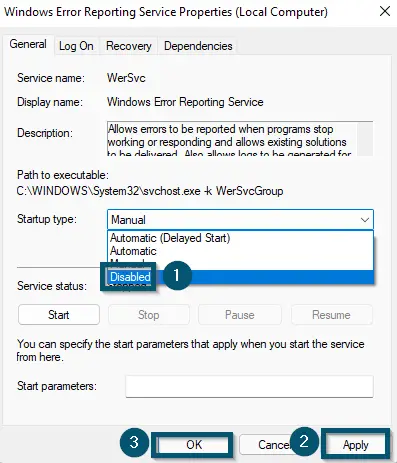
Right-clicking on the ‘Windows Error Reporting Service’ and choosing the ‘Properties’ option - A sub-window will open. So, change the ‘Startup type:’ to ‘Disabled’ and apply the settings. Doing this will disable the WerFault.exe altogether.
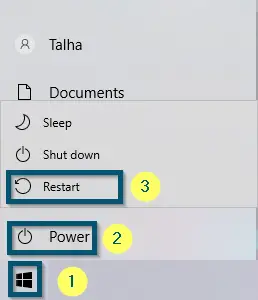
Changing the ‘Startup type’ to ‘Disabled’ and applying the settings - Now, restart your system for the changes to take place.
Restarting the system
How to Fix the WerFault Application Error?
Here are verified and tested methods to fix the error message. Make sure you start with the first one and work your way down accordingly.
1. Running the System File Checker
System File Checker (SFC) is the built-in component of Windows that scans and repairs corrupted system files by replacing them with their original versions. Experts recommend running an SFC scan if you face the BSOD or program crashing issues in Windows systems.
We have already created a thorough guide on when and how to use the SFC scan. So, follow the complete guide to fix the faulting application name WerFault.exe problem. This process will remove all older versions of files and replace them with new ones. It will also check for any missing files in your operating system.
Also Read: PFN List corrupt
2. Scanning the System for Malware
As mentioned earlier, often malware developers name malware as official executable files to deceive Windows users. Such executable files create issues like high-resource consumption and continuously interrupt the systems with error messages. In this case, you should use malware removers. A few of the best malware removers are:
- Malwarebytes.
- Avast.
- AVG.
- Bitdefender.
- Emsisoft.
- Norton AntiVirus.
3. Checking the Event Viewer for Responsible Process
Another thing to check before we move on to other solutions is to check whether a specific process is causing the process to go into an error state or consume large resources. This is a very common scenario and can occur with any application.
As we cannot see directly which process spawns the process, the Event viewer will show us what caused the process in the first place.
- Type ‘Eventvwr.msc’ in the dialog box and open the Event Viewer.
- At a first glance, you will the Summary of Administrative events. This will show an overview of all errors that are occurring.
- Expand the Error section and click the Application Error.
- After being redirected to a new page, make sure you look at the first line of the gray box. It will contain the name of the application which is causing the errors.
- Once you have identified the program, check and try to make out what is causing the issue. We’ve seen a wide range of applications that include VPN services as well. You can either disable the application or uninstall it if you are not using it.
4. Performing a Disk Clean-up
We have also found links between older junk files present in disks with the errors associated with WerFault.exe. Even though this doesn’t make sense, in reality, a lot of these files are still linked with the operating system and also cause the process to respond slowly and eventually, time out.
Running a disk clean-up will instantly remove all the junk files including logs that are not required by the operating system.
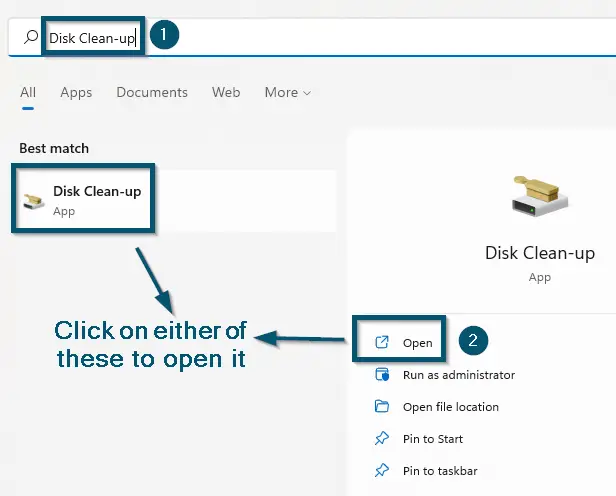
- Search for ‘Disk Clean-up’ on your system and open this application.
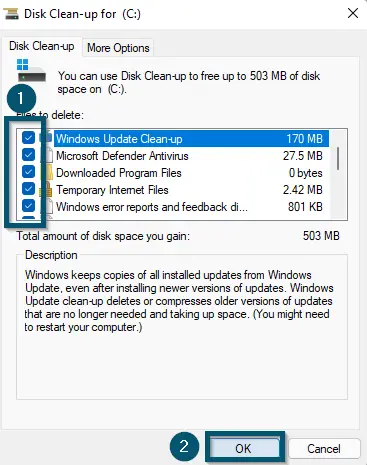
Searching and opening the ‘Disk Clean-up’ application - Then, check every box in the newly opened window except the ‘Downloaded Program Files’ entry because it will also remove your downloads.
- Then, click on the ‘OK’ button.
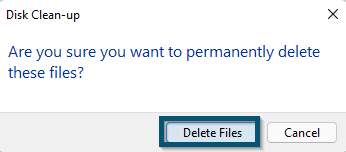
Selecting the files to delete and clicking on the ‘OK’ button - After that, click on the ‘Delete files’ button.
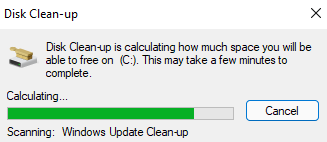
Clicking on the ‘Delete Files’ button - Doing this will start the disk clean-up procedure. Make sure you complete the process and restart your computer to make sure all changes are implemented.
Disk Clean-up program is cleaning the files
5. Performing Memory Diagnostics
Your memory is constantly being written into by hundreds of processes at once in order to store valuable information which is used in their operation. Even though the whole process is completely seamless, there are instances where some blocks might get corrupted or have bad data present.
It is here that the process kicks in; its main duty is to log issues/errors and in some cases, it goes into overdrive. Checking for memory problems will identify any issues and fix them immediately.
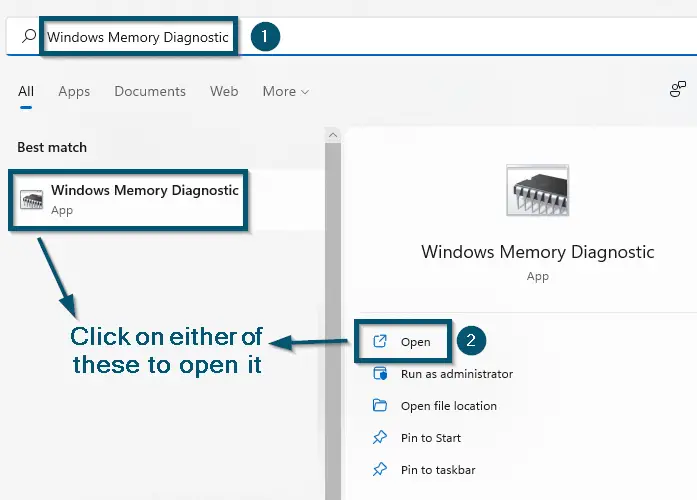
- Search for the ‘Windows Memory Diagnostics’ tool and open it.
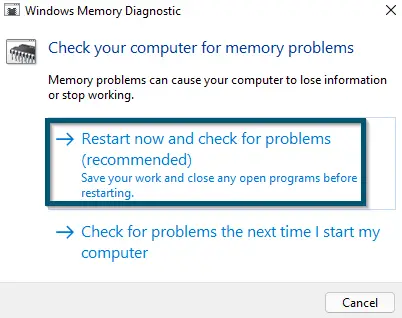
Searching and opening the ‘Windows Memory Diagnostic’ application - Then, click on the ‘Restart now and check for problems (recommended)’ option. This step will restart your system. So, upon restart, the ‘Windows Memory Diagnostics’ tool will scan your system.
Clicking on the ‘Restart now and check for problems (recommended)’ option
After all the process is complete, restart your computer and see if the issue is resolved.

