‘MoUSO Core Worker Process’ (Microsoft Update Session Orchestrator) is a Windows process that automatically activates in the background whenever Windows checks for updates. Microsoft introduced this process in version 1903 of Windows 10. If you are using any Windows 10 version before 1903, you might not find it in the ‘Task Manager.’
This process works alongside the following executables and DLL files to manage and install the new features and Windows updates on a system:
- USOCoreWorker.exe
- USOClient.exe
- USOapi.dll
- USOcoreps.dll
- USOsvc.dll
This process is necessary because it keeps the system protected against threats by updating the system. However, it also continually wakes up your system from sleep and you will often find the fan of your system running or blinking LED lights because it cannot find the update status.
If you find that this process is excessively consuming your system resources or simply don’t want your computer waking up, you should disable it.
We went through a lot of different use cases and found out that this process went into overdrive after a Windows Update. Microsoft officials have not publically responded to this problem in any forums. In some cases, installing the latest updates fixed the issue instantly while in others, users couldn’t get the process to settle down even after the update.
Is ‘MoUSO Core Worker Process’ Safe?
Like the high-resource consumption of ‘Waasmedic Agent.exe,’ MoUSO (Update Session Orchestrator) Core Worker Process also consumes excessive system resources due to its flawed implementation after a Windows update. It should be noted however that it is a legitimate Windows Process to help the process of installing updates to the computer system. You can check out the detailed process at Microsoft’s explanation.
However, there are changes, even though very little, that some malware creators are naming their processes as this one to inject trojans or malware. If you have any doubts, you should check the authenticity of this process.
How to Check if this is Conflicting with Sleep Function?
MoUsoCoreWorker.exe is known to block the Sleep mode of several computers. This occurs because whenever your computer goes into sleep mode, Windows pings its Update servers to check if there are any updates to be installed. The MoUSO Core Worker Process facilitates this process by scanning the system and determining if any update is available.
If an update is blocked and is not letting the system going forward, it might have the process go into overdrive and make it keep running. Here are the steps you should follow to check if this is happening:
- Open an elevated Windows command prompt. Open your Windows search, type ‘command prompt’, right-click on the application, and select Run as administrator.
- Once you are in an elevated command prompt, type the following:
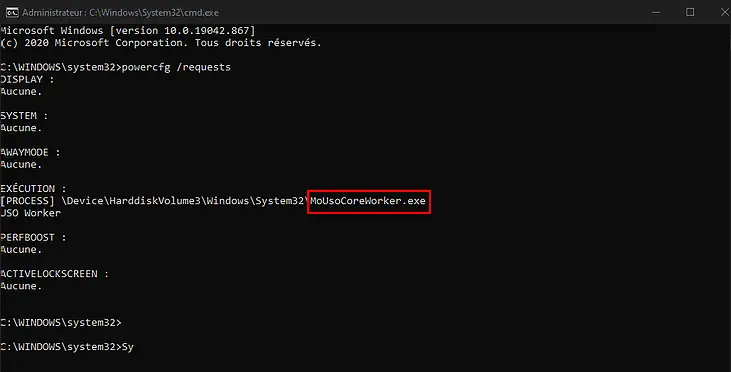
powercfg /requests

Checking processes blocking the power cycle - Here, you will see the process listed if it is blocking the sleep mode.
- If it is, press Windows + R, and then type the following command:
services.msc
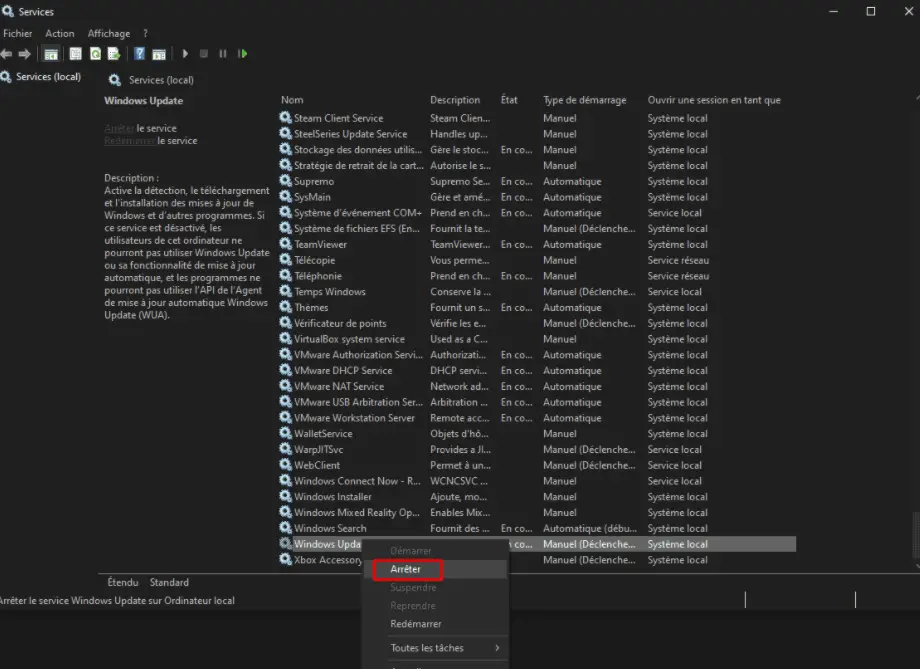
- Next, find the Windows Update service. Now, right-click on it and click on Stop.

Stopping Windows Update Process - Next, click on the service again and click Start followed immediately by Restart.
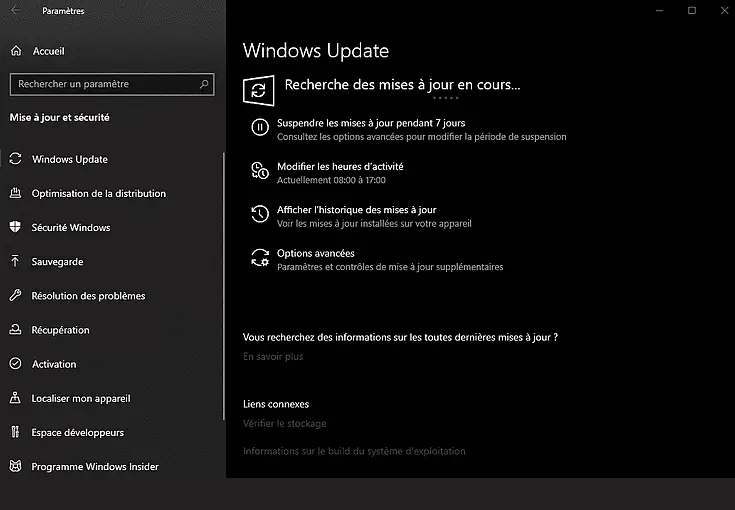
- Now open the Windows Update panel on your computer and install all pending updates.

Installing Pending Updates - Restart your computer and check if the issue is resolved.
What causes the High Utilization of Resources by MoUSO Core Worker Process?
As explained above, this process is responsible for fetching and orchestrating the entire Windows update process. These were the main reasons why you might be experiencing heightened consumption of resources:
- The process is bugged out and you haven’t installed the latest Windows update which fixes its internal workings.
- Some pending update is blocking the entire Windows update process.
- Windows update itself is in an error state.
How to Disable or Fix it?
Here are a few methods that we can use to either fix the process or disable it so it doesn’t run and consume resources.
1. Using Windows Update Troubleshooter
Since this process is tied to the Windows update module, we will first attempt at checking whether are any problems with the Windows update module itself. Windows Update uses several different mechanisms and modules when it is updating or searching for updates on your computer.
You should first run the Windows Update Troubleshooter and see if this does the trick. If there are any issues that are fixed, restart the computer and see if this fixed the problem for you.
2. Pausing Updates
Another quick workaround that we saw work with users was pausing the Windows Updates and then resuming them right back. This might seem like a bizarre fix but behind the scenes, it removes all current processes of Windows updates running in the background and then restarts them again.
- Navigate to Windows Update, and click on Advanced Options.
- Next, select Pause Updates and select the farthest update that is visible to you.
- Now, exit the settings completely and after waiting a few minutes, open the Settings application again and click Resume Windows Update.
If there are any updates available, go ahead and install them on your computer.
3. Installing the Latest Update of Windows
The most common reason for this issue are pending updates. If you are running Windows 10 version 1809 or later, we recommend installing the latest version of Windows 10. The fix for this problem was created by Engineers at Microsoft and was rolled out in the subsequent updates.
- First of all, go to the ‘Start menu’ and click on the ‘Settings’ option.

Going to the ‘Settings’ from the ‘Start menu’ - Then, click on the ‘Update & Security’ option.

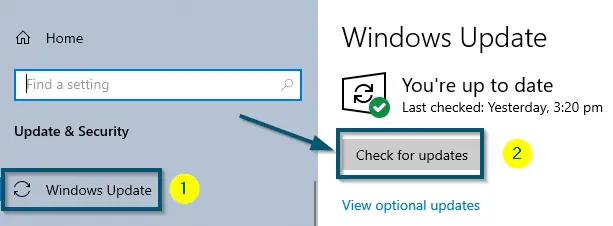
Clicking on the ‘Update & Security’ option - Now, click on the ‘Check for updates’ button to let Windows download the latest update available.

Clicking on the ‘Check for updates’ button


Note: Your system will restart while installing updates. So, don’t worry
If your system doesn’t download the updates automatically, we recommend using the ‘Microsoft Update Catalog’ to download and install the update manually.
Once the updating process is complete, check whether this solution has worked for you or not.
4. Disabling Delivery Optimization
Temporary Fix
In this solution, we will disable the ‘Delivery Optimization’ in Windows 10 via ‘Registry Editor’ because normally, Windows 10 won’t allow you to disable it. Disabling it won’t stop the updates, but it will reduce resource utilization.
Note: Microsoft introduced ‘Delivery Optimization’ in the Anniversary Update of Windows 10. This feature allows the users to download updates from a local machine that previously downloaded them rather than directly downloading from Microsoft. It reduces the bandwidth, but at the same time, it is a risk
Make Sure All Your Updates are Installed
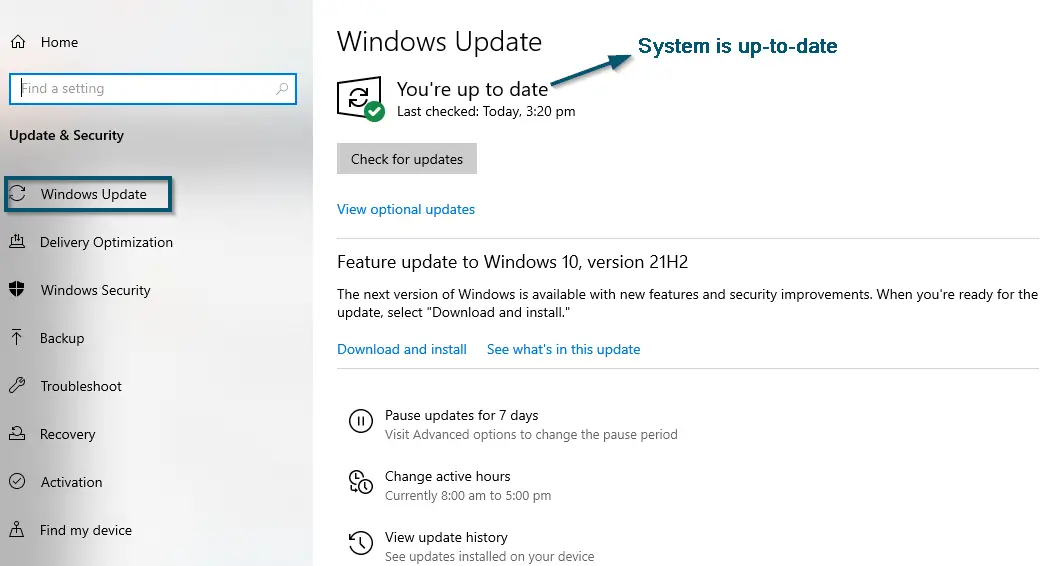
- First of all, check whether your system has successfully installed all the updates or not. So, go to the ‘Update & Security’ option by following the ‘first two steps of Solution 1.’
- After that, if your system shows the following message, this means that your system is up-to-date.

Windows-10 indicating that system is up-to-date
Disabling ‘Delivery Optimization’ via ‘Registry Editor’
- Now, open ‘Registry Editor’ as ‘Administrator.’

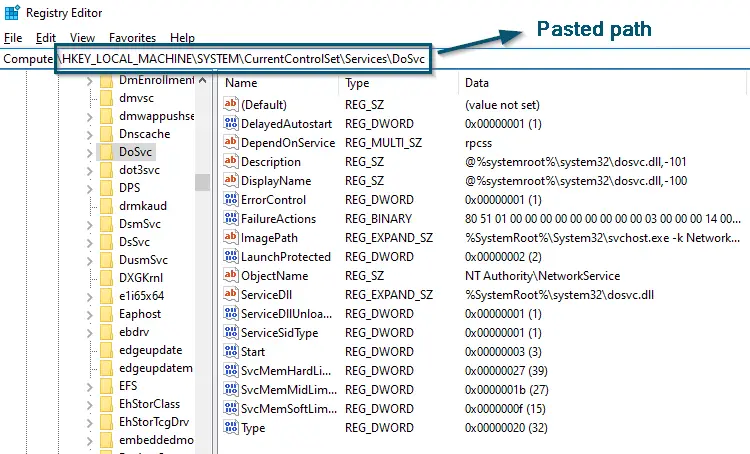
Opening ‘Registry Editor’ as ‘Administrator’ - After that, paste the following path in the address bar of ‘Registry Editor’ after ‘Computer’ to reach the ‘DoSvc’ folder.

\HKEY_LOCAL_MACHINE\SYSTEM\CurrentControlSet\Services\DoSvc
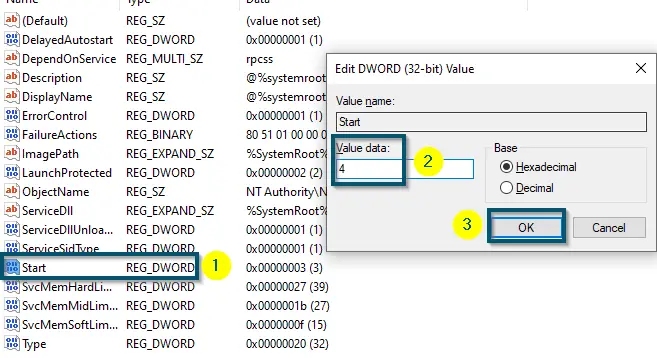
- Now, double-click on the entry named ‘Start’ and change its ‘Value data:’ to ‘4.’
- Then, click on the ‘OK’ button and exit ‘Registry Editor.’

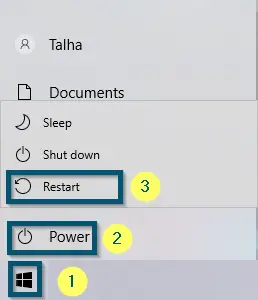
Changing ‘Value Data’ to ‘4’ and clicking on the ‘OK’ button - Now, restart your system.

Restarting the system - Once the system has successfully restarted, open the ‘Services’ from the ‘Start menu.’

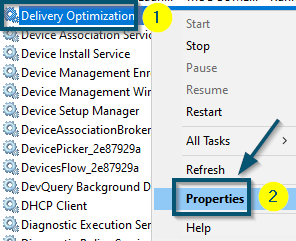
Opening ‘Services’ from the ‘Start menu’ - Now, scroll down to find ‘Delivery Optimization’ and right-click on it, then choose the ‘Properties’ option.

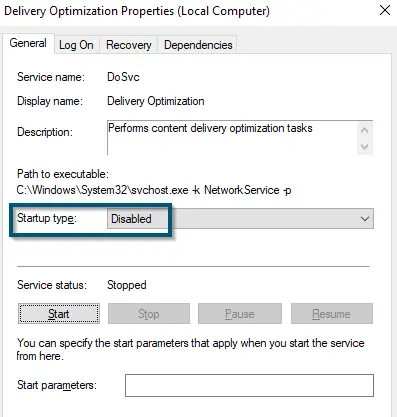
Scrolling down to find ‘Delivery Optimization’ and going to its ‘Properties’ - You can see in the following picture that Windows has successfully disabled the ‘Delivery Optimization’ service.

Windows indicating that ‘Delivery Optimization’ has been disabled

Now, check whether the resource consumption of the ‘MoUSO Core Worker Process’ has gone back to normal or not.
Note: When the system installs any updates, you will have to repeat the same procedure
5. Forcefully Preventing ‘MoUSO Core Worker Process’ from Waking Your System
As mentioned earlier, this process constantly wakes up your PC and you will often find the blinking LED light or fan of your system running. So, to overcome this, we will ignore the ‘wake up’ requests of ‘MoUSO Core Worker Process’ through Windows PowerShell.
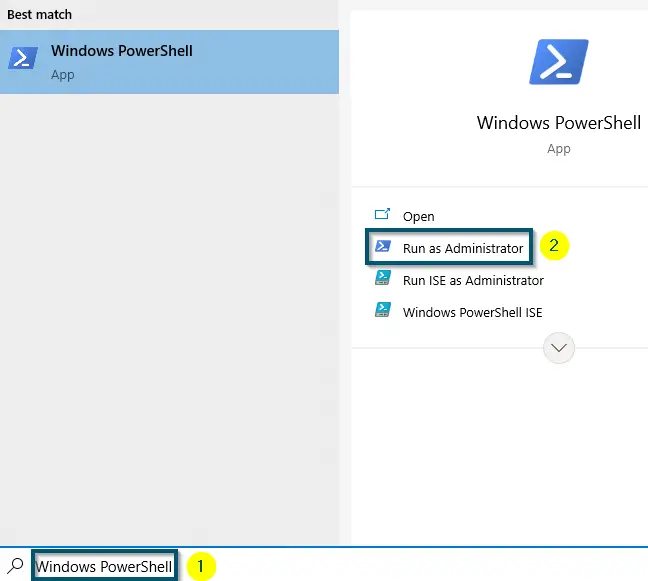
- First, open ‘Windows PowerShell’ as ‘Administrator.’

Opening ‘Windows PowerShell’ as ‘Administrator’ - Then, paste the following command in ‘Windows PowerShell’ and hit the ‘Enter’ key to execute this command.
powercfg /requestsoverride process MoUsoCoreWorker.exe execution

Now, this process won’t wake up your system to check for updates. Check whether this solution has resolved the system wake-up issue or not.
6. Resetting Default ‘Power’ Settings
If your computer continually wakes up, it might happen due to badly configured sleep functionality. This functionality is usually set by Windows but in some cases, it might have gotten changed by the user or other applications. Here, we’ll reset these power settings and see if this does the trick for us.
- First of all, open ‘Windows PowerShell’ as ‘Administrator’ as we did earlier.
Note: You can also use ‘CMD’ as ‘Administrator’
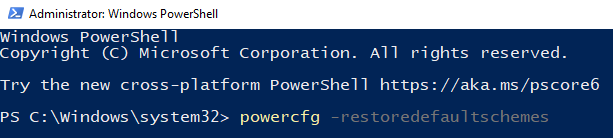
- Then, type the following command and hit the ‘Enter’ key to execute this command.
powercfg -restoredefaultschemes
- Wait for the command to complete its operation. After that, restart your system.
Restarting the system
Once the system has successfully restarted, check whether this solution has solved the issue of wrong wake-up calls of the ‘MoUSO Core Worker Process’ or not.
7. Restarting ‘Windows Update’ Services
Tested for People Using Windows 10 Build 2004 or later
If your system running Windows 10 doesn’t go to sleep and you have already checked the cause of this issue using the ‘powercfg /requests’ command, then restarting the ‘Windows Update’ service will fix this issue.
- First of all, open ‘Services’ from the ‘Start menu’ by following ‘step number 9 of Solution # 2.’
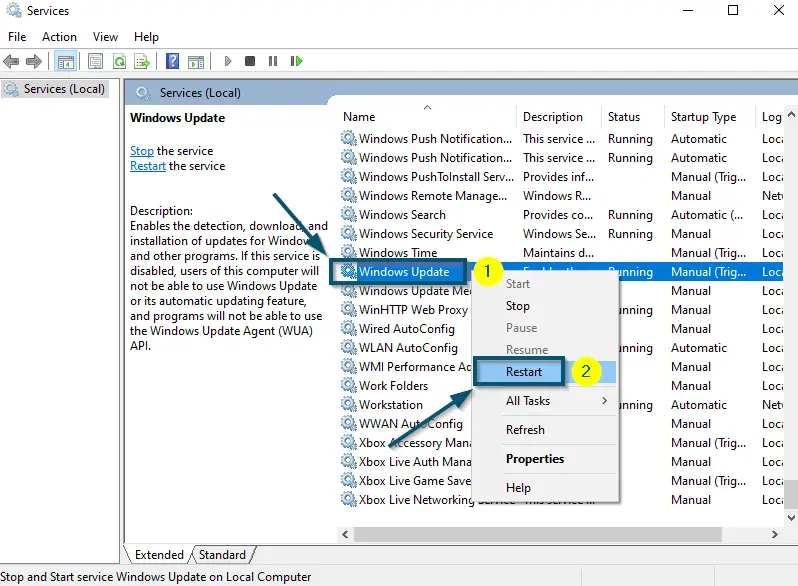
- After that, scroll down to find the ‘Windows Update’ service.
- Now, right-click on the ‘Windows Update’ service and choose the ‘Restart’ option. This process will restart the ‘Windows Update’ service if it has stopped.

Restarting the ‘Windows Update’ service - After that, restart your system by following ‘step number 3 of Solution # 4.’
Note: Check whether you have any pending updates or not because after restarting the ‘Windows Update’ service, windows will show all the pending updates. So, install all the pending ones
Check whether this solution has proved useful for you or not. If yes, then good for you. Otherwise, try the next solution.
Wrapping Up
‘MoUSO Core Worker Process windows 10’ is a Windows process and Windows needs it to keep the system protected against ever-growing system threats. So, we recommend removing it only if it is a virus.
But if it is not a virus and you are removing it because of high resource consumption, we recommend upgrading your system according to Microsoft’s recommendations.
